
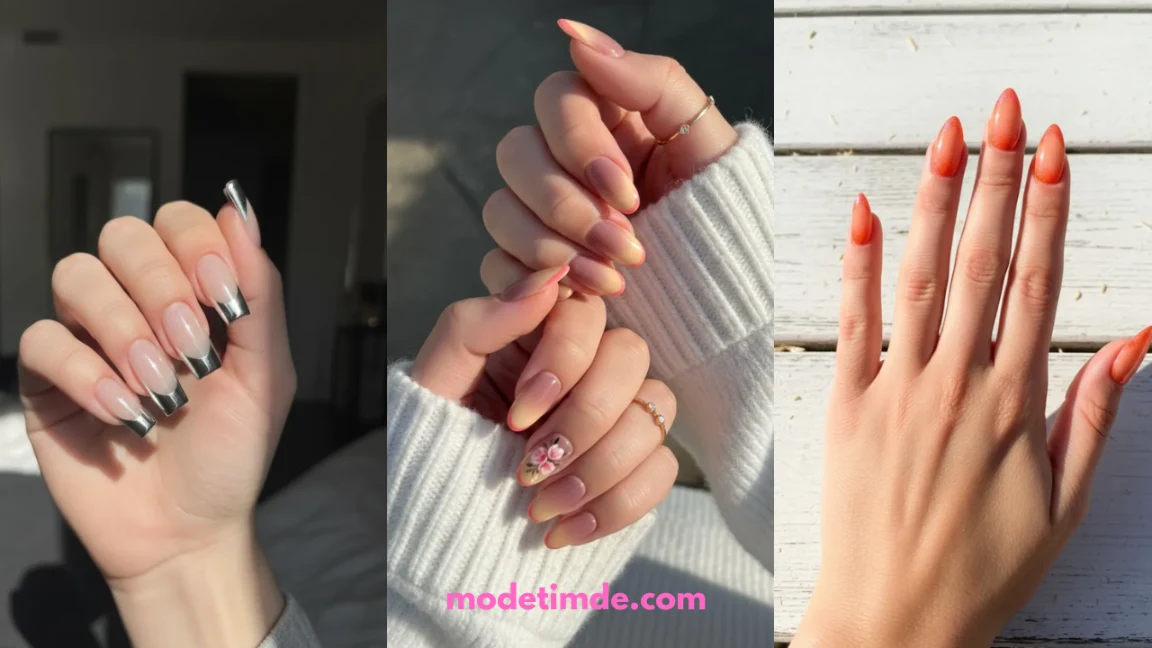
The French manicure has been around for decades, but the version your mom got in 1997 is not what anyone is asking for at the salon anymore. Today’s modern French tip nail ideas look nothing like that thick white stripe on a square acrylic.
They come in wavy lines, pearl finishes, neon tips, floral accents, and colors that have no business working as well as they do.
The problem is that most tutorials still show the same three variations. So you end up saving the same blush-and-white almond nail photo five times, hoping a new one magically appears.
This list skips the repeats. All 30 ideas here are distinct, specific, and actually worth trying, whether you’re heading to the salon next weekend or doing your own nails at the kitchen table on a Sunday night.
Some are salon-level. Some are beginner-friendly with the right striping tape. All of them are worth saving.
1. Classic White Almond French With a Black Swirl Line Accent
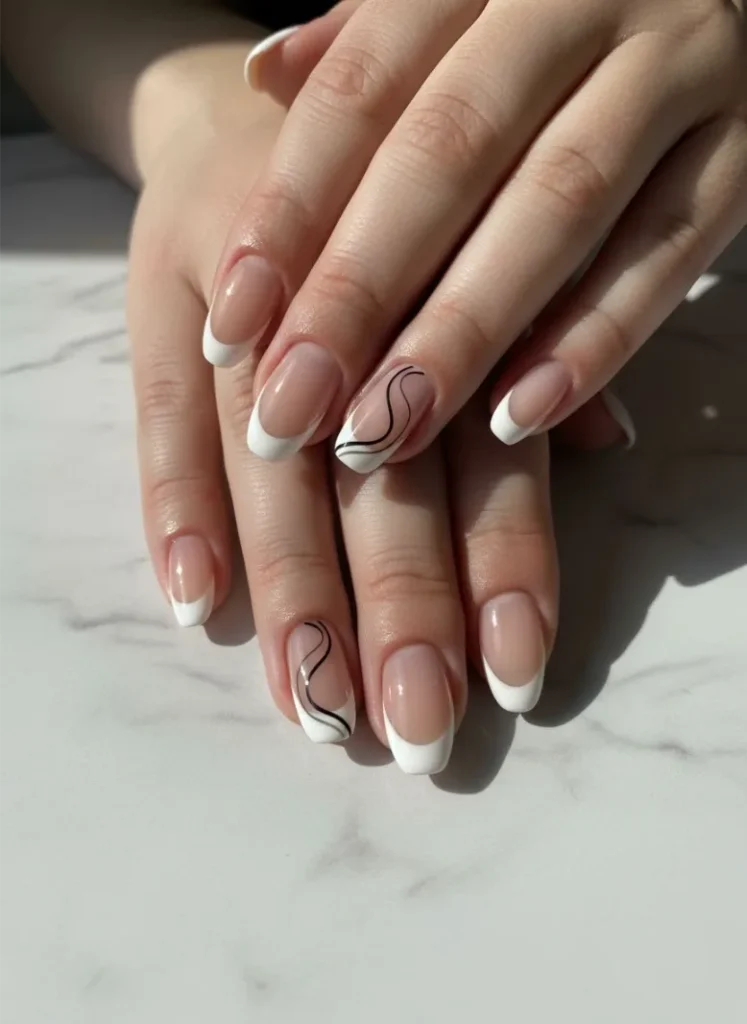
The standard white French tip gets a lot more interesting the second you draw one thin black line across it.
That’s exactly what’s happening in the first reference image above: almond nails with a clean white French tip, plus a single curved black line that swoops across the tip like an abstract brushstroke.
Some nails get the white tip only. Others get the line. The mix is what makes it feel intentional rather than chaotic.
You don’t need steady freehand skills to pull this off at home.
- Use a thin nail art liner brush or a striping tape as your guide
- Draw one loose curve, not a straight line, it reads more organic
- Leave two or three nails plain white to balance the look
For a more playful manicure, explore these colored French tip nails for every season.
2. Blush Ombre French Tips With a Floral Accent Nail
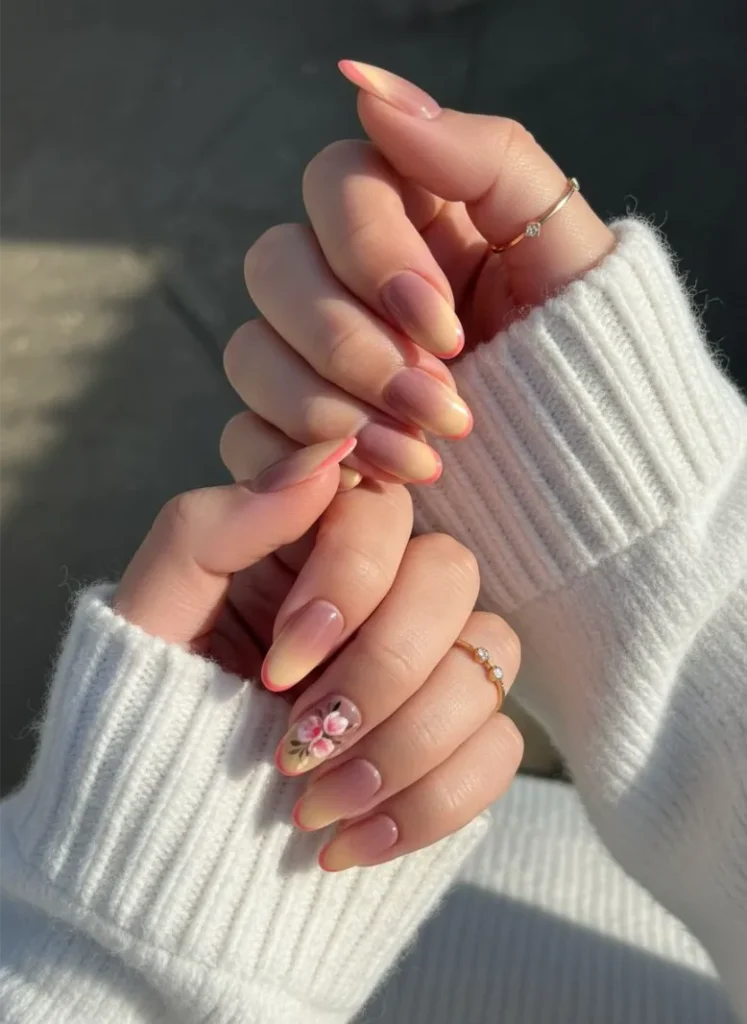
Most ombre French tips fade from nude to white. This version fades from a dusty mauve base into a soft cream-yellow tip, then blushes into the faintest pink at the very edge.
That’s the look in the second reference image: almond nails in a muted rosy purple, with tips that shift through warm cream into a soft coral-pink flush. One accent nail on each hand carries a simple hand-painted flower in the same color family.
The ombre alone is already a complete look. The floral is optional, but it makes the whole set feel considered rather than basic.
Short on time? Skip the flower and just do the ombre tip. The mauve-to-cream gradient reads fresh on its own.
💡 Quick Tip
Sponge the ombre blend onto your tip using a torn makeup sponge, then clean the edges with a small flat brush dipped in acetone. This gives you a soft gradient without needing a special tool.
3. Gold Chrome Mixed With White French on Almond Nails
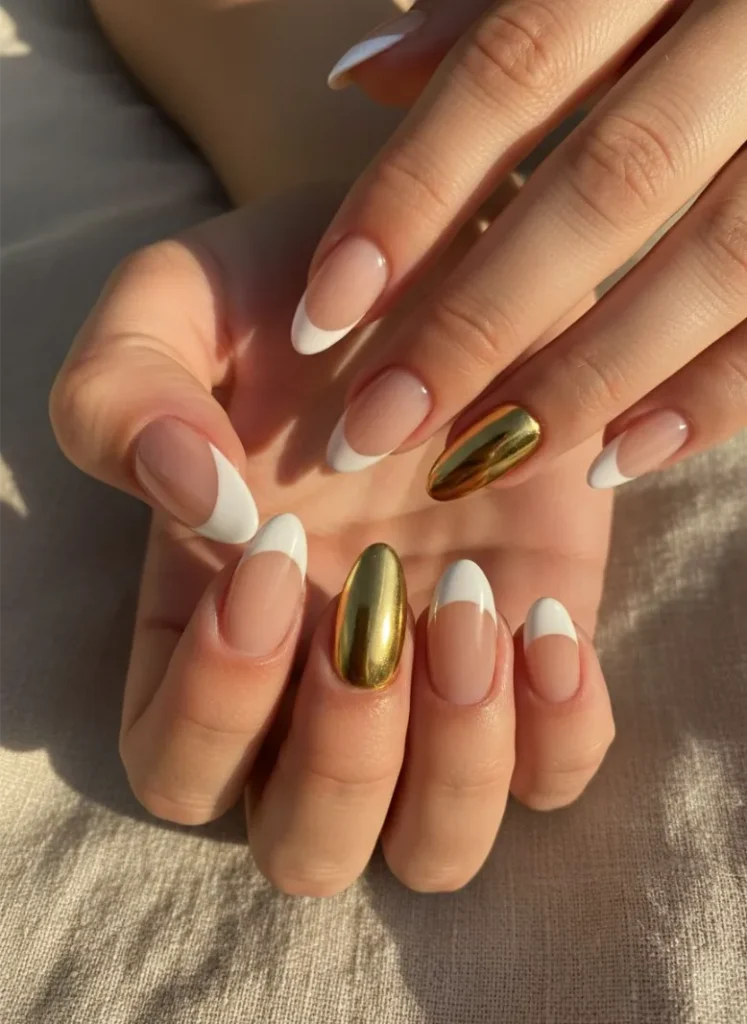
Not every nail has to match. That’s the whole idea here.
Reference image three shows almond nails where some tips are a clean classic white and one nail gets a gold chrome tip instead.
The base across all nails is the same sheer nude, so the set feels cohesive even though the tips differ. The gold chrome catches light in a way white polish simply cannot.
The contrast works because the base stays constant.
If you’re doing this at home, apply the chrome powder to one fully cured gel nail before sealing with top coat.
The powder needs a tacky surface to grip, so do not wipe the inhibition layer before buffing it on.
Read More- French tip ideas for Beginners.
4. Neon Orange Shimmer French for Summer Almond Nails
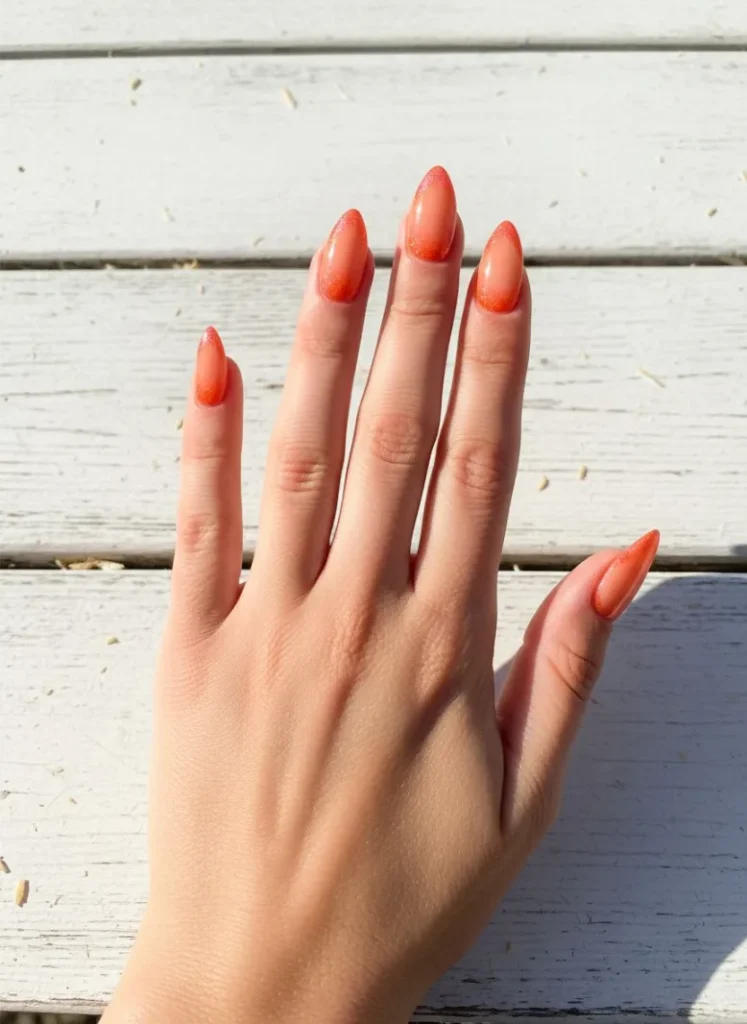
White French tips made sense for winter. For summer, neon orange makes a much stronger argument.
Reference image four shows almond nails with a sheer peachy-nude base and tips in a vivid orange that leans almost coral, with a faint shimmer running through the color. There’s a barely-there pink shimmer blended into the orange at the very edge, which stops it from reading as flat neon.
That shimmer detail is what separates this from a basic colored French.
| Neon Orange French | Classic White French |
|---|---|
| Reads bold and summer-ready | Reads clean and year-round |
| Works best on medium to deeper skin tones | Flattering across all skin tones |
| Pairs with casual and vacation outfits | Works for office and formal settings |
| Add shimmer polish to the tip for depth | Keep the line thin for a modern finish |
Keep the tip line thin. A thick neon band tips into costume territory fast.
5. Pearl Iridescent French Tips That Catch Every Light
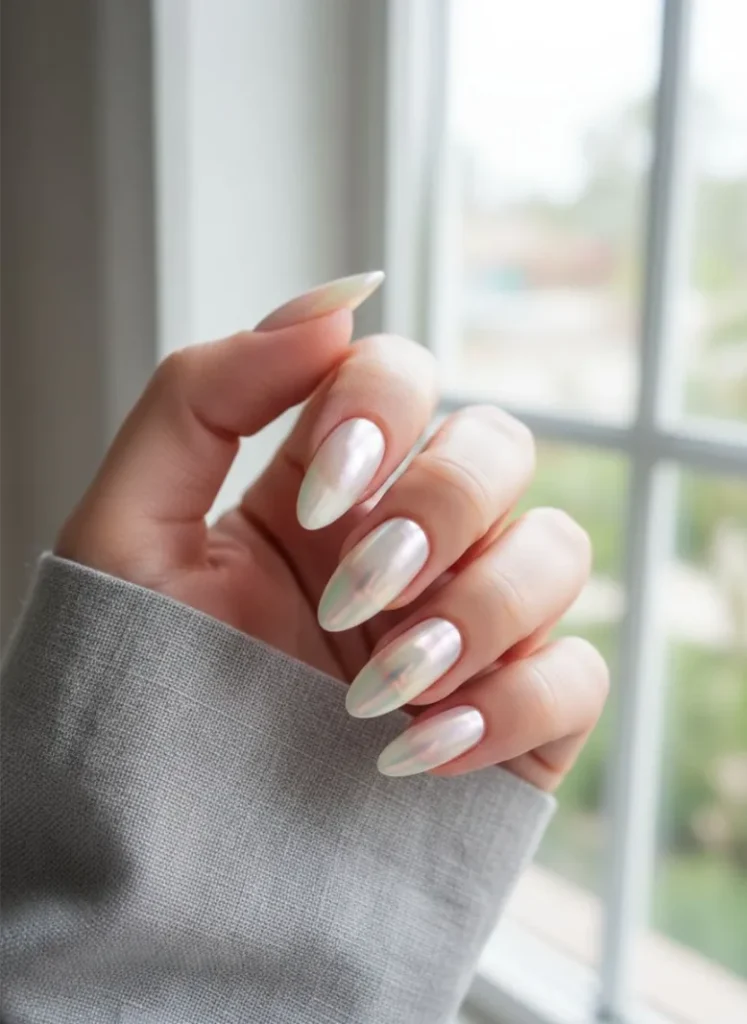
Regular white polish sits flat. Pearl polish moves.
Reference image five shows exactly why this distinction matters: almond nails with a sheer base and tips in a soft iridescent white that shifts between pearl, champagne, and the faintest green depending on how the light hits. It looks expensive without requiring anything complicated.
The finish does the work here, so the shape and application need to be clean.
Two things to know before you try this:
Flat, opaque finish. Any uneven line shows clearly. Needs at least two coats to avoid streaks. Looks the same in every light.
Shifts color in different lighting. One thin coat is often enough. Minor line imperfections read less harshly because the shimmer draws the eye. Looks different morning, afternoon, and evening.
Pearl tips work especially well on short almond and oval shapes. The iridescent finish makes a small nail look polished rather than crowded.
6. Polka Dot Patterned French on Long Square Nails
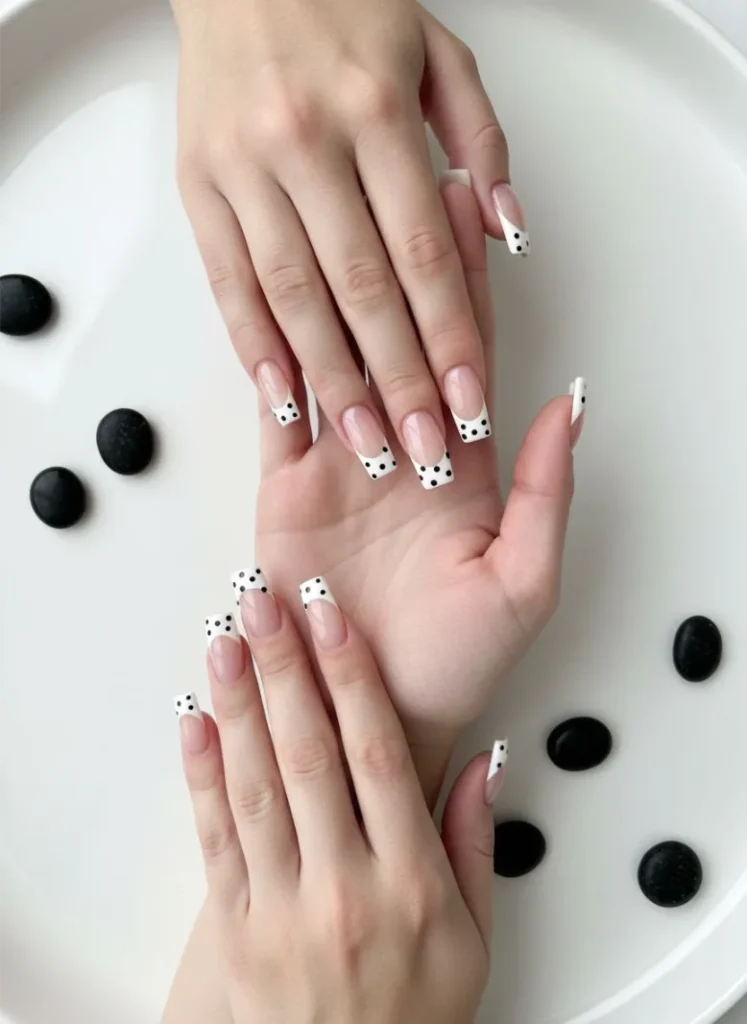
Dots on French tips sound like a craft project. Done right, they look like something from a high-fashion runway.
Reference image six shows exactly how the execution makes the difference: long square coffin nails with a sheer nude base and tips covered in tiny, evenly spaced black dots on a white background.
The dots are small and consistent, which is what keeps the look graphic rather than messy.
The key is restraint. Small dots. Even spacing. Clean white base beneath them.
This works best on longer nails because the square tip gives you a flat canvas to work with. Shorter round nails don’t give the dots enough room to breathe.
What to grab before you start
Matte top coat over polka dot French tips reads more editorial. Glossy keeps it classic and clean.
7. Micro French Tips on Short Oval Nails
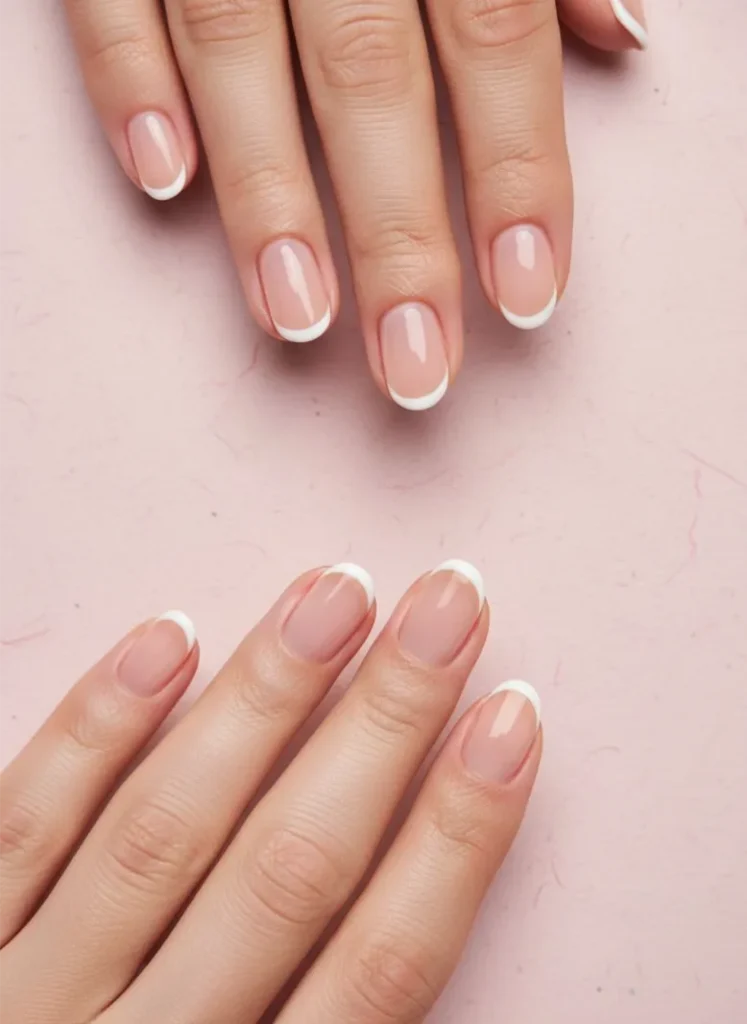
The biggest complaint about short nails and French manicures is that the white band takes over the entire tip and makes the nail look even shorter.
Micro French solves that completely.
The tip line here is barely 1mm wide, sometimes less. It sits right at the very edge of the nail like a whisper rather than a statement.
On short oval nails it reads clean and intentional, and it makes the nail bed look longer rather than cutting it off.
This is the modern French tip nail idea that works hardest for people who keep their nails short by choice or by habit. Modern diagonal french tip variations add a contemporary twist to a classic style, making them perfect for any occasion. These designs can easily be customized with different colors and patterns to reflect personal style. Additionally, they remain chic while still being practical for those who prefer short nails.
White works, but so does a sheer nude or a barely-there pink for the micro line. The thinner the tip, the more color options open up.
8. Diagonal French Tip in Nude and White
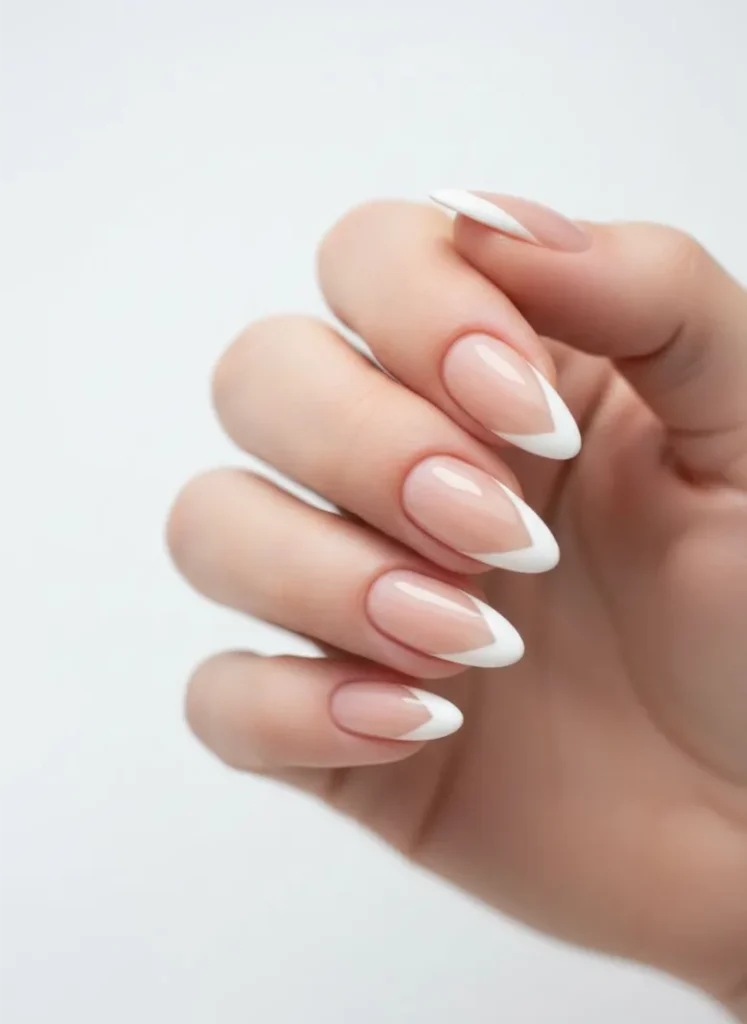
The standard French tip runs straight across. This one doesn’t.
A diagonal French tip cuts across the nail at an angle, usually from one lower corner to the opposite upper edge.
Half the nail stays bare or nude. The other half gets the white or colored tip. The result looks architectural without being complicated to execute.
It works especially well on almond and stiletto shapes because the angle mirrors the natural taper of the nail.
One common mistake: making the diagonal line too steep. A gentle angle reads elegant. A sharp angle reads uneven.
💡 Quick Tip
Use a small piece of nail tape placed diagonally across the nail to get a clean edge. Press it down firmly at the center before painting over it, then peel it off while the polish is still slightly wet for the sharpest line.
Try a nude-to-cream diagonal rather than nude-to-white for a softer, more wearable everyday version.
9. Double French Line With Negative Space
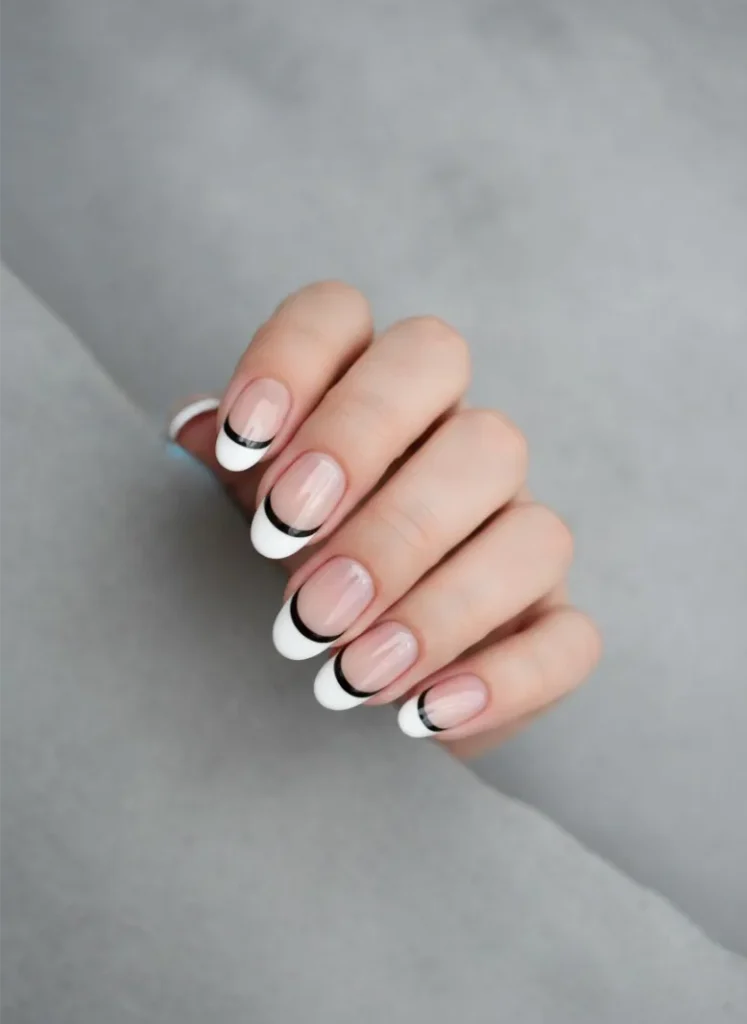
Two lines are better than one, but only if the space between them is doing something.
This design uses two thin parallel lines at the tip, with the nail’s natural color showing through the gap between them.
The lines can both be white, or you can use white for the outer line and a contrasting color like black, gold, or sage for the inner one.
The negative space strip between the two lines is the design. That gap needs to stay clean and even or the whole thing falls apart.
Keep the gap between the two lines consistent across every nail, even if it means going back to fix one.
Use striping tape to map out both lines before you paint anything.
Don’t make the two lines the same thickness as a standard French tip. Thin lines are the whole point here.
Don’t use the same color for both lines if you want a more editorial finish. Contrast between the two reads better in photos.
This look photographs well because the negative space gives the camera something to focus on. Great for content creators who want their nails to show up clearly in flat lays.
10. Colored French Tip in Butter Yellow
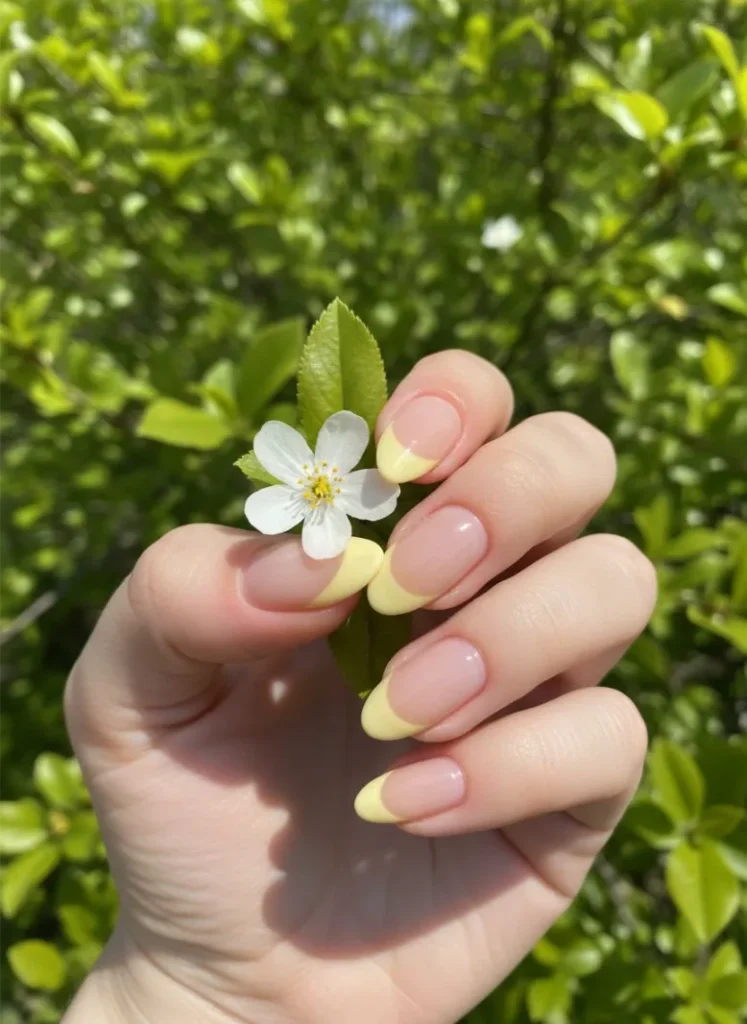
Yellow is having a moment in nail art, and the French tip version is the most wearable way to try it.
Butter yellow sits between cream and lemon, warm enough to feel fresh rather than cold. As a French tip it replaces the white band entirely, sitting on the same sheer or nude base you would use for a classic French.
The reason it works so well as a French tip color is that it doesn’t compete with skin tone the way a full yellow nail can. The nude base keeps it grounded.
Here’s how to get the most out of this look:
Start with a sheer nude or milky base across all nails and let it cure fully before touching the tip.
Choose a butter yellow that leans warm rather than neon. Test it on your pinky nail first to check how it reads against your skin tone in natural light.
Apply the yellow in one thin coat at the tip, then add a second coat only if needed. Yellow can look muddy when over-layered.
Seal with a high-gloss top coat. Yellow polishes tend to dull faster than other shades, so a good top coat extends the life of the color significantly.
Butter yellow French tips look especially good against warm and medium skin tones. On cooler or fairer skin, shift toward a cream-yellow rather than a golden one.
11. Reverse French Manicure With a Sheer Base
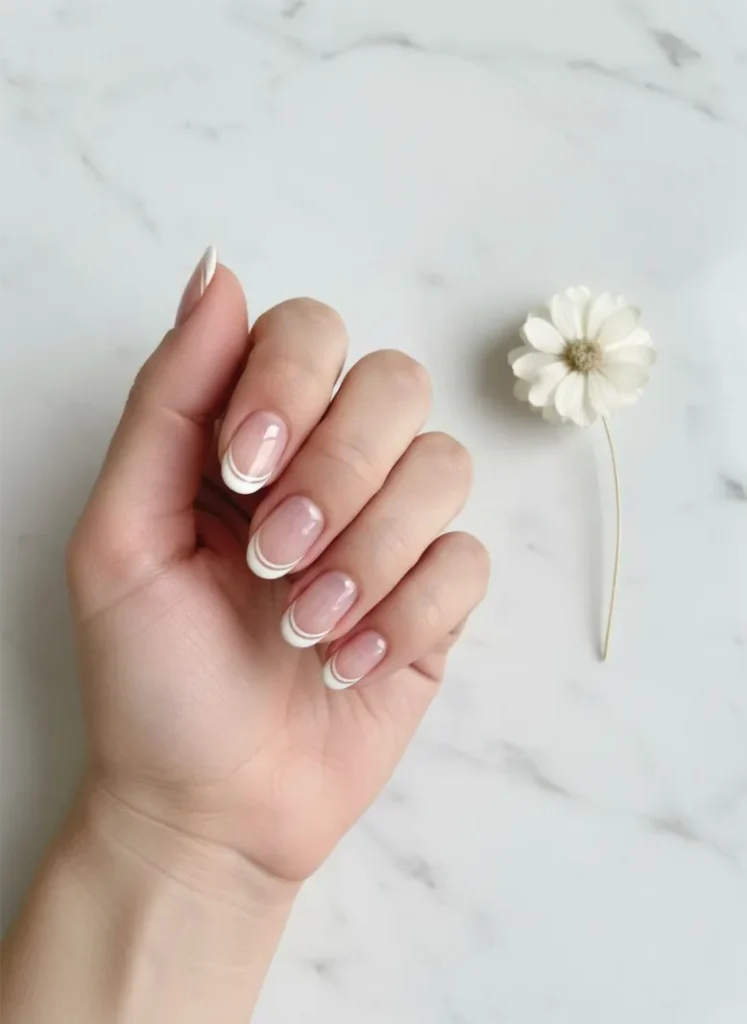
Most people think the French tip only lives at the top of the nail. The reverse French puts it at the bottom, right at the cuticle line, and the effect is completely different.
Instead of color at the tip, the colored or white arc sits at the base of the nail. The rest of the nail stays sheer or bare. It frames the nail from the opposite direction and draws the eye downward rather than upward.
The reverse French looks especially striking on almond and oval shapes because the curved cuticle line naturally mirrors the arc of the design. On square nails it reads sharper and more graphic.
This is one of those ideas that photographs better than it sounds.
The arc at the cuticle needs to follow the natural curve of your nail base. If it runs straight across, it reads as a mistake rather than a design choice.
A thin black or gold arc at the cuticle on a sheer base is the most minimal version of this look and one of the easiest to pull off at home with a thin liner brush.
12. Tortoiseshell French Accent Nail
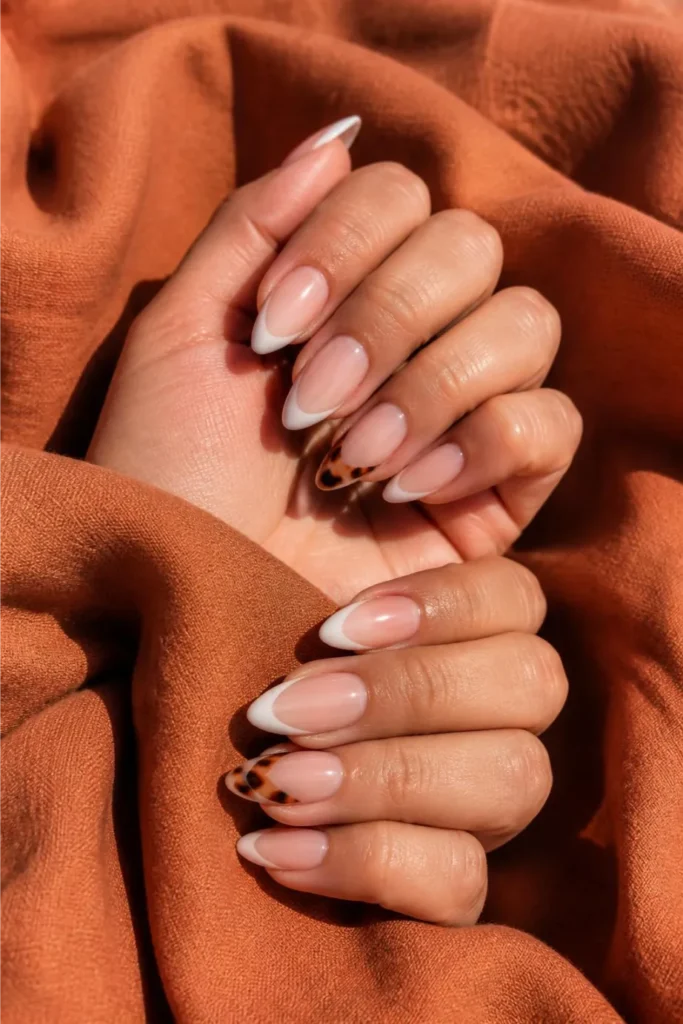
A full set of tortoiseshell nails can feel like a lot. One tortoiseshell French accent nail in a set of clean whites is exactly enough.
The idea is simple: four nails get a standard white French tip, and one nail on each hand gets a French tip filled with a tortoiseshell pattern instead of solid white. The warm amber, brown, and black tones of the tortoiseshell sit inside the tip zone only, which keeps the rest of the nail clean.
It’s a small detail that makes the whole set look custom rather than copied from a standard template.
The accent nail works best on the ring finger. It catches the light when you gesture and shows up in photos without overwhelming the rest of the set.
What you need for the tortoiseshell tip
Blur the edges of each tortoiseshell patch slightly before curing. Hard edges make the pattern look printed rather than painted.
13. Red French Tips on Short Squoval Nails
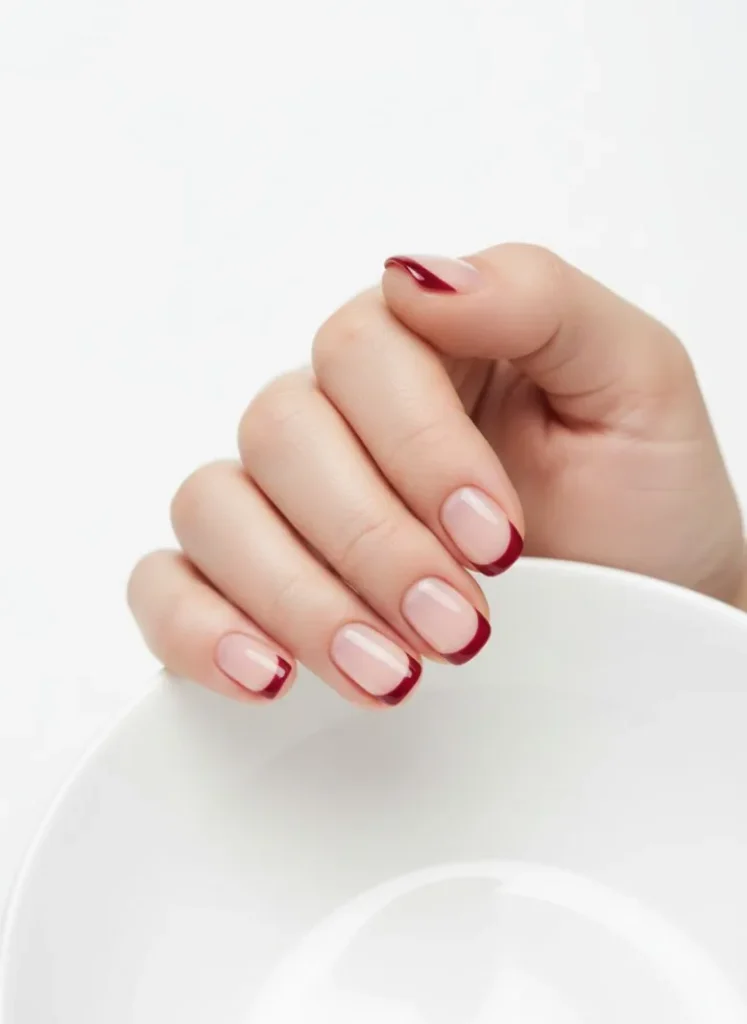
Red French tips have been circling back hard, and they look nothing like the version from the early 2000s.
The current take uses a deeper, more saturated red rather than a bright primary red, and it sits on a sheer or nude base rather than a full opaque pink.
The tip line is kept thin and precise. On short squoval nails the effect reads bold without being aggressive because the shape itself is soft.
This is the French tip that works for people who want something with more presence than a white tip but more restraint than a full color nail.
Stay away from orange-reds for this specific look. A blue-toned or neutral red keeps the tip feeling polished rather than loud.
14. Lilac Ombre French for Spring Almond Nails
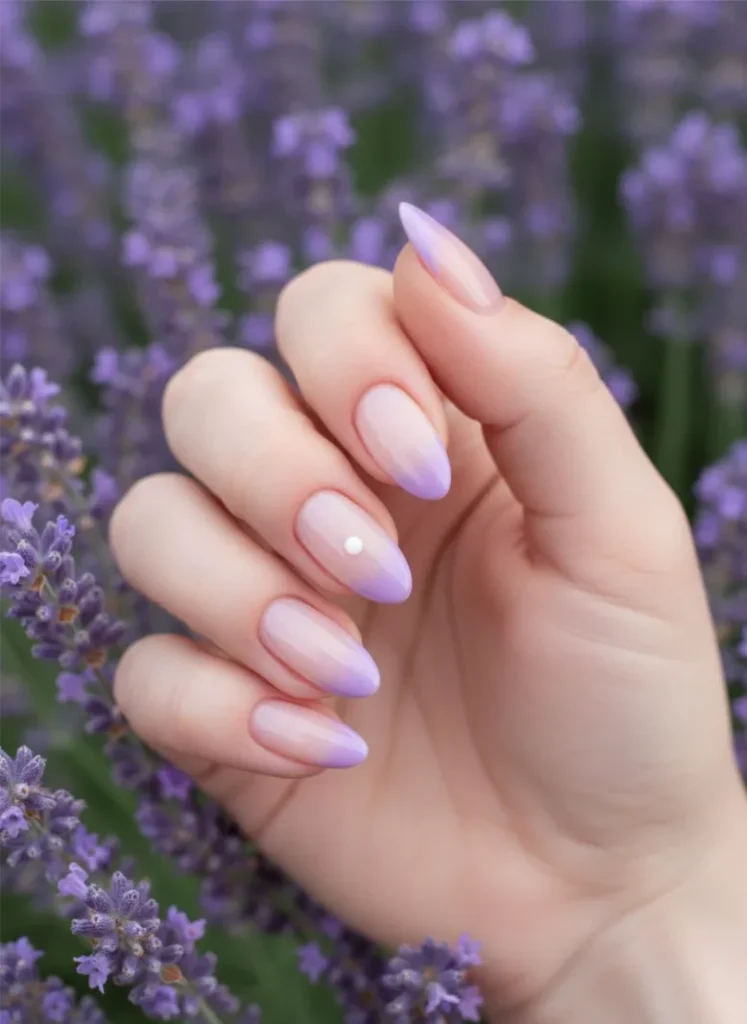
Lilac as a full nail color can wash out lighter skin tones. As an ombre French tip it does something completely different.
The color fades in gently at the tip rather than covering the entire nail, so the sheer base keeps the look balanced and fresh.
On almond nails the soft curve of the tip blends the lilac in a way that feels organic rather than painted on.
Spring is the obvious season for this, but a deeper mauve version of the same concept works easily into fall.
| Lilac Ombre French | Full Lilac Nail |
|---|---|
| Works on all skin tones because the base stays sheer | Can wash out very fair or very light skin tones |
| Feels delicate and soft without looking unfinished | Needs two to three coats for full opacity |
| Easy to adapt into mauve or dusty rose for other seasons | Very season-specific look |
| One makeup sponge and five minutes to blend the tip | Straightforward application, no blending needed |
Add a single white dot at the center of the tip on one accent nail to bring in a tiny floral nod without committing to full nail art.
15. Chrome Silver French Tips on Coffin Nails
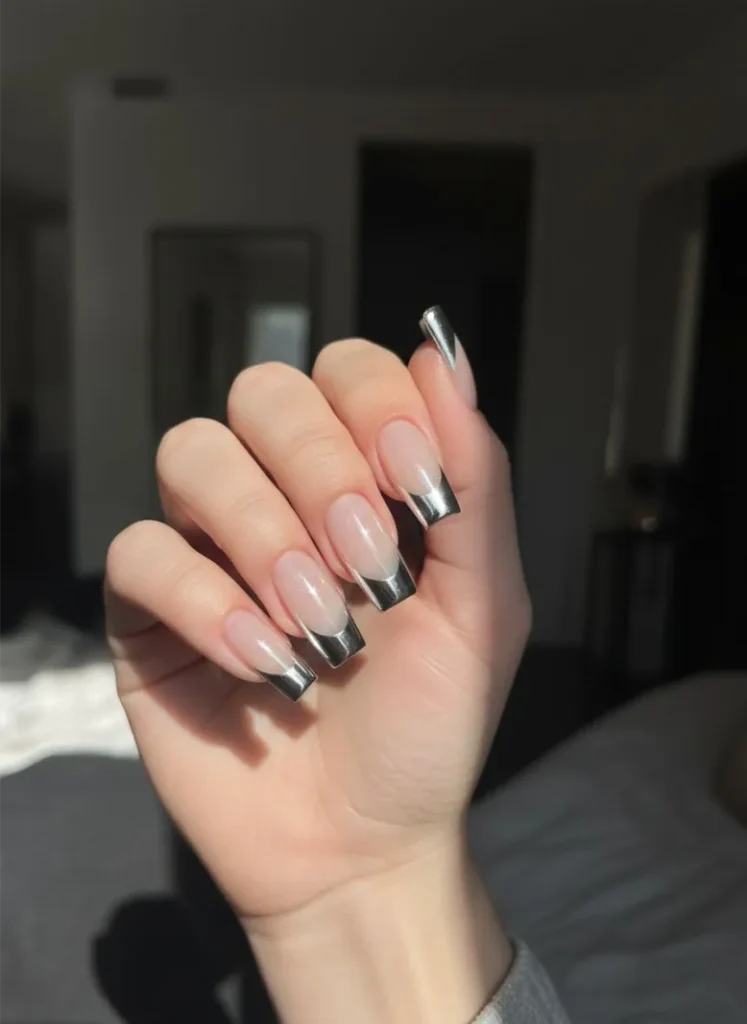
Silver chrome on a coffin nail tip is one of those combinations that looks significantly more expensive than it is to achieve.
The coffin shape gives the chrome tip a flat, wide canvas that catches light across the whole surface rather than just at the edge. A sheer or milky base underneath keeps the look clean.
The chrome powder goes on after the gel tip is cured, buffed onto the surface before the final top coat seals it.
The result is a mirror-like tip that shifts from silver to white depending on the angle.
Flat metallic finish. Brush strokes often show through. Needs multiple coats to look even. Dulls within a few days without a strong top coat.
True mirror finish with no brush strokes. Applied by rubbing powder onto cured gel. One application gives full coverage. Stays glossy longer when sealed with a non-wipe top coat.
Use a non-wipe top coat as your final seal over chrome powder. A wipe top coat can dull the mirror finish and leave it looking hazy instead of sharp.
16. Abstract Wavy French Line in Black
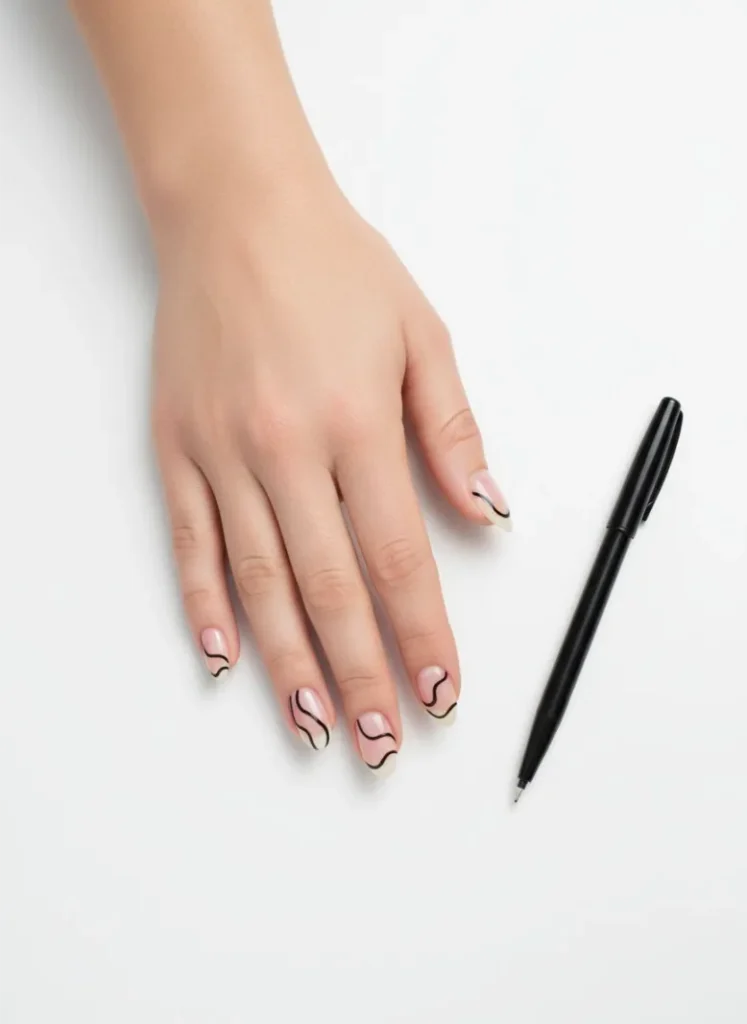
The straight French tip line is a rule. This idea breaks it on purpose.
Instead of a clean horizontal edge across the tip, the line curves, wobbles, or ripples across the nail in a loose freehand wave.
Done in black on a sheer nude base, it reads like modern nail art rather than a manicure that went slightly wrong.
The wobble has to look intentional. A line that is almost straight but not quite reads as a mistake. A line that clearly commits to its curve reads as a design.
One thing that helps: practice the wave shape on paper twice before touching the nail. Your hand learns the motion faster than you think.
💡 Quick Tip
Use a thin nail art liner brush loaded with black gel paint and rest your painting hand against the table rather than holding it in the air. The support gives you more control over the curve and stops the line from shaking mid-stroke.
Try pairing the wavy black line with one plain sheer nail on each hand. The negative space nail makes the wave read louder without adding more work.
17. Sage Green French Tips on Oval Nails
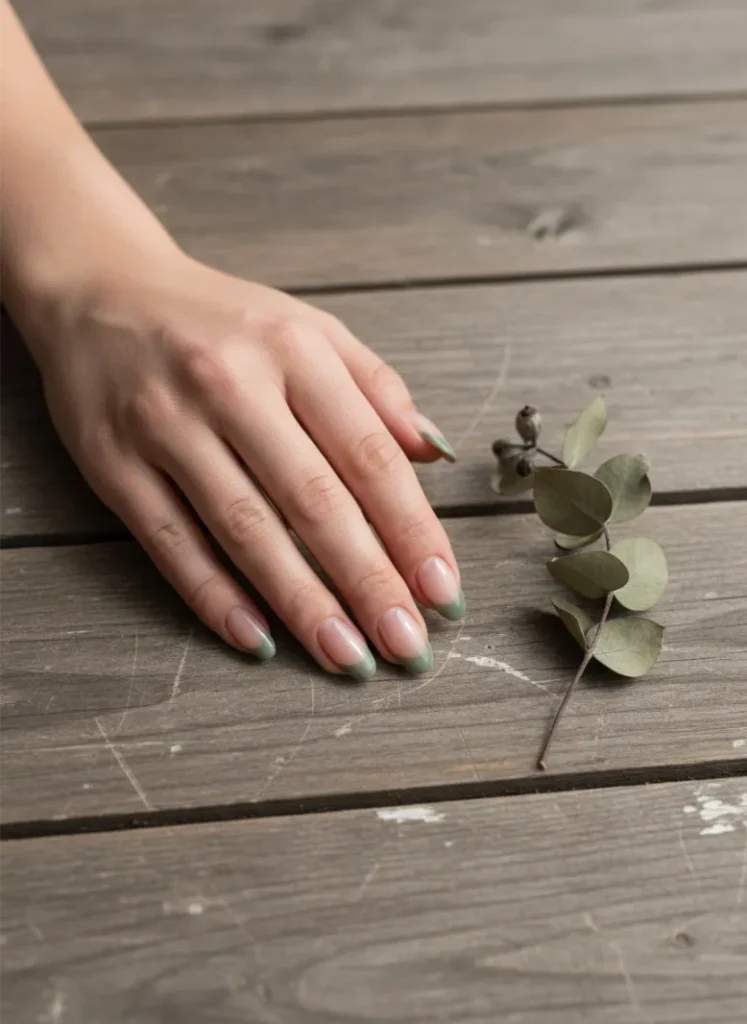
Green has taken over nail color trends, and sage is the version that works in every season without feeling forced.
As a French tip on oval nails, sage sits quietly at the edge without demanding attention the way a brighter green would.
The muted, grey-toned quality of sage means it pairs naturally with the nude base underneath rather than fighting it.
It reads earthy in autumn, fresh in spring, and grounded enough to wear to work without a second thought.
The oval shape matters here. Sage tips on square nails can read flat. The curved oval edge softens the color and makes it feel more organic.
A matte top coat over sage green French tips makes them look even more considered. The flat finish pulls out the earthy quality of the color in a way gloss does not.
18. Glitter French Tips for New Year and Formal Events
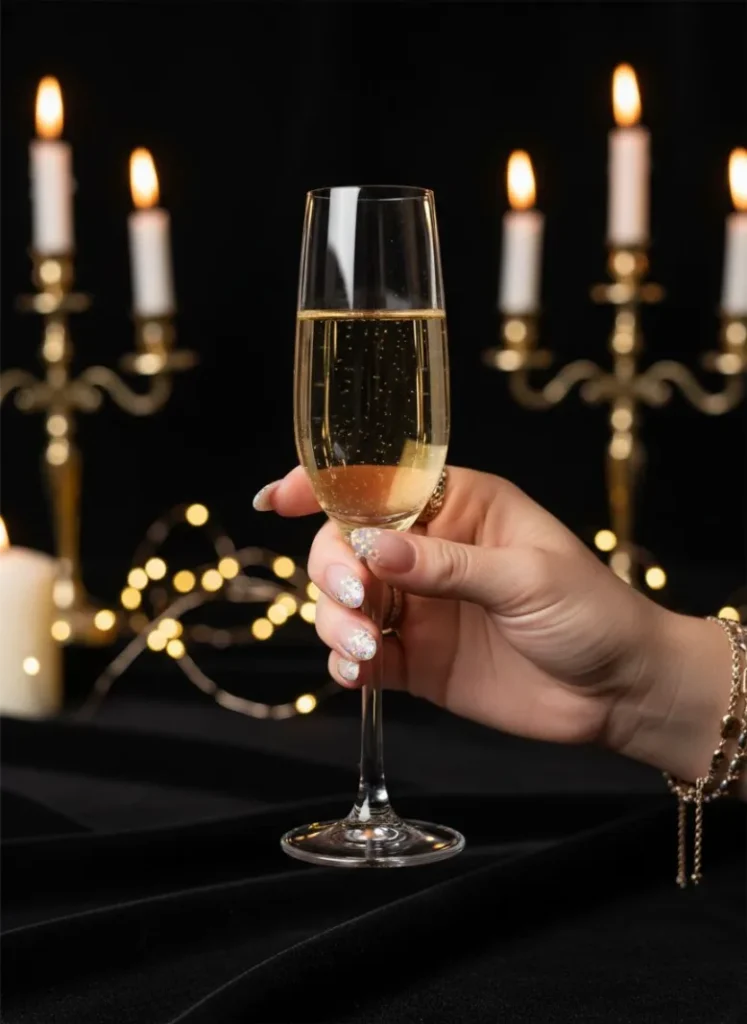
A glitter French tip is not the same as a glitter nail. The distinction matters.
Full glitter nails can look costume-like outside of a party setting. Glitter only at the tip stays contained and purposeful.
The sheer base does the grounding work, and the glitter sits where the eye naturally goes anyway at the edge of the nail.
For formal events and New Year celebrations this is the right amount of sparkle. Enough to show up in photos and catch candlelight, not so much that it overwhelms a dressed-up look.
Here is how to get the cleanest glitter tip application:
Apply and cure your sheer base coat across all nails first. A clean, smooth base is what makes the glitter tip look intentional rather than patchy.
Use nail tape along the French tip line before applying glitter gel or loose glitter mixed into a clear gel. Press the tape down firmly so no glitter sneaks underneath the edge.
Peel the tape off slowly while the glitter gel is still uncured. Curing first and then peeling can lift chunks of glitter along with the tape.
Cure the glitter layer, then cap the free edge with clear gel before your final top coat. This seals the glitter in and stops it snagging on fabric throughout the night.
Fine holographic glitter reads more refined in photos than chunky glitter. If you want maximum sparkle, layer a fine holographic under a slightly chunkier glitter rather than going chunky alone.
19. Rose Gold French With Pearl Dot Detail
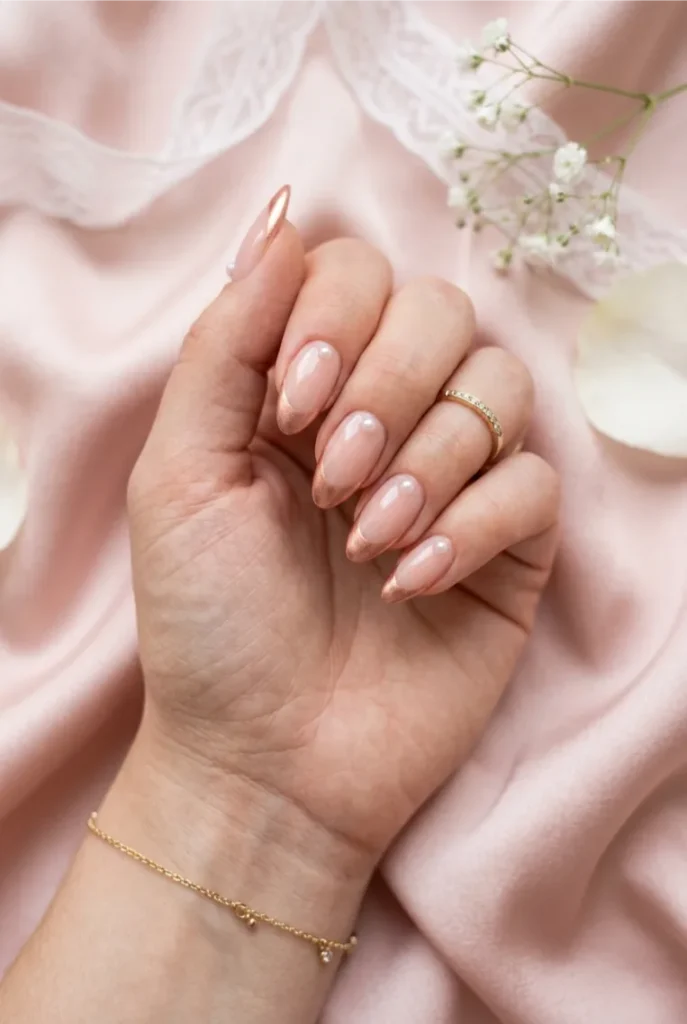
Rose gold as a French tip already reads warm and considered. Adding a single pearl dot at the corner of the tip takes it one step further without tipping into over-decorated.
The pearl dot sits right where the tip meets the side of the nail, that small curved junction that most people ignore.
One tiny pearl there, secured with nail glue or gel, turns a fairly simple colored French into something that looks finished in a way you notice but cannot immediately explain.
This is the kind of detail that makes people ask where you got your nails done even when you did them yourself.
Use a micro pearl, 1mm to 2mm at most. Anything larger shifts the balance of the nail and makes the pearl the focal point rather than an accent.
Place the pearl consistently on the same corner on every nail so the set reads deliberate.
Don’t place pearls on every nail unless you want a bridal look. One or two accent nails with the pearl reads more modern.
Don’t skip encapsulating the pearl under top coat. An unsealed pearl catches on everything and pops off within a day.
Rose gold tips with pearl dots work particularly well for wedding guest nails. They photograph beautifully and hold up through a long day without looking overdone by the evening.
20. Glazed Donut French Tips in Soft White
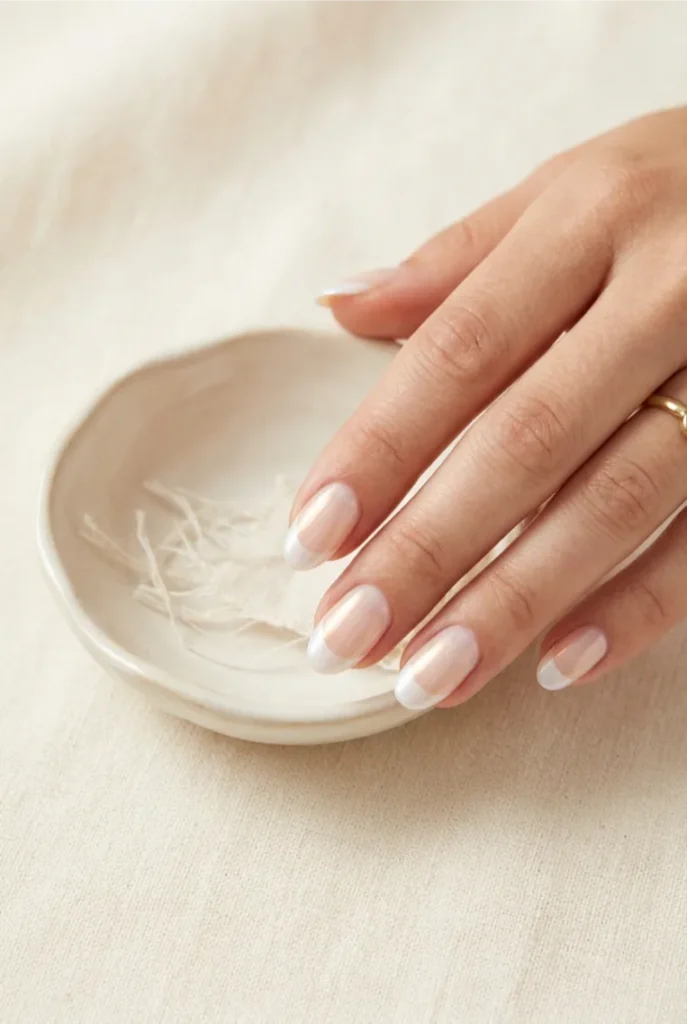
The glazed donut finish is essentially a chrome effect in the softest possible form. No sharp mirror reflection, just a warm, milky shimmer that sits across the nail like light on glass.
Applied to just the French tip rather than the whole nail, it creates something quieter and more wearable than a full glazed donut set. The sheer base stays natural. The tip catches light in a soft, blurred way that looks almost three-dimensional.
This is the modern French tip idea for people who find chrome too bold but want something more interesting than plain white polish.
How to get the glazed donut tip at home
Opal chrome powder gives a warmer, more golden shimmer than straight silver chrome. For the glazed donut effect specifically, opal reads closer to the original inspiration.
21. Navy Blue French Tips on Square Nails
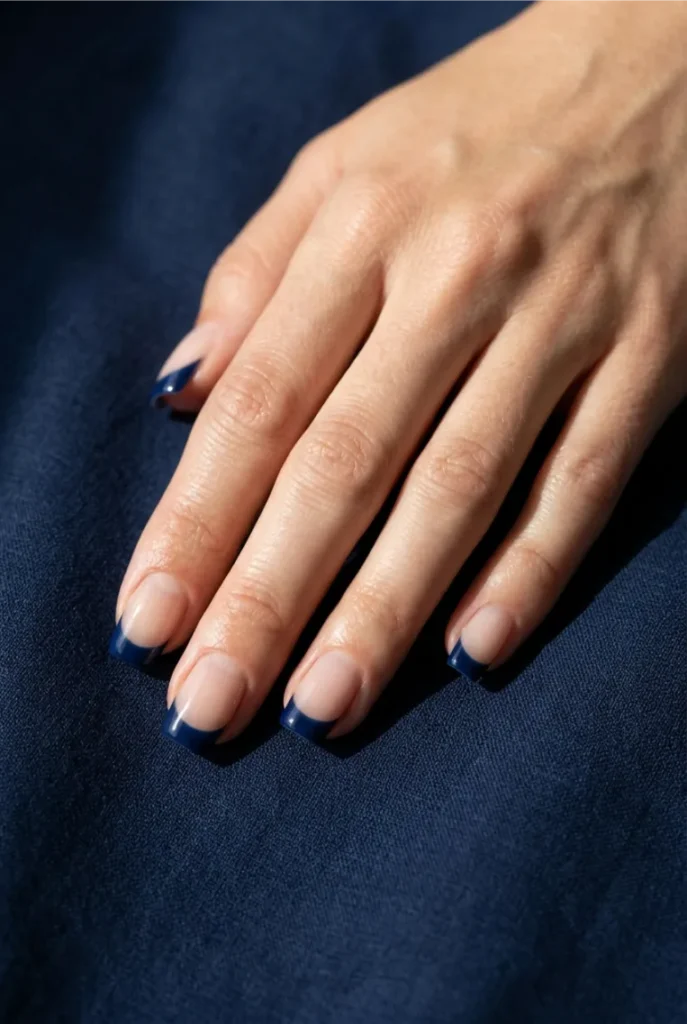
Dark French tips used to feel like a Halloween idea. Navy changed that conversation entirely.
Navy sits deep enough to feel dramatic but cool enough to wear anywhere. On square nails the flat tip edge gives the color a sharp, deliberate finish that rounded shapes simply cannot replicate. It reads polished in a boardroom and interesting enough for a Saturday night out.
Three reasons navy works better than black as a dark French tip:
- Navy reads as a color choice rather than an absence of color, so it feels more intentional
- It pairs with more outfit colors, warm tones, neutrals, and whites all sit well against it
- It photographs with more depth than flat black, which can disappear in lower light
The base matters here. Keep it sheer or barely-there nude. A full opaque base under a dark tip makes the nail look heavy rather than striking.
Keep the tip line thin on navy. A wide navy band reads as a dark full nail that stopped halfway. A thin precise line reads as a French tip with intention.
Navy also works beautifully as a double French line, one thin navy line and one thinner white line just above it, if you want to push the idea further without adding more color.
22. Skinny Micro French in Pastel Pink
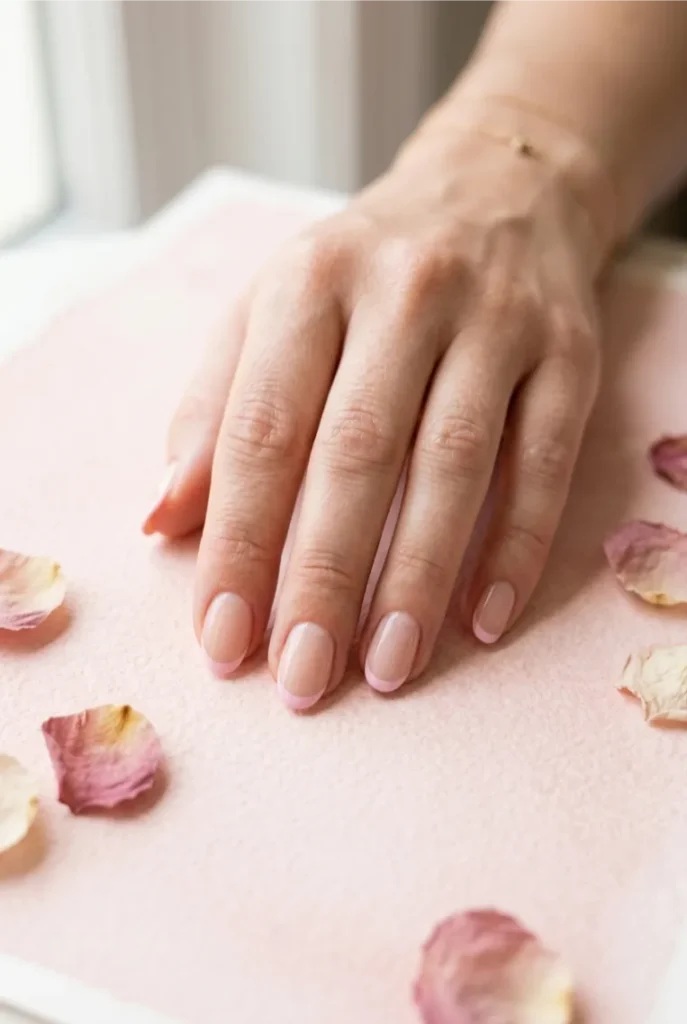
The thinner the French tip line, the more modern it reads. That rule holds especially true with pastel pink.
A full-width pastel pink French tip can slide into looking like an unfinished nail or a faded version of a bolder color.
Bring that same pink down to a micro line, barely 1mm at the tip edge, and the whole read changes.
It looks precise. Considered. Like someone made an actual decision rather than defaulting to the nearest pink.
This works on every nail length, but it does something especially good on short nails:
- It adds definition at the tip without shortening the visual length of the nail
- The thin line draws the eye outward rather than across, which makes the nail bed look longer
- Pastel at micro width reads softer than white, which suits natural shorter nail shapes better
Pick a pastel pink with a slightly warm undertone rather than a cool lavender-pink. The warm version sits more naturally against the nude base and reads less stark.
💡 Quick Tip
A micro French line this thin is easier to apply with a striping brush than a standard French tip brush. Load the brush lightly, rest your hand flat on the table, and draw the line in one slow continuous stroke rather than dabbing it on in sections.
If the line comes out slightly uneven on one nail, a tiny amount of acetone on a fine brush cleans the edge back to sharp in about ten seconds.
23. Burnt Orange French Tips for Fall Almond Nails
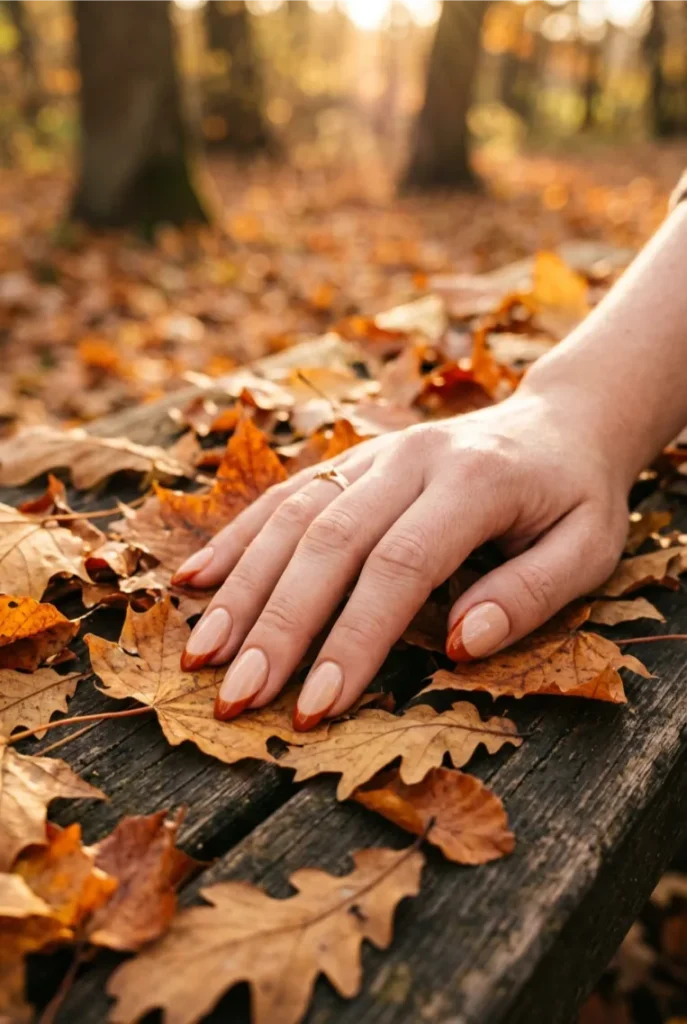
Burnt orange is autumn’s answer to the neon summer French tip.
Where neon orange reads bright and beach-ready, burnt orange pulls in enough brown to feel warm and seasonal. On almond nails the curved tip softens the color so it never feels harsh, even though the shade itself is fairly saturated.
This is the kind of French tip that works as a full set without needing an accent nail to balance it out.
Here is a quick comparison of how different orange shades read as French tips:
- Burnt orange: Warm, earthy, flattering across medium to deep skin tones, strong autumn feel
- Terracotta orange: Slightly more muted and clay-like, works well for a sophisticated fall look
- Coral orange: Brighter and warmer, bridges summer and early fall, suits lighter skin tones well
- Neon orange: Bold and summer-specific, high contrast, best for medium to deep skin tones
Burnt orange specifically tends to look richer under a glossy top coat than a matte one. The gloss brings out the warm undertones in a way matte finish flattens.
Pair burnt orange tips with a warm golden-nude base rather than a cool pink-nude. The warm base makes the orange feel cohesive rather than dropped onto a mismatched foundation.
24. White French With a Single Rhinestone at the Corner
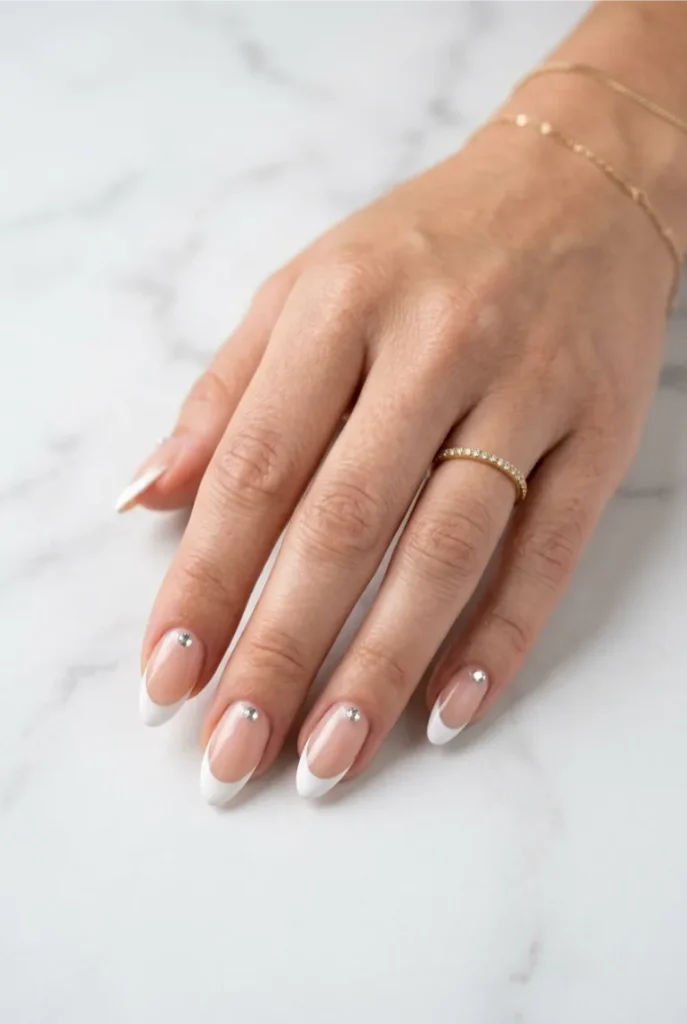
The rhinestone detail is one of those additions that sounds like too much and reads as just enough.
A single small rhinestone, placed right at the inner corner where the French tip meets the side of the nail, adds a point of light without decorating the nail. The white tip stays the main event.
The stone is a detail you notice on closer inspection rather than from across the room.
There are a few choices to make before you start:
| Detail | Option A | Option B |
|---|---|---|
| Stone size | 1.5mm crystal | 2mm pearl |
| Placement | Inner corner of tip | Center base of tip |
| Finish | Glossy top coat sealed over stone | Stone left slightly raised above top coat |
| Best nail shape | Almond or oval | Coffin or square |
Sealing the stone under top coat keeps it in place for weeks. Leaving it slightly raised looks more dramatic but means it catches on fabric and lifts faster.
| Sealed Under Top Coat | Left Raised Above Top Coat |
|---|---|
| Lasts two to three weeks without lifting | Can snag on fabric and pop off within days |
| Stone reads flush and refined up close | Stone catches more light from a distance |
| Better for everyday wear and active hands | Better for a one-time event or photoshoot |
Use a wax pencil or orange stick with a tiny dot of gel to pick up and place the rhinestone precisely. Tweezers tend to send small stones flying across the room.
25. Two-Tone French: White Base With Colored Tip Line
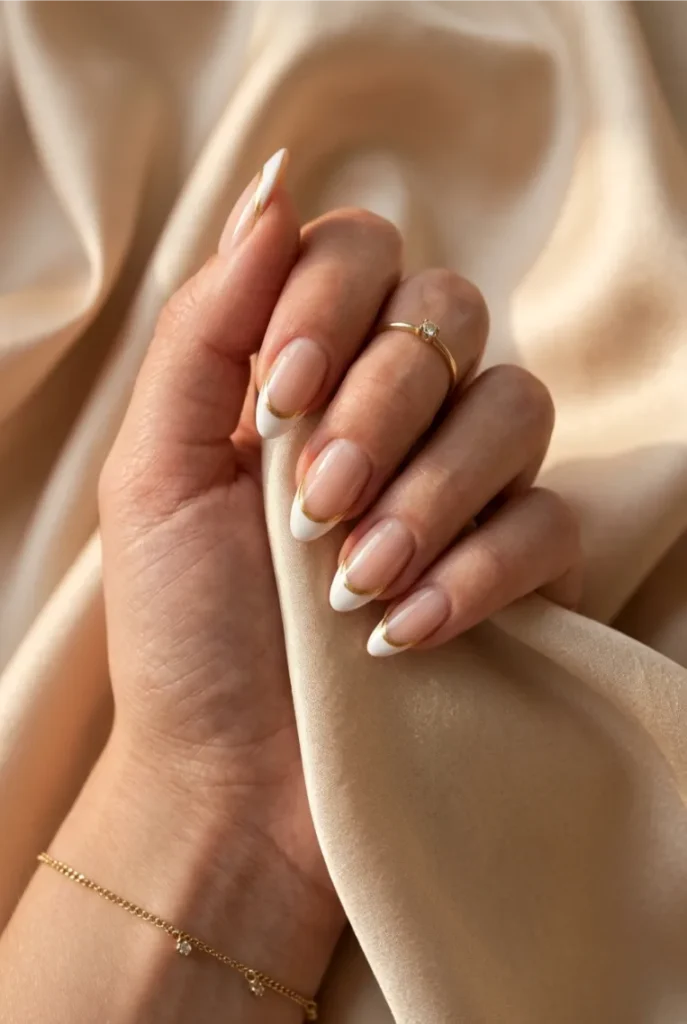
This takes the standard French one step further by splitting the tip itself into two layers.
The nail gets a white French tip as usual. Then a second, thinner line of color sits right along the very edge of that white tip, like a rim of color outlining the white band.
The colored line can be black for contrast, gold for warmth, or a soft blush for a tonal effect.
The result looks like the French tip has a border, and it reads significantly more detailed than the effort it actually takes.
Three combinations that work particularly well with this technique:
- White tip plus black edge line: The sharpest contrast option, reads graphic and modern, suits square and coffin shapes best
- White tip plus gold edge line: Warm and bridal-adjacent, works on almond and oval shapes, photographs beautifully at events
- White tip plus dusty rose edge line: Soft and tonal, the most subtle of the three, works on every shape and skin tone
The colored edge line needs to be thinner than the white base beneath it. If the two are equal width the design loses its hierarchy and starts reading as a thick tip in two colors rather than a French with a detail.
One clean white band at the tip. Classic and complete on its own. No further detail needed. Reads the same at every angle.
White base tip with a thinner contrasting line along the very edge. Reads differently as the hand moves. More detail without more complexity. Looks custom even on a simple nail shape.
Apply the colored edge line after the white tip has fully cured. Trying to do both wet layers at once causes the colors to bleed into each other at the boundary.
26. French Tips With Stamped Lace Detail
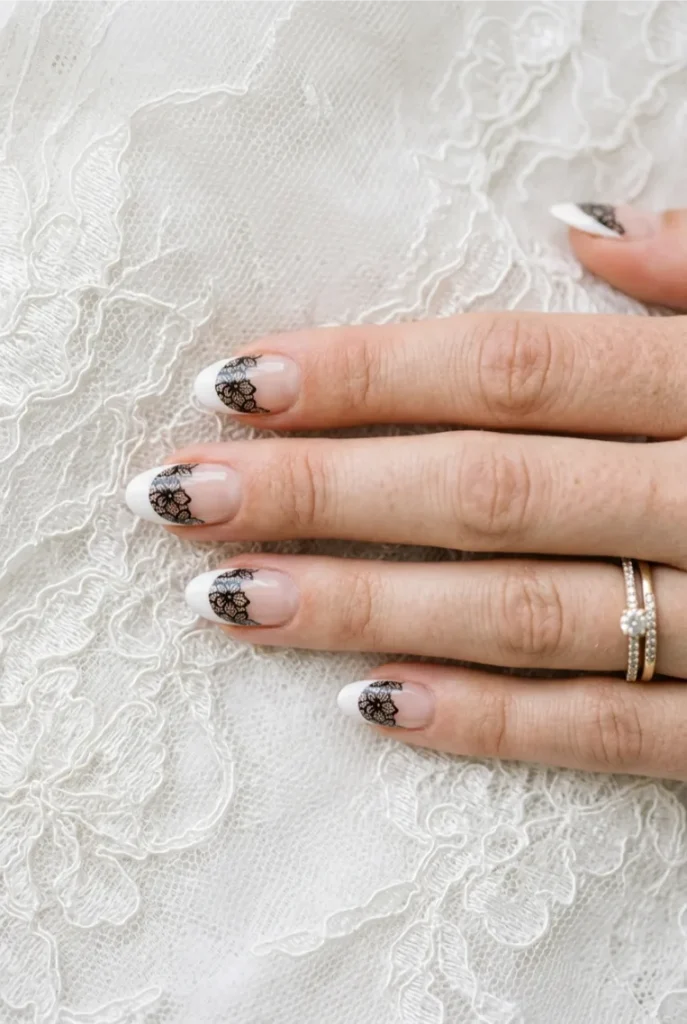
Lace nail art sounds like it requires a steady hand and three hours of free time. Stamping plates cut that down to about fifteen minutes.
A stamping plate with a lace pattern lets you transfer a clean, detailed lace design onto the white French tip in one press. The result looks hand-painted from a distance and holds up to close inspection because the lines are crisp and consistent across every nail.
The key difference between lace stamping that looks refined and lace stamping that looks busy comes down to one decision: keep the lace only inside the tip zone rather than letting it bleed onto the nail bed below.
Here is the full process from start to finish:
- Apply and cure your sheer base across all nails before touching the tip area
- Paint the white French tip as you normally would and cure fully
- Load the stamping plate with a contrasting stamping polish, either black, gold, or a deep nude, and scrape off the excess with one firm pass
- Press the stamper head firmly onto the plate pattern and then roll it gently onto the nail tip in one motion, do not slide it
- Let the stamped design sit for thirty seconds before sealing, stamping polish needs a moment to set or the top coat drags it
- Cap with a glossy top coat and cure to lock the lace detail in place
Apply and cure your sheer base coat across all nails. A smooth, even base is what stops the lace stamp from looking textured underneath.
Paint the white French tip cleanly and cure fully before any stamping. Stamping onto uncured gel causes the design to sink and blur.
Load the stamping plate with your chosen stamping polish, scrape with one clean pass, and press the stamper head straight down onto the plate pattern without twisting.
Roll the stamper gently onto the tip zone only. Position it so the lace lands inside the white band and does not spill onto the nude nail bed below.
Wait thirty seconds before sealing with top coat. Rushing this step drags the stamped design and blurs the lace lines before they have set.
Black stamping polish on a white tip reads graphic and modern. Gold on white reads bridal and warm. Try both on a practice nail before committing to the full set.
27. Swirl French in Terracotta and Cream
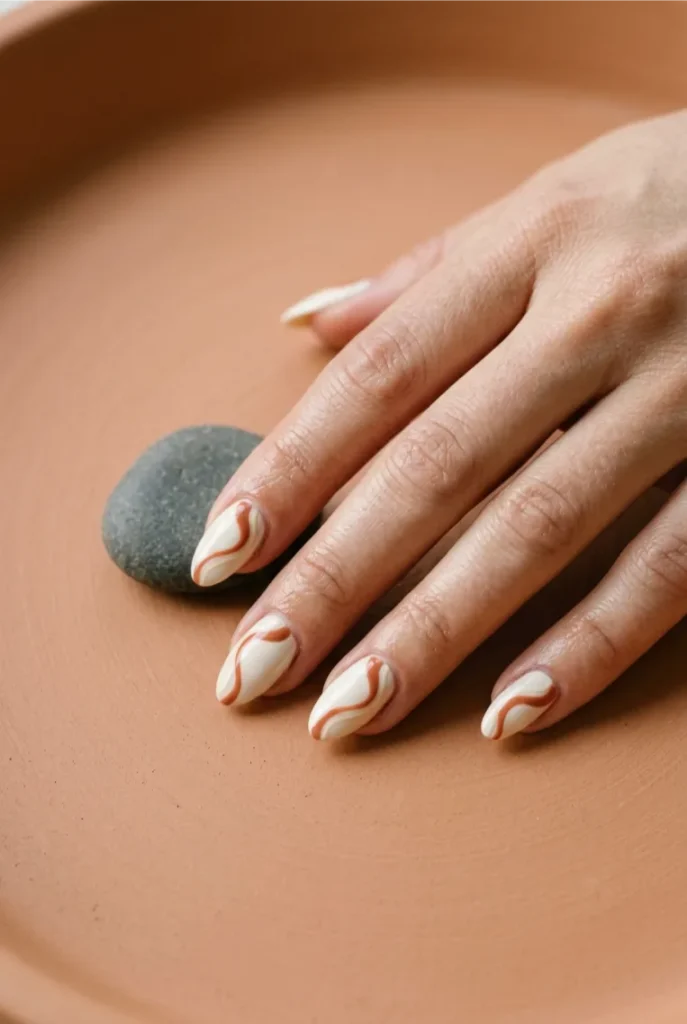
The swirl French replaces the straight tip line with a loose painted curl that moves across the nail rather than sitting at the edge.
Terracotta and cream together is one of those color pairings that reads earthy and considered without trying too hard.
The terracotta swirl sits on a cream or off-white base, and the two colors overlap slightly at the curl, which is what makes the design feel painted rather than stamped.
Before starting this look, it helps to understand where each color goes and why:
- Cream base coat: Covers the full nail, replaces the standard sheer nude, gives the terracotta swirl a warm surface to sit against
- Terracotta swirl: Applied freehand with a thin liner brush in one loose curved stroke, starts at one side of the nail and curls inward before lifting
- Cream overlap detail: A second thin cream line drawn inside the terracotta curl adds dimension and stops the design from looking flat
- Glossy top coat: Brings the two colors together and gives the swirl a painted-art quality rather than a nail-polish look
The swirl does not need to be perfect. A slightly imperfect curve reads more organic and hand-crafted than a geometrically flawless one.
Practice the swirl stroke on a piece of paper five times before moving to the nail. The hand-to-paper muscle memory transfers surprisingly well and stops first-attempt hesitation marks from showing up in the design.
28. Black French Tips for an Edgy Minimal Look
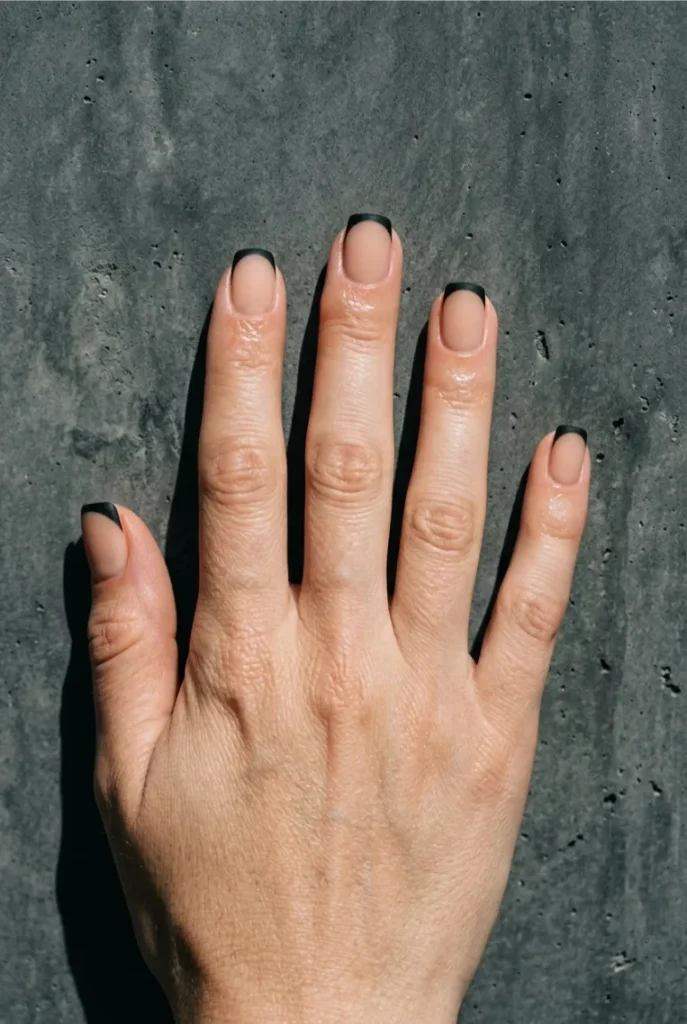
Black French tips get dismissed as too bold or too seasonal. That reputation is not entirely deserved.
The version that looks hard to wear is the thick opaque black band on a full coverage base.
The version that actually works is a thin, precise black tip on a sheer or barely-there nude base. That combination reads minimal and sharp rather than gothic or seasonal.
Three things that separate a black French tip that looks intentional from one that looks like a mistake:
- Tip width: Keep it at the thinner end of a standard French, around 2mm to 3mm. Wider than that and the black starts to dominate the entire nail
- Base color: A warm sheer nude underneath keeps the black from feeling cold. A pink base makes it feel punk rather than refined
- Finish: Matte top coat over a black French tip reads more editorial than glossy. Glossy works too but matte is the version getting the most attention right now
⚠️ Watch Out
Black polish shows every brush stroke more than any other color. Apply it in one thin, confident stroke per nail rather than going back over the tip to fix edges while the polish is wet. Clean up the line with acetone and a fine brush after the layer dries instead.
A single thin gold line drawn just below the black tip, in the gap between the tip and the nail bed, adds enough contrast to make the whole look feel finished rather than stark.
29. Milky White Sheer French on Coffin Nails
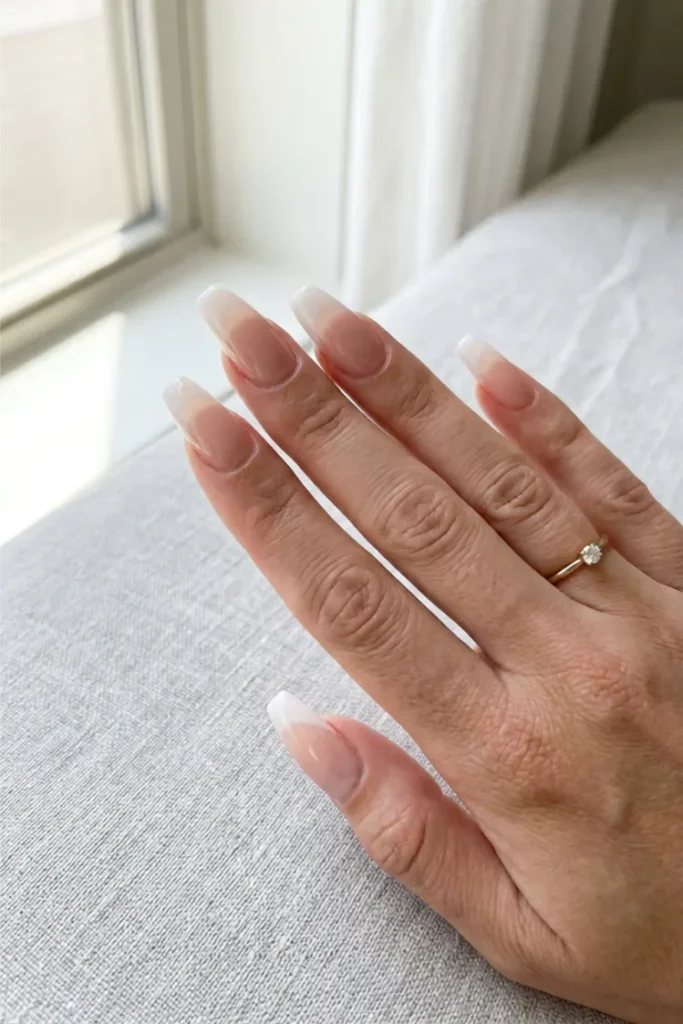
The milky French is what happens when you take the opacity out of the classic white tip and replace it with a soft, translucent wash of color.
The tip is still white. It just does not announce itself. Instead of a solid opaque band, the milky version lets the natural nail or base coat show through faintly underneath, which gives the nail a softness that solid white cannot achieve.
On coffin nails specifically, the flat square tip with slightly tapered sides makes the milky wash sit like a soft gradient across the full width of the nail rather than a hard line.
Here is how the milky French compares to its closest alternatives:
| Milky White French | Opaque White French | Sheer Gloss Only | |
|---|---|---|---|
| Opacity | Translucent wash | Fully opaque | Completely clear |
| Nail visibility | Faint show-through | None | Full |
| Best for | Everyday refined look | Classic bridal set | Barely-there natural look |
| Coats needed | One thin coat | Two to three coats | One coat |
| Works on short nails | Yes | Yes | Yes |
Apply the milky white in one thin layer and resist the urge to add a second coat. The translucency is the point, and a second coat kills it.
Use a warm-toned milky white rather than a bright cool white. Warm reads softer and more skin-flattering across most skin tones.
Don’t use a matte top coat over a milky white French. The matte finish flattens the soft luminosity that makes this look work.
Don’t apply the milky tip over a dark or heavily pigmented base. The translucency only reads correctly over a sheer or bare nail.
A high-shine glossy top coat is non-negotiable here.
The gloss mimics the natural sheen of a healthy nail and makes the milky tip look like it is part of the nail rather than sitting on top of it.
30. French Tips With a Sunset Ombre Blend
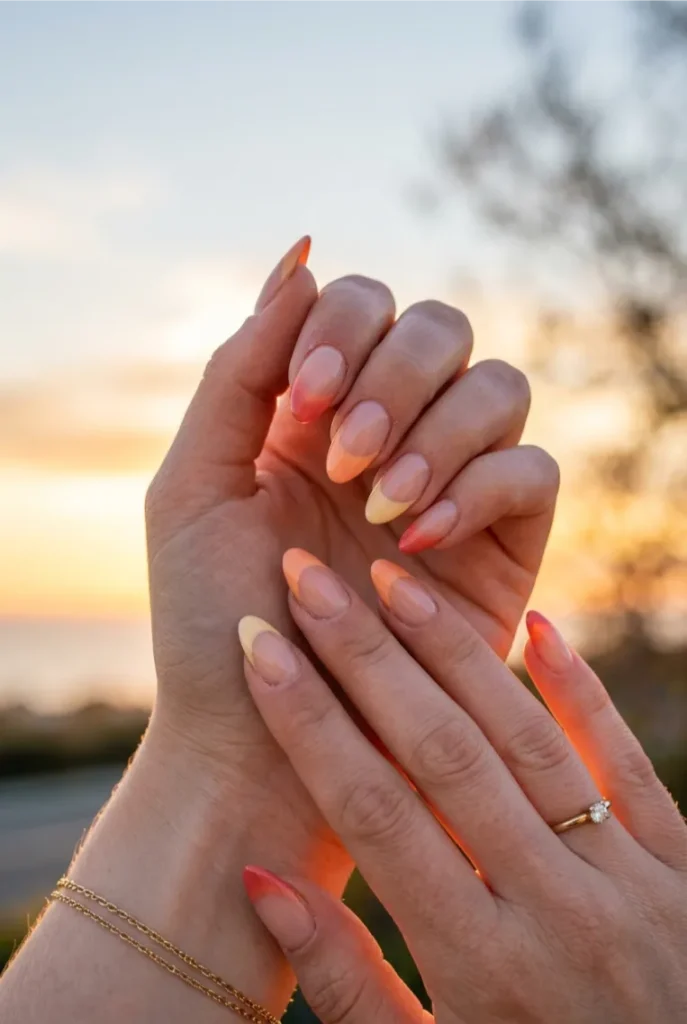
The last idea on this list is also the most ambitious, and the most rewarding when it comes together.
A sunset ombre French tip blends two or three warm colors across the tip zone rather than using a single solid shade.
The classic version moves from a deep coral or orange at the outer edge, through a warm pink in the middle, into a soft yellow or cream where the tip meets the nail bed.
The blend mimics a sunset gradient without looking like a literal painting. It works because the colors are all in the same warm family and fade into each other rather than sitting side by side as distinct bands.
Four things to get right before you start:
- Color selection: Choose three shades from the same warm family. Orange, peach, and cream work. Orange, purple, and yellow do not sit together the same way
- Sponge technique: Dab each color onto a torn makeup sponge and press the three colors onto the tip in one motion so they overlap at the boundaries naturally
- Blending speed: Work quickly before the polish starts to dry on the sponge. Have all three colors loaded before you touch the nail
- Sealing: A glossy top coat deepens the color saturation and makes the gradient read richer than it looks before sealing
The sunset ombre works because the colors share warm undertones. The moment you introduce a cool-toned shade into the blend, the gradient loses its cohesion and reads as three separate colors rather than one flowing transition.
This is the one idea on this list worth practicing on a nail tip or a piece of acetate before committing to all ten nails.
The sponge technique feels awkward the first time and natural by the third attempt.
The French Tip Is Not Going Anywhere
Thirty ideas in and the one thing that stands out is how much range a single manicure concept actually has.
A French tip can be a barely-there micro line in pastel pink on a short oval nail or a sunset ombre blend across a long coffin tip.
It can be stamped lace, wavy black line art, pearl chrome shimmer, or a single rhinestone sitting quietly at the corner. The base concept stays the same. What changes is every decision made on top of it.
The modern French tip nail ideas that hold up longest are the ones that suit the nail shape and length you actually have, not the ones that look best on someone else’s hands in a photo. Start with one idea that fits your current nail length and skill level. Get that one right before adding more detail.
These 30 ideas are worth coming back to every season since the same shapes read completely differently in butter yellow for spring, burnt orange for fall, or navy for winter.
✨ Before you go, pick your first try
Save this list to your Pinterest nail board for the next time you need a fresh idea. There is always a French tip version that fits exactly where you are. Elegant nail designs for prom night can truly elevate your overall look. Consider experimenting with metallic or glitter accents to add a touch of glamour. Don’t forget to choose a design that complements your dress and overall theme for the evening.


