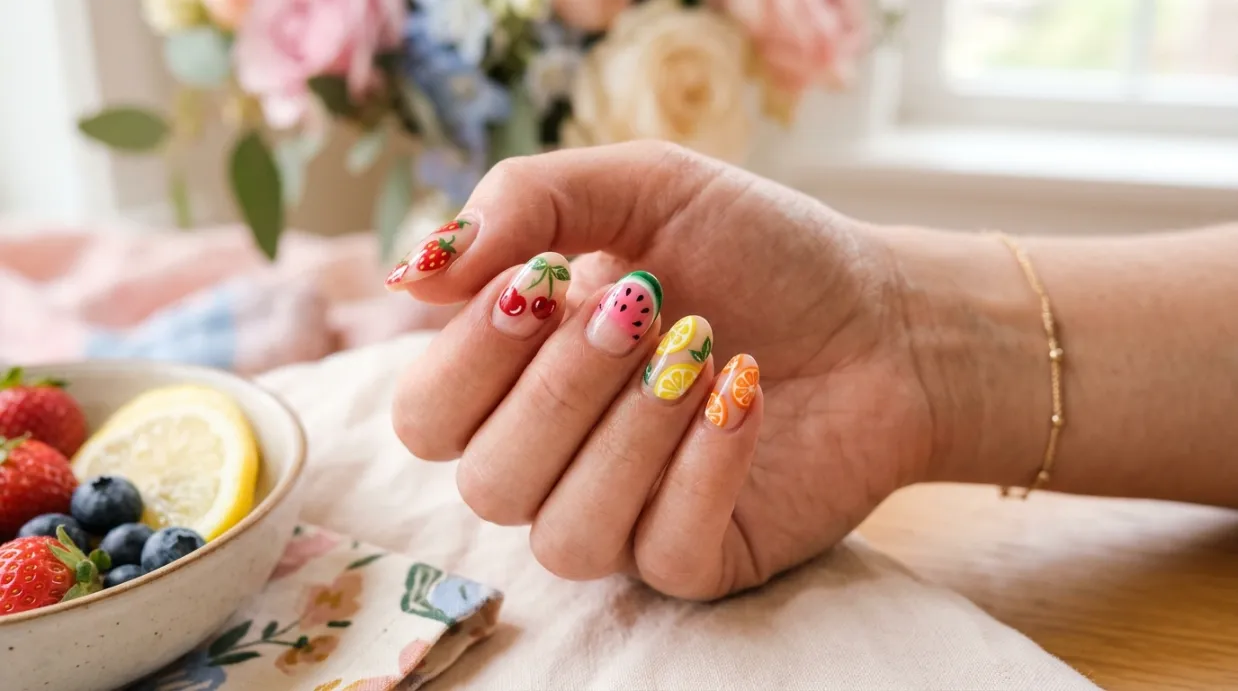
Fruit-inspired nail art is a fun way to add a little color and personality to your manicure.
From tiny strawberries and cheerful cherries to refreshing watermelon slices and sunny lemons, these playful designs can make even a simple manicure feel special.
The best part? You don’t need professional nail art skills or an expensive collection of tools to get started. With a few colorful nail polishes, a thin brush, and a dotting tool, you can create adorable fruit designs right at home.
In this fruit nail art tutorial, we’ll walk through five beginner-friendly designs, explain how to paint each fruit step by step, and share practical tips for making your manicure look neat.
Whether you prefer short natural nails or slightly longer shapes, there’s a cute fruit design you can try.
What You’ll Need to Create Fruit Nail Art
Fruit Nail Art,
Made Cute!
Turn your nails into tiny fruity masterpieces with these four easy steps!
Your 4-Step Guide 🍑
Prepare Your Nails
Shape your nails, gently buff the surface, and push back your cuticles. Clean away oils and apply a protective base coat.
Apply Your Base Color
Choose a soft pastel pink, creamy white, or peach. Apply thin, even layers and allow each layer to dry.
Paint Cute Little Fruits
Use a fine nail-art brush or dotting tool to create strawberries, cherries, lemons, and oranges. Add tiny leaves and playful details.
Seal & Add the Shine
Once your designs are completely dry, apply a glossy top coat to protect your artwork and give your fruity nails a beautiful finish.
Pro Tip: Start with simple fruit shapes and use a toothpick or dotting tool for tiny seeds. Let every layer dry before adding the next!
Before painting, gather your supplies. Having everything ready makes the process easier, especially when you’re working with small details.
Essential nail art tools
You don’t need a professional nail art kit. These basic supplies are enough for most fruit designs:
- Base coat: Helps prepare your nails before applying colored polish.
- White or pastel nail polish: Creates a clean background for colorful fruit.
- Red nail polish: For strawberries and cherries.
- Yellow nail polish: For lemons.
- Green nail polish: For leaves, stems, and watermelon rinds.
- Pink or coral polish: For watermelon flesh and playful backgrounds.
- Black nail polish: For tiny fruit seeds.
- White nail polish: For highlights and decorative details.
- Fine nail art brush: Helps create thin stems, leaves, and outlines.
- Dotting tool: Makes small circles, seeds, and fruit details.
- Glossy top coat: Finishes and seals your design.
- Cotton swabs and nail polish remover: Useful for cleaning up small mistakes.
Beginner tip: If you don’t own a dotting tool, try using the rounded end of a clean toothpick or a small dotting pen. You can also use a fine brush for details.
Step 1: Prepare Your Nails Before Painting
A neat fruit manicure starts with a clean nail surface. Taking a few minutes to prepare your nails can make the finished design look more polished.
Follow these simple steps:
- Remove any old nail polish with a suitable nail polish remover.
- File your nails into your preferred shape, such as round, oval, or squoval.
- Wash your hands and make sure your nails are completely dry.
- Apply a thin layer of base coat.
- Allow the base coat to dry according to the product instructions.
Next, choose a background color.
White, milky pink, pale yellow, and soft pastel blue are lovely choices because they allow colorful fruit illustrations to stand out.
For a playful manicure, you can also paint each nail a different pastel shade.
Important: Avoid cutting your cuticles or forcefully pushing them back. The American Academy of Dermatology recommends leaving cuticles intact to help protect against infection.
Step 2: How to Paint Cute Strawberry Nail Art
Strawberries are one of the easiest fruits to recreate on your nails. Their rounded shape, tiny seeds, and green leaves make them instantly recognizable.
Colors needed: Red, green, white, and a light background color.
Step-by-step instructions
- Apply your chosen background polish and let it dry.
- Use a small brush to paint a rounded red strawberry shape on an accent nail.
- Make the top slightly wider and the bottom narrower to create a strawberry silhouette.
- Allow the red polish to become touch-dry.
- Use a dotting tool or fine brush to add tiny white or pale-yellow seed marks.
- Paint two or three small green leaf shapes around the top.
- Add a tiny white highlight if you want a slightly more dimensional appearance.
- Let the artwork dry before applying a glossy top coat.
Cute design variation: Paint one large strawberry on your ring finger and add tiny strawberry seed dots to another nail. Keep the remaining nails a soft pink or creamy white.
This creates a balanced manicure without covering every nail in detailed artwork.
Step 3: Create Adorable Cherry Nail Art
Cherry nail art is perfect when you want something simple, sweet, and recognizable. You only need two small red circles and a couple of curved green lines.
Colors needed: Red, green, and white or nude polish.
Step-by-step instructions
- Paint your nails with a light pink, milky white, or nude base color.
- Select an accent nail for your cherry design.
- Use a dotting tool to create two small red circles close together.
- Slightly adjust the shape with a fine brush if the circles look uneven.
- Draw two thin green stems that curve upward from the cherries.
- Join the stems near the top to create a natural cherry pair.
- Add tiny white highlights to the red circles if desired.
- Allow everything to dry before applying top coat.
Cute design variation: Add a tiny heart between the cherries or paint miniature cherries on two accent nails. For a softer look, use cherry red against a pale pink background.
If you’re new to nail art, this is an excellent design to practice because it uses simple shapes rather than complicated illustrations.
Step 4: Paint Fresh Watermelon Nail Art
Watermelon nails are a cheerful choice for summer-inspired manicures. The combination of pink or red, white, green, and black makes this fruit design easy to recognize.
Colors needed: Pink or red, white, green, and black.
Step-by-step instructions
- Apply a light-colored base coat, such as white or pale pink.
- Use a small brush to paint a curved pink or red half-moon shape near the tip or side of the nail.
- Add a thin white line along the curved edge of the fruit.
- Paint a second thin green line outside the white section to represent the watermelon rind.
- Allow the colored layers to dry.
- Use a fine brush or dotting tool to add three to five tiny black seeds.
- Check that the rind lines are smooth and the seeds are spaced naturally.
- Finish with a glossy top coat once the design is dry.
Cute design variation: Try a watermelon French tip by painting a pink-red curved tip with a white and green border. This works particularly well on short oval or squoval nails.
You can also paint one full watermelon slice on an accent nail and keep the other nails solid pastel pink.
Step 5: Create Sunny Lemon Nail Art
Lemon nail art is a lovely option if you prefer bright but simple designs. You can paint a whole lemon, a tiny lemon slice, or just a few yellow citrus details.
Colors needed: Yellow, white, and green.
Step-by-step instructions
- Start with a white, pale blue, or soft cream background.
- Use yellow polish to create a small oval shape on your chosen accent nail.
- Add two tiny pointed ends to make the oval resemble a lemon.
- Let the yellow shape dry.
- Use a fine green brush to add one or two small leaves near the top.
- Add a tiny white curved highlight to give the lemon a fresh appearance.
- For a lemon-slice variation, paint a small yellow circle instead of an oval.
- Add a white outline and several thin white lines radiating from the center to represent citrus segments.
- Allow the artwork to dry before sealing it with top coat.
Cute design variation: Combine little lemons with white polka dots or delicate green leaves. A pastel yellow background with one or two lemon accent nails creates a cheerful, coordinated manicure.
Step 6: Try a Cute Orange or Citrus Slice Design
If you enjoy the lemon design, orange slices are another easy option. Their circular shape and simple segments make them suitable for beginners.
Colors needed: Orange, white, and a little pale yellow.
Step-by-step instructions
- Apply a white or nude base color.
- Paint a small orange circle on an accent nail.
- Add a thin white border around the circle.
- Use a fine brush to draw four to six thin white lines from the center toward the outer edge.
- Add a tiny white dot in the middle.
- Allow the design to dry before applying top coat.
Cute design variation: Paint miniature orange slices along one side of the nail instead of placing a large circle in the center. This gives the manicure a playful fruit-pattern appearance.
How to Combine Different Fruits Into One Manicure
Once you’ve practiced individual fruit designs, you can combine them to create a colorful fruit-themed manicure.
However, painting a different detailed fruit on every nail can sometimes make the design look crowded. A little coordination helps.
Here are three combinations worth trying:
1. Strawberry and Cherry Manicure
Choose a milky pink background. Paint strawberries on your thumb and ring finger, then add tiny cherry pairs to your middle finger. Keep the remaining nails a simple glossy pink.
2. Summer Citrus Manicure
Combine lemon and orange slices with a creamy white background. Use pale yellow on two nails and add citrus illustrations to your accent nails.
3. Colorful Mixed Fruit Manicure
Use strawberries, cherries, lemons, and watermelon slices across different accent nails. Keep the remaining nails in a neutral shade to balance the bright illustrations.
For short nails, miniature fruit shapes and single accent designs are often easier to manage than large, detailed illustrations.
Practical Tips for Neater Fruit Nail Art
Small fruit illustrations can be tricky when you’re just starting. These tips can help you achieve cleaner results.
Start with simple shapes
Don’t try to paint a highly detailed strawberry or orange slice immediately. Begin with circles, ovals, curved lines, and dots. Once you’re comfortable, add leaves, seeds, and highlights.
Use less polish on your brush
Too much polish can make small designs look thick and uneven. Wipe excess polish from your brush before creating tiny details.
Let each layer dry
Avoid adding seeds, leaves, or outlines while the underlying color is still wet. This can cause the colors to drag into each other.
Practice on paper first
If you’re nervous about painting directly onto your nails, practice the fruit shapes on paper or a nail art practice wheel. It gives you a chance to control your brush before working on a small nail surface.
Keep the designs proportional
A large strawberry may look attractive on a long nail but overwhelm a shorter nail. Adjust the size of your illustrations to suit your available nail space.
Apply thin layers of top coat
Once the artwork is sufficiently dry, apply a smooth, thin layer of top coat. Avoid pressing the brush too firmly against the artwork, as this can drag small details.
Common Fruit Nail Art Mistakes and How to Fix Them
Even simple nail designs can take a little practice. Here are a few common problems and their solutions.
| Common mistake | How to fix it |
|---|---|
| Fruit shapes look uneven | Start with smaller circles and ovals. |
| Seeds look too large | Use a finer tool or the tip of a toothpick. |
| Colors mix together | Allow each layer to dry before adding details. |
| Leaves look messy | Use a fine brush and paint simple leaf shapes. |
| Too many designs look crowded | Keep some nails in a solid background color. |
| Top coat smudges the artwork | Let the design dry longer and use gentle brush strokes. |
Remember, cute fruit nail art doesn’t need to look perfectly identical on every nail. Slight differences can give a handmade manicure its charm.
Frequently Asked Questions
1. Is fruit nail art easy for beginners?
Yes! Many fruit designs use basic shapes such as circles, ovals, dots, and curved lines. Start with cherries, lemons, or simple strawberries before trying more detailed illustrations.
2. What nail polish colors do I need for fruit nail art?
The basic colors are red, pink, yellow, green, white, and black. A nude or pastel polish is also useful for creating a soft background. You can create several fruit designs without buying a large collection of colors.
3. Can I create fruit nail art on short nails?
Absolutely. Short nails can look lovely with miniature strawberries, tiny cherries, small citrus slices, or watermelon French tips. Choose smaller illustrations and avoid overcrowding the nail surface.
4. How do I draw tiny fruit designs without a dotting tool?
You can use the rounded end of a clean toothpick for small dots and a fine nail art brush for stems and leaves. Practice controlling the amount of polish before working directly on your nails.
5. How can I prevent my fruit nail art from smudging?
Use thin layers, allow each design element to dry, and avoid rushing the top coat application. Follow the drying instructions for your polish. Remember that polish can feel dry on the surface before it has completely hardened.
Final Thoughts
Fruit nail art is a creative way to make your manicure feel fresh, colorful, and playful.
You don’t need complicated techniques to get started. A few basic polish colors, a dotting tool, and a little patience can help you create adorable strawberries, cherries, watermelon slices, lemons, and oranges.
If you’re a beginner, start with one or two accent nails rather than decorating every finger.
Once you become comfortable painting small shapes and details, experiment with different fruit combinations and pastel backgrounds.
Most importantly, have fun with the process. Your fruit manicure should reflect your personal style, whether you prefer tiny minimal illustrations or a colorful mixed-fruit design.