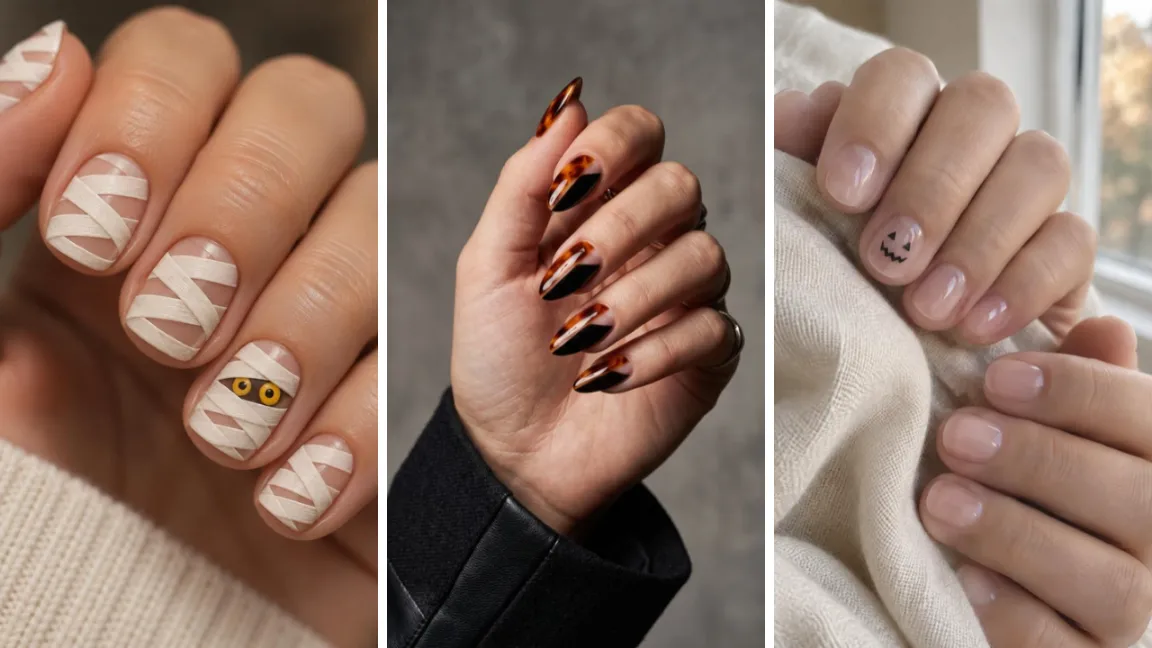
Halloween manicure season is the best excuse to try something creative. Whether you like minimalist micro-details or bold statement nails, these 20 spooky Halloween nails mix gothic elegance, playful creatures, and classic seasonal motifs that work on short natural nails and long extensions alike.
Each design includes a color palette, difficulty rating, step-by-step DIY instructions, and a practical tip.
Difficulty ratings are based on the tools needed, the number of steps, and how much freehand control the design demands.
Beginner designs need only a dotting tool or tape, while Advanced designs need specialty products like builder gel or chrome powder.
1. Floating Ghost French Tips

A playful twist on the classic smile line that turns white tips into tiny floating ghosts.
Visual description: A sheer milky nude base with wavy white tips shaped like small ghost bodies, finished with black dot eyes and an open oval mouth.
Best nail length: Short to medium.
Best nail shape: Oval, squoval, or round.
Color combination: Sheer milky nude, crisp white, jet black.
Difficulty level: Beginner.
How to recreate it: Apply your sheer base. Use the rounded edge of a white polish brush to paint a wavy tip across the free edge, letting one or two points drop lower to form ghost “tails.” Dip a toothpick or small dotting tool in black polish for two eye dots and a small mouth dot. Finish with a glossy top coat.
Best occasion: Office-friendly Halloween weeks and everyday October wear.
Practical tip: Let the white fully dry before adding the black facial details so the colors don’t bleed.
2. Velvet Midnight Cat Eyes
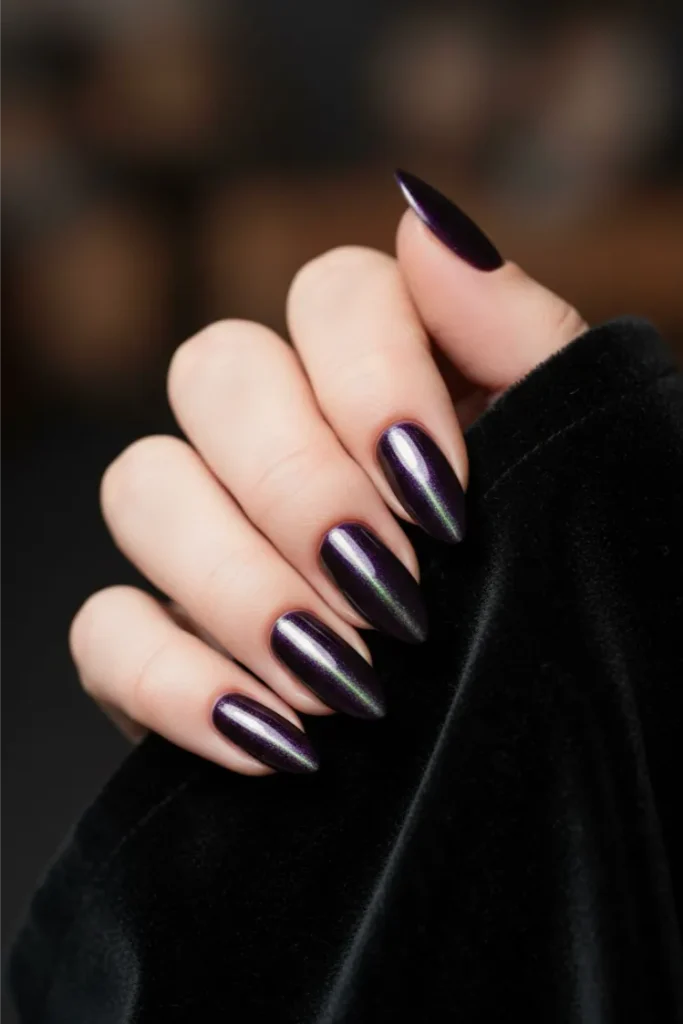
A moody, dimensional manicure that mimics a black cat’s gaze in the dark.
Visual description: A deep midnight purple or charcoal base with magnetic shimmer pulled into a sharp diagonal beam of light.
Best nail length: Any length.
Best nail shape: Almond, oval, or short square.
Color combination: Black-purple with silver or emerald magnetic particles.
Difficulty level: Intermediate (requires magnetic polish and a magnet).
How to recreate it: Apply a dark base. Brush on one nail of magnetic polish, hold the magnet diagonally about 2–3 mm above the wet surface for 10 seconds, then cure under the lamp (gel) while still holding the magnet in place. Repeat nail by nail, then add a top coat only after the effect is set.
Best occasion: Evening Halloween parties and costume balls.
Practical tip: Work one nail at a time. The magnetic effect only forms while the polish is wet, so don’t paint all ten nails first.
3. Delicate Spiderweb Accent Tips

Minimalist line art that keeps the set clean while adding a subtle seasonal accent.
Visual description: Neutral glossy nails with fine white or silver cobweb lines radiating from one corner of one or two accent nails.
Best nail length: Short to medium.
Best nail shape: Square or squoval.
Color combination: Beige or soft blush with white or silver chrome.
Difficulty level: Intermediate.
How to recreate it: Using an ultra-fine 000 detail brush, paint three curved guide lines spreading from the corner. Connect them with small inward-curving arches, like gentle “smiles” between the spokes. Seal with a glossy top coat.
Best occasion: Subtle everyday styling for minimalists.
Practical tip: Rest your pinky on the table while drawing to steady your hand.
4. Matte Vampy Ombré

A dark gradient inspired by vintage horror and dried rose petals.
Visual description: Deep oxblood or garnet at the cuticle fading into pitch black at the tip, finished in matte.
Best nail length: Medium to long.
Best nail shape: Coffin, stiletto, or almond.
Color combination: Crimson, bordeaux, and black.
Difficulty level: Intermediate.
How to recreate it: Apply a crimson base. Paint stripes of red and black side by side on a makeup sponge, then dab gently along the nail for a smooth gradient. Repeat for opacity, clean the cuticle edge with an acetone-dipped flat brush, and finish with a matte top coat.
Best occasion: Vampire costumes and fall dinners.
Practical tip: Protect the surrounding skin with peel-off latex or petroleum jelly before sponging.
5. Micro Pumpkin Polka Dots
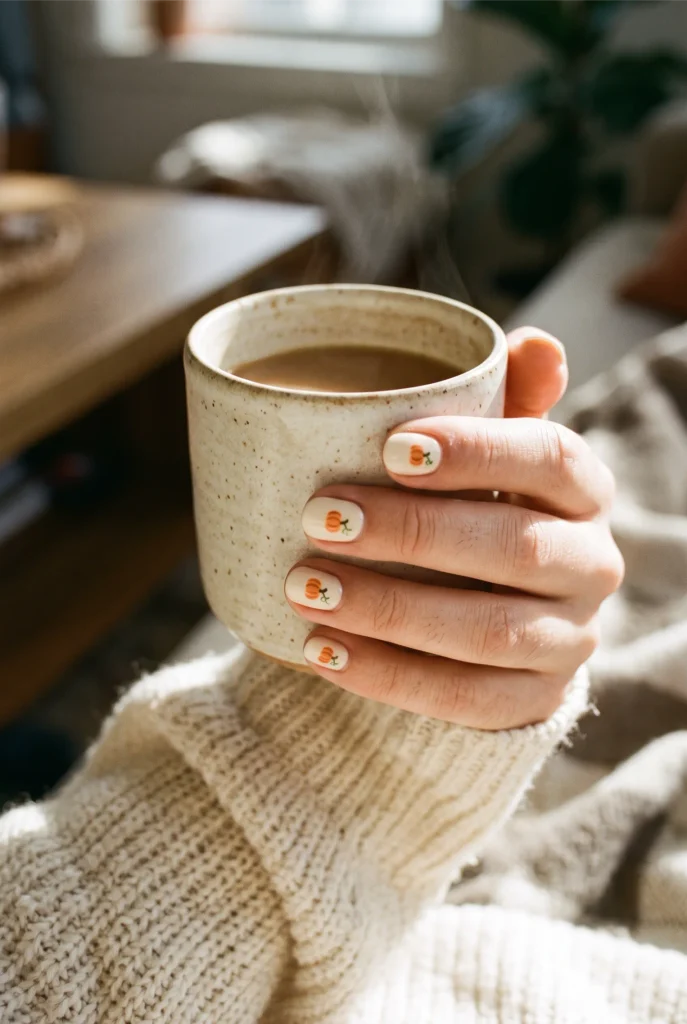
A cheerful, low-effort design that blends fall warmth with Halloween charm.
Visual description: A cream base scattered with tiny pumpkins with green stems.
Best nail length: Very short to short.
Best nail shape: Round or short square.
Color combination: Ivory, burnt orange, olive green.
Difficulty level: Beginner.
How to recreate it: Apply two coats of ivory. With a medium dotting tool, place two overlapping orange dots side by side for a wide pumpkin shape. Use a toothpick to flick a tiny green stem on top.
Best occasion: Apple picking, casual days out, and family gatherings.
Practical tip: Hold the dotting tool at a slightly flatter angle so the polish forms a wide bead instead of a narrow point.
6. Tortoiseshell & Black Negative Space
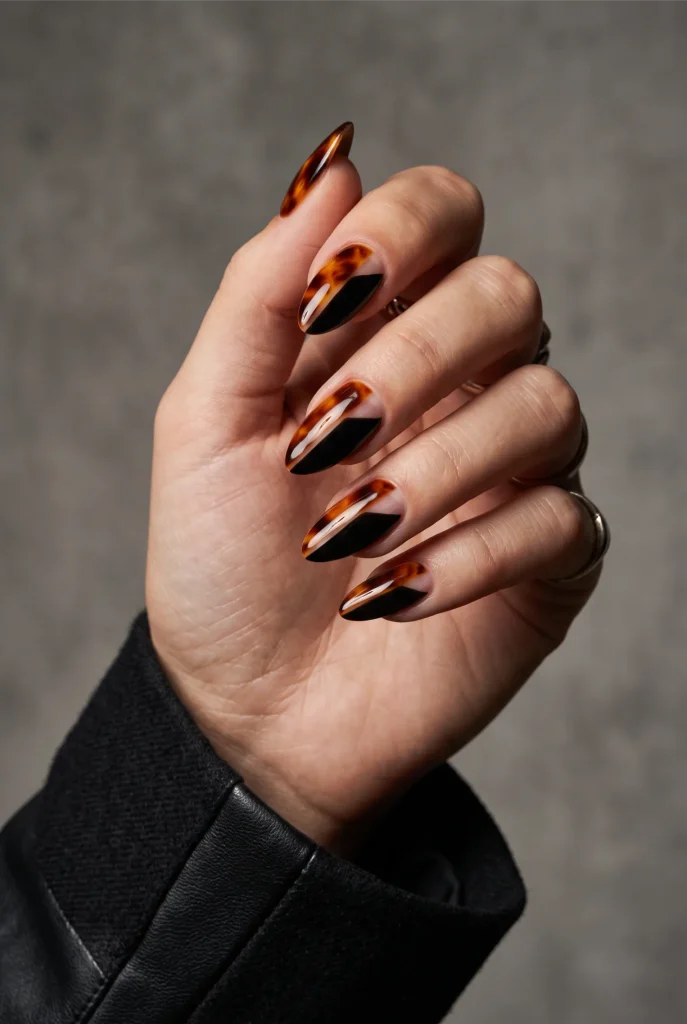
A sophisticated fall design pairing amber tortoiseshell with sharp black.
Visual description: Each nail is split diagonally: one side translucent amber tortoiseshell, the other solid black, with a thin strip of bare nail between them as the negative space.
Best nail length: Medium.
Best nail shape: Almond or soft square.
Color combination: Sheer amber, chocolate brown, black.
Difficulty level: Intermediate to advanced.
How to recreate it: Place a diagonal strip of striping tape across the nail, leaving a thin gap of bare nail beside it. Layer sheer mustard jelly polish with dabs of caramel brown, then a second jelly layer and small dark brown spots on one side. Paint the other side black, remove the tape, and top coat.
Best occasion: High-fashion fall styling that carries into November.
Practical tip: Work in thin, translucent layers for realistic depth.
7. Drip French Tips (Blood Red or Slime Green)
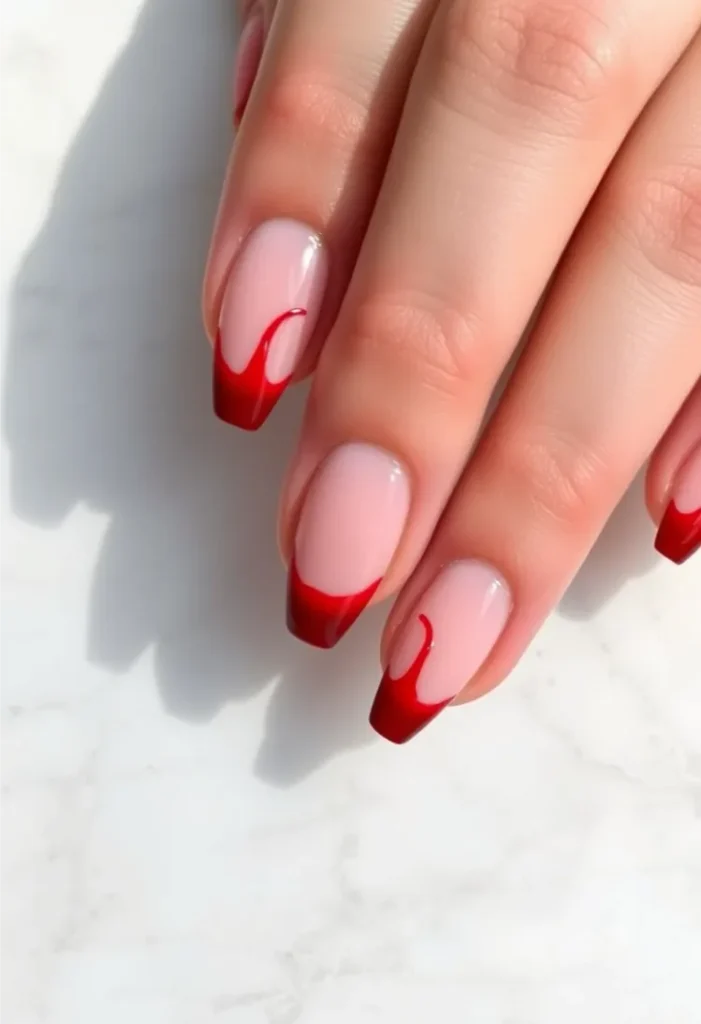
A dramatic edge that looks like liquid dripping down from the tips.
Visual description: A sheer nude base with blood-red drips running down from the tip, or a black base with neon lime drips.
Best nail length: Medium to long.
Best nail shape: Almond or coffin.
Color combination: Nude with crimson, or black with electric lime.
Difficulty level: Beginner to intermediate.
How to recreate it: Apply your base. Paint a thin line of drip color along the free edge. Then place three or four dots just below that line at different heights and pull each one down toward the cuticle to form a rounded drip. Seal with a glossy top coat.
Best occasion: Zombie, monster, and classic horror costumes.
Practical tip: Vary the drip lengths from nail to nail so the set looks organic.
8. Gothic Lace Stamping
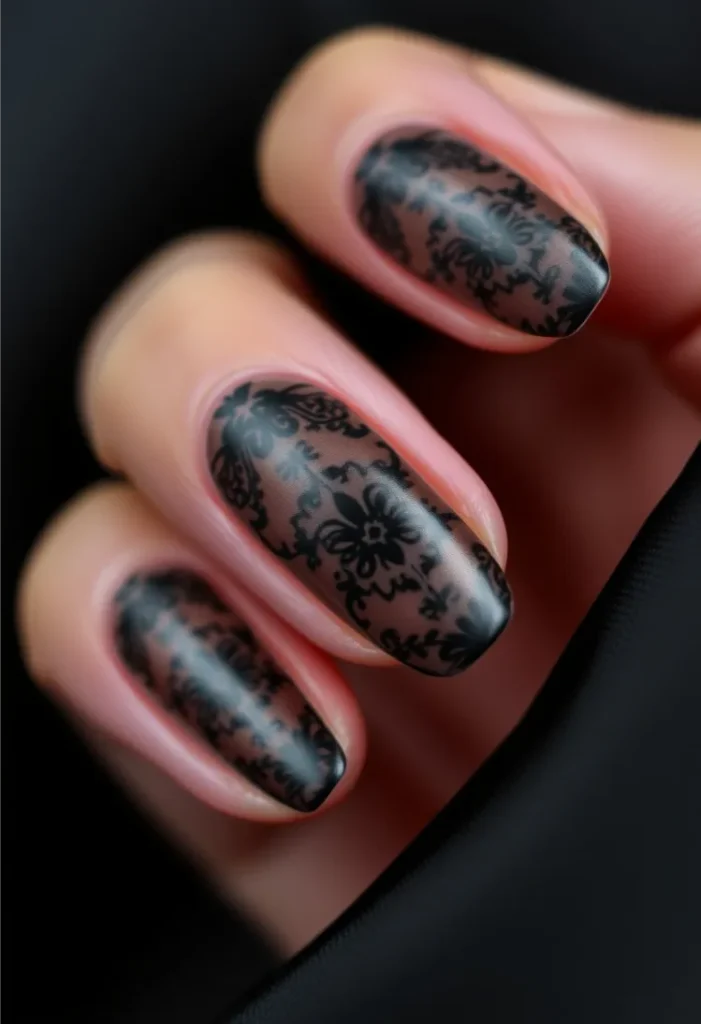
Victorian-inspired lace for a romantic, vintage gothic feel.
Visual description: Fine black lace and floral filigree over a smoky nude, mauve, or sheer grey base.
Best nail length: Any length.
Best nail shape: Oval or almond.
Color combination: Smoky mauve with black lace.
Difficulty level: Intermediate (requires a stamping plate and stamper).
How to recreate it: Apply your base and let it dry. Scrape black stamping polish across a lace plate, pick up the design with a silicone stamper, and press it onto the nail with a quick rolling motion. Seal with top coat.
Best occasion: Witchy aesthetics, Victorian costumes, and moody date nights.
Practical tip: Clean the stamper with tape or a lint roller instead of acetone to keep its tackiness.
9. Celestial Witching Hour
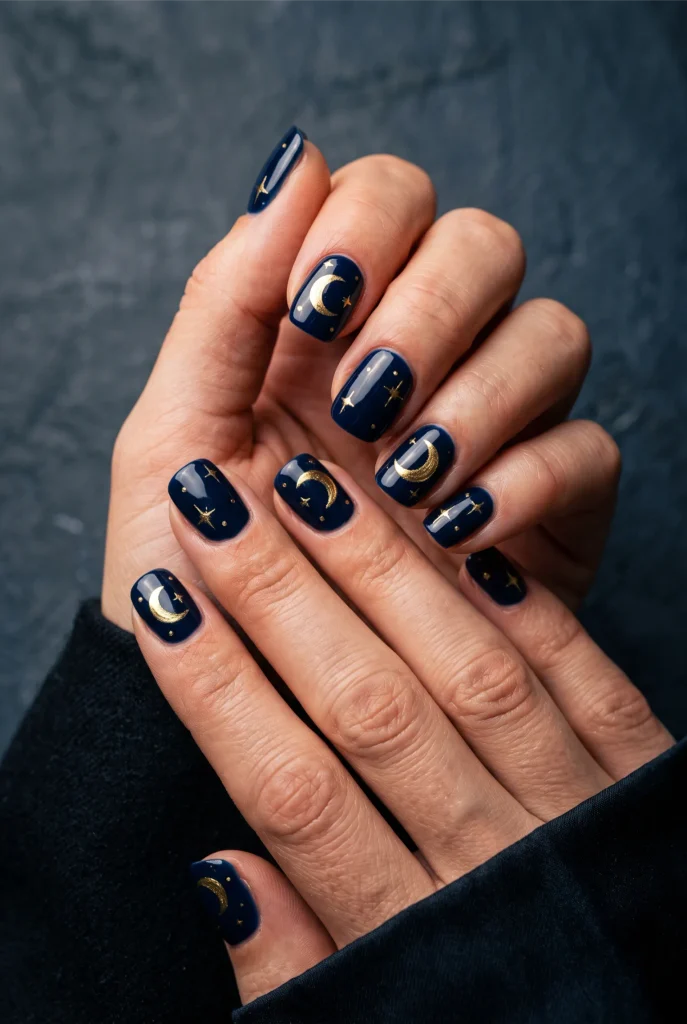
A starry midnight design with crescent moons and twinkling stars.
Visual description: A navy or midnight black base with gold crescent moons, four-point stars, and fine metallic specks.
Best nail length: Short to medium.
Best nail shape: Round or almond.
Color combination: Navy and metallic gold.
Difficulty level: Beginner (decals) to intermediate (freehand).
How to recreate it: Apply two coats of navy. With a fine brush and gold polish, paint a crescent moon on accent nails and tiny four-point stars on the others. Or place thin water decals over dry polish.
Best occasion: All-October wear for astrology fans.
Practical tip: Seal foils and decals with two coats of top coat to stop the corners from peeling.
10. Cute Candy Corn Accents

A retro, candy-colored stripe design in wearable shades.
Visual description: Horizontal color blocks of yellow at the base, orange in the middle, and white at the tip.
Best nail length: Short to medium.
Best nail shape: Squoval or round.
Color combination: Warm yellow, marigold orange, milky white.
Difficulty level: Beginner.
How to recreate it: Paint the whole nail yellow and let it dry. Place tape across the nail to cover the lower third, then paint the top two-thirds white and remove the tape while the polish is still slightly tacky. Next, tape just above the yellow and paint a middle band of orange, again peeling the tape while tacky. Top coat.
Best occasion: Trick-or-treating, classroom parties, and casual fall weekends.
Practical tip: Always pull the tape away from the painted area, not across it, to keep the lines crisp.
11. Pearlescent Glazed Skeleton Hands

Eerie bone art with a glazed pearl chrome finish.
Visual description: A milky sheer base with white skeleton hand bones, topped with an iridescent glaze.
Best nail length: Medium to long.
Best nail shape: Almond or coffin.
Color combination: Milky white, chalk white, pearl chrome.
Difficulty level: Advanced.
How to recreate it: On a milky base, paint thin bone segments with rounded knuckles using white gel and a detail brush. Cure, apply a no-wipe top coat, cure again, then buff white pearl chrome powder over the surface and seal.
Best occasion: Elegant costume parties and editorial-style looks.
Practical tip: Leave tiny gaps between the joints so the bones look separate and realistic.
12. Matte Beetlejuice Stripes
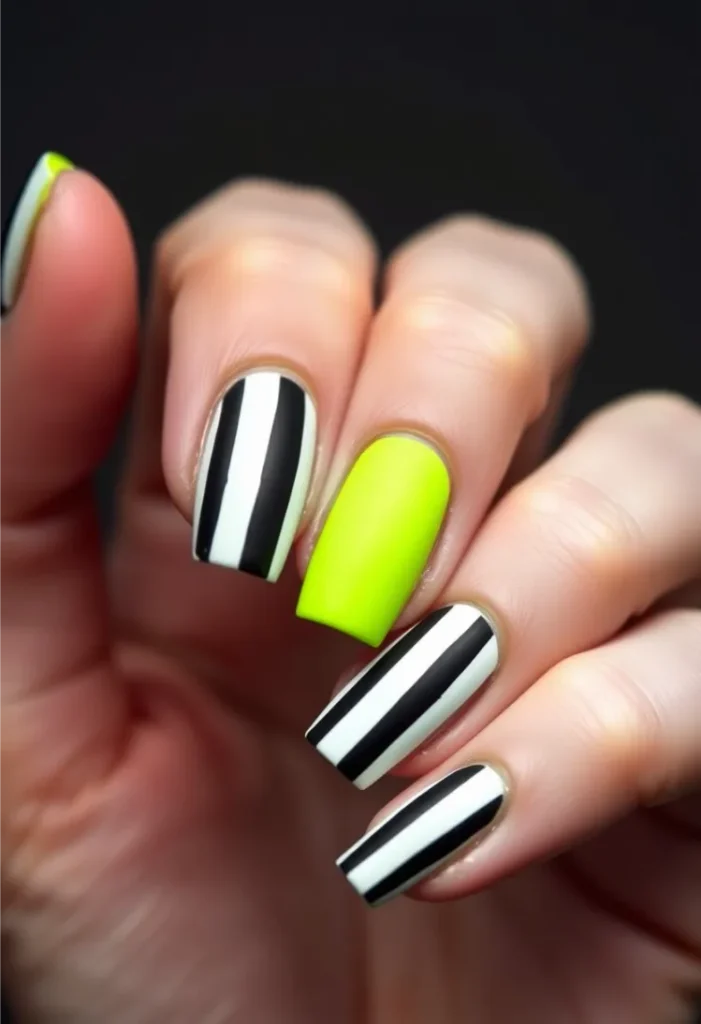
Bold black-and-white stripes with an optional slime-green accent nail.
Visual description: Alternating vertical black and white stripes in flat matte, with one neon lime accent nail.
Best nail length: Short to medium.
Best nail shape: Square or squoval.
Color combination: White, black, neon lime.
Difficulty level: Intermediate.
How to recreate it: Paint nails white and let them dry fully. Lay thin vertical tape strips down each nail, paint black over the whole nail, and peel the tape right away. Seal with matte top coat.
Best occasion: Movie nights and pop-culture Halloween parties.
Practical tip: Make sure the white base is completely dry so the tape doesn’t lift it.
13. Minimalist Jack-o’-Lantern Smile

An understated carved face on an otherwise bare nail.
Visual description: A sheer pink nail with two small pointed triangle eyes and a jagged smile in fine black linework.
Best nail length: Short.
Best nail shape: Round or square.
Color combination: Translucent nude and black.
Difficulty level: Intermediate (the fine detail takes a steady hand).
How to recreate it: Apply sheer polish. With a toothpick or 000 brush dipped in black, draw two small triangles with the points facing up, then a row of tiny zig-zag strokes for the smile.
Best occasion: Workplaces that allow subtle festive nail art.
Practical tip: Keep the lines very thin, since chunky strokes blend together on short nails.
14. Black Widow Red Hourglass
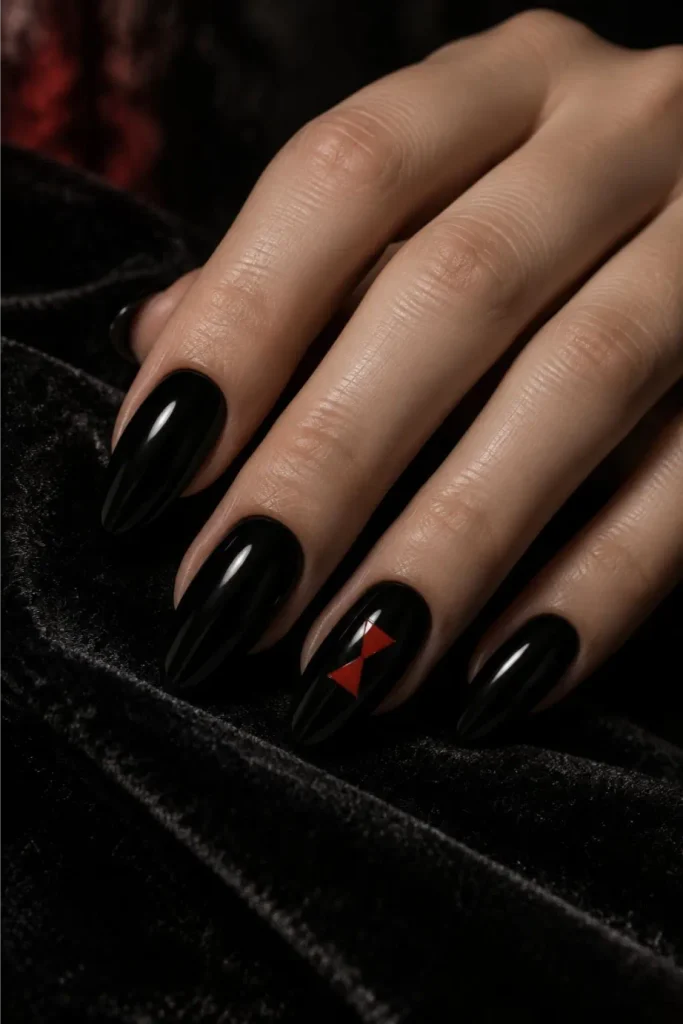
A sleek, dangerous accent for anyone who wants drama without the clutter.
Visual description: Glossy black nails with a small red hourglass mark on the ring finger accent nail.
Best nail length: Medium.
Best nail shape: Almond or oval.
Color combination: Black and bright red.
Difficulty level: Intermediate.
How to recreate it: Apply two coats of black and top coat. Using a fine brush and red polish, paint two small triangles meeting at their points to form an hourglass in the center of the accent nail. Seal with top coat.
Best occasion: Parties, nights out, and anyone dressing as a villain.
Practical tip: Draw a faint dot at each end of the hourglass first so the triangles come out symmetrical.
15. Mummy Bandage Negative Space
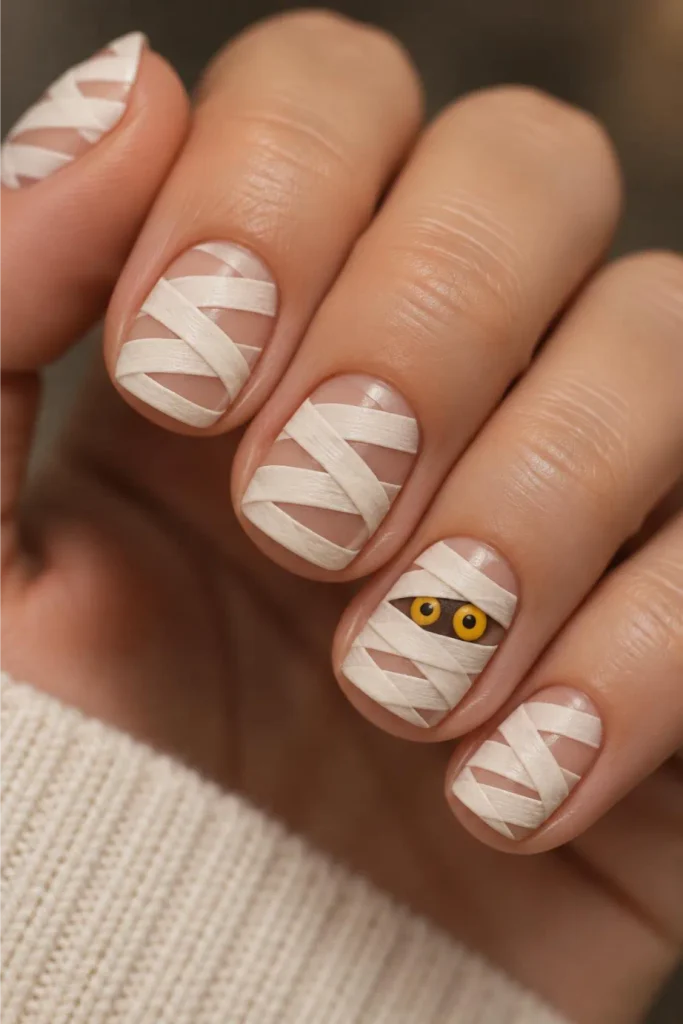
Overlapping white wraps that look like ancient mummy bandages.
Visual description: Bare nail showing through crisscrossing cream and white diagonal bands, with two glowing yellow eyes peeking out.
Best nail length: Short to medium.
Best nail shape: Square or squoval.
Color combination: Natural nail, cream, chalk white, yellow.
Difficulty level: Beginner.
How to recreate it: With a flat brush, paint overlapping diagonal bands in cream and white, leaving small gaps. In one gap, add two yellow dots with tiny black pupils.
Best occasion: Casual costume parties and family activities.
Practical tip: Mix two slightly different whites for realistic depth.
16. Molten Chrome & Obsidian
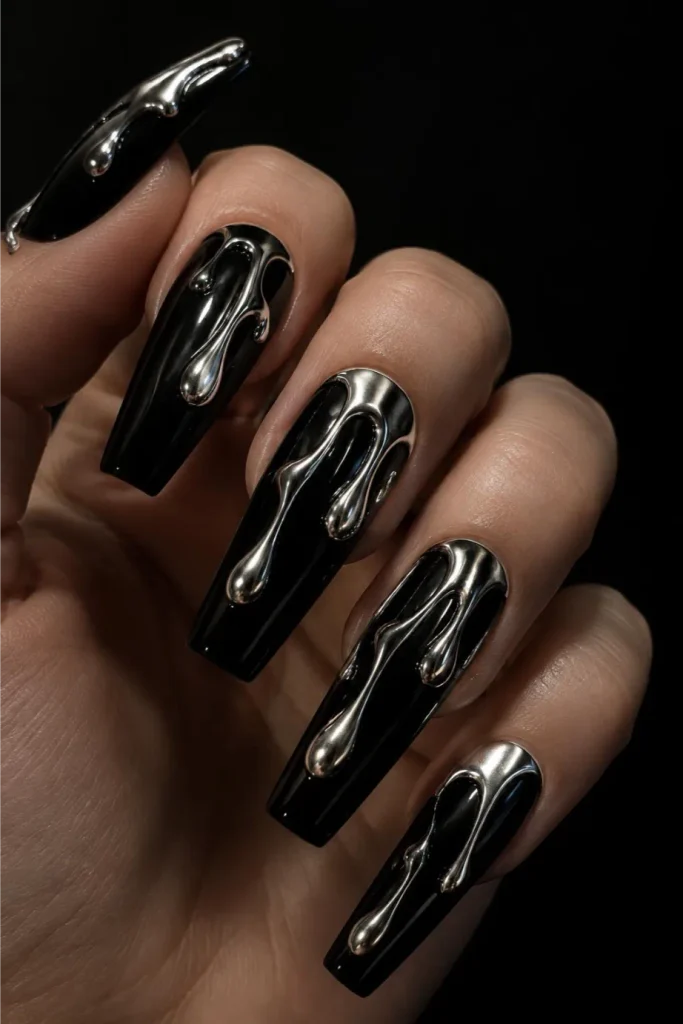
Dark-fantasy nails with liquid-metal drips on a black base.
Visual description: Glossy black nails with raised, dripping pools of mirror silver chrome.
Best nail length: Medium to long.
Best nail shape: Almond, coffin, or stiletto.
Color combination: Obsidian black and silver chrome.
Difficulty level: Advanced (requires builder gel and chrome powder).
How to recreate it: Apply black gel and cure. Use thick clear builder gel to sculpt 3D drips or molten waves on top, then cure. Coat only the raised gel with no-wipe top coat and cure. Rub chrome powder onto those drips. It sticks only where there is a cured no-wipe layer. Wipe stray powder off the black with a lint-free wipe, then seal the black areas with a regular top coat.
Best occasion: High-fashion looks, gothic raves, modern vampire costumes.
Practical tip: Keep the no-wipe layer off the black base, or the chrome will cling everywhere.
17. Matte Black & Glossy French Tip Contrast

Monochrome elegance built purely on texture.
Visual description: Pitch-black matte nails with a thin glossy black French tip.
Best nail length: Any length.
Best nail shape: Square, squoval, or almond.
Color combination: Black in two finishes.
Difficulty level: Beginner.
How to recreate it: Apply two coats of black and a matte top coat. Once dry, tape off or freehand a thin tip line and paint only that edge with glossy top coat.
Best occasion: Professional settings and chic evening events.
Practical tip: Apply the gloss generously so the contrast shows in indoor lighting.
18. Haunted Forest Silhouette
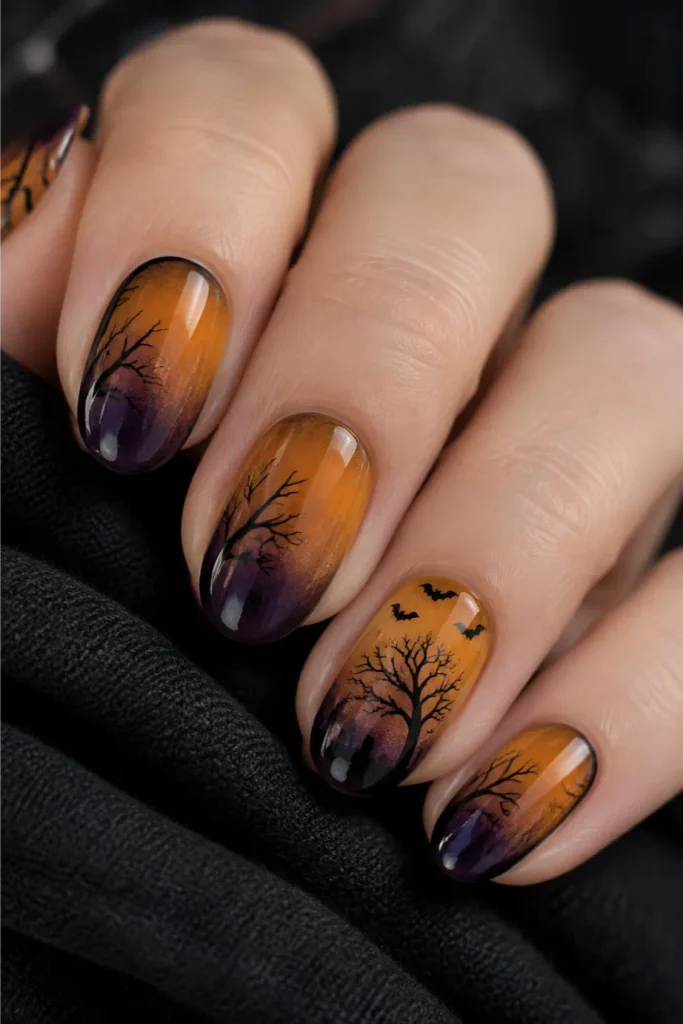
A storybook scene of bare trees and bats at twilight.
Visual description: A soft amber-to-grey-violet gradient with black twisted branches and a few tiny flying bats.
Best nail length: Medium.
Best nail shape: Oval or almond.
Color combination: Amber, smoky lilac, black.
Difficulty level: Intermediate.
How to recreate it: Sponge a soft yellow-to-lilac gradient onto the nail. With a thin liner brush and black paint or polish, draw a vertical trunk and flick thin branches outward. On an accent nail, add two or three tiny “W” shapes for bats.
Best occasion: Fall festivals and seasonal photo shoots.
Practical tip: Black craft acrylic paint is easier to control than polish for fine branches. Let it dry fully before sealing.
19. Blood Spatter Splatter Nails
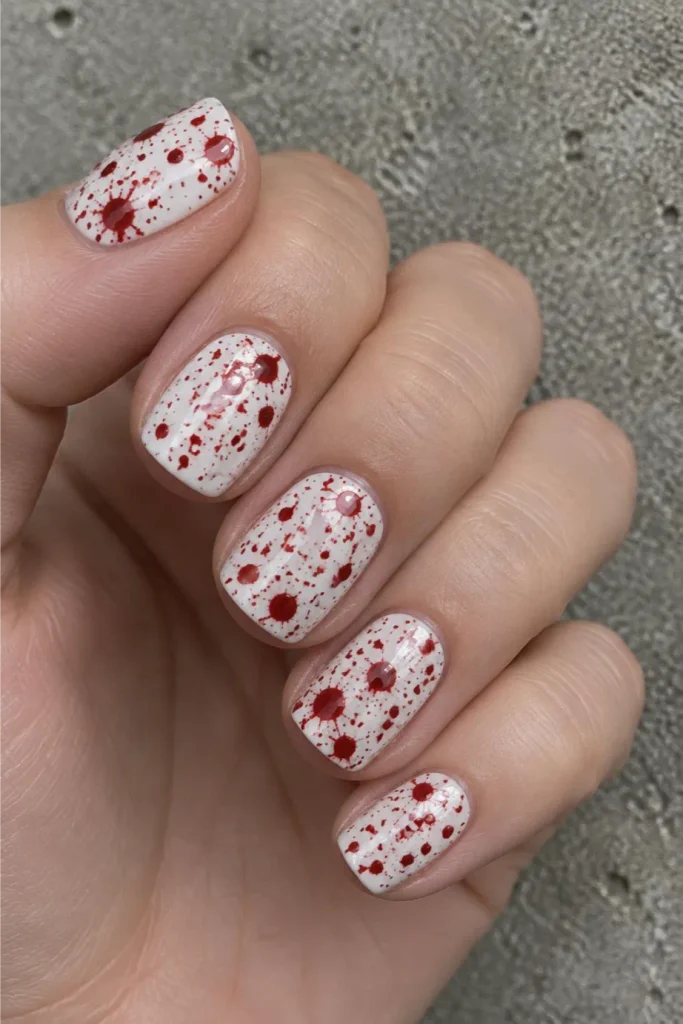
A high-impact horror look with dynamic droplet patterns.
Visual description: A chalk-white or stone-grey base covered in irregular crimson speckles.
Best nail length: Short to medium.
Best nail shape: Short square or squoval.
Color combination: Chalk white and deep oxblood red.
Difficulty level: Beginner (messy but easy).
How to recreate it: Apply two coats of white and protect the skin with tape or peel-off latex. Dip a plastic straw in runny red polish, hold it 1–2 inches above the nail, and blow sharply to spray fine droplets. Seal once dry.
Best occasion: Zombie crawls, slasher movie nights, and haunted houses.
Practical tip: Work in a well-ventilated space, cover your table, and consider wearing safety glasses. Practice on paper first to judge droplet size.
20. Glow-in-the-Dark Boos
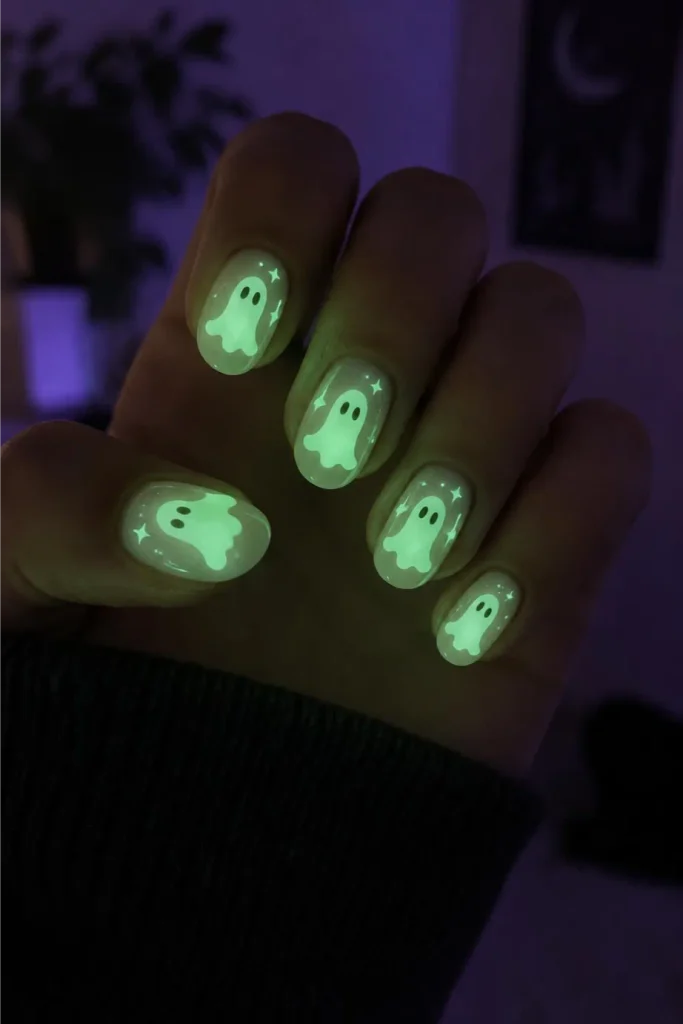
A hidden surprise that looks calm by day and glows after dark.
Visual description: Pastel lavender or nude nails by day, with ghosts and tiny stars that glow neon green in the dark.
Best nail length: Short to medium.
Best nail shape: Any shape.
Color combination: Pale lilac or sheer nude, turning lime green in the dark.
Difficulty level: Beginner.
How to recreate it: Paint your base color. Draw ghost shapes with glow-in-the-dark polish, and add a few tiny dots or stars around them. Layer two to three thin coats of glow polish for the strongest effect.
Best occasion: Night trick-or-treating, haunted houses, and glow parties.
Practical tip: “Charge” your nails under a flashlight or lamp for 30 seconds before going into the dark.
Halloween Nail Design Comparison
| Design | Skill Level | Best Length | Finish | Time (At Home) |
|---|---|---|---|---|
| Floating Ghost French Tips | Beginner | Short to Medium | Glossy | 25–35 min |
| Velvet Midnight Cat Eyes | Intermediate | Any | Magnetic Shimmer | 30–45 min |
| Spiderweb Accent Tips | Intermediate | Short to Medium | Glossy | 30–40 min |
| Matte Vampy Ombré | Intermediate | Medium to Long | Matte | 35–45 min |
| Micro Pumpkin Polka Dots | Beginner | Very Short to Short | Glossy | 20–30 min |
| Tortoiseshell & Black Negative Space | Intermediate to Advanced | Medium | Glossy | 45–60 min |
| Drip French Tips | Beginner to Intermediate | Medium to Long | Glossy | 30–40 min |
| Gothic Lace Stamping | Intermediate | Any | Glossy or Satin | 25–35 min |
| Celestial Witching Hour | Beginner to Intermediate | Short to Medium | Glossy with Metallic | 25–35 min |
| Cute Candy Corn Accents | Beginner | Short to Medium | Glossy | 30–40 min |
| Pearlescent Glazed Skeleton Hands | Advanced | Medium to Long | Chrome Pearl | 50–70 min |
| Matte Beetlejuice Stripes | Intermediate | Short to Medium | Matte | 35–45 min |
| Minimalist Jack-o’-Lantern Smile | Intermediate | Short | Glossy | 25–35 min |
| Black Widow Red Hourglass | Intermediate | Medium | Glossy | 30–40 min |
| Mummy Bandage Negative Space | Beginner | Short to Medium | Matte or Satin | 25–35 min |
| Molten Chrome & Obsidian | Advanced | Medium to Long | 3D Mirror Chrome | 50–65 min |
| Matte Black & Glossy French Tip | Beginner | Any | Matte & Gloss | 20–30 min |
| Haunted Forest Silhouette | Intermediate | Medium | Glossy | 40–50 min |
| Blood Spatter Splatter | Beginner | Short to Medium | Glossy | 25–35 min (plus cleanup) |
| Glow-in-the-Dark Boos | Beginner | Short to Medium | Luminescent | 20–30 min |
Best Colors for Different Skin Tones
- Fair skin: Deep oxblood, navy, and smoky lilac create striking contrast. Bright neon can look harsh, so soften it with a sheer base.
- Medium and olive skin: Amber, burnt orange, and emerald shimmer look rich, and gold accents glow against the skin.
- Deep skin: Chalk white, neon lime, bright orange, and metallic silver pop beautifully, and high-contrast designs like Beetlejuice stripes and ghost tips look especially bold.
Tips for Long-Lasting Halloween Manicures
Regular Polish vs. Gel Polish
- Regular polish dries by air. It is easy to change and remove. Never put it under a UV/LED lamp, since the lamp doesn’t speed up its drying.
- Gel polish hardens only under a UV/LED lamp. It is ideal for fine art such as skeleton bones or spiderwebs, because you can flash-cure each layer for 10–30 seconds so lines don’t spread.
- Removal: Never peel or scrape off gel polish or press-ons. Peeling pulls off layers of the natural nail. Soak with acetone until the product slides off gently.
Preparation Essentials
- Dehydrate the nail plate: Wipe nails with 90%+ isopropyl alcohol before the base coat. Natural oils and lotion are a common cause of early chipping.
- Use detail brushes: Stock polish brushes are too wide for fine art. A cheap set of 00 or 000 liner brushes gives you real control.
- Cap the free edge: Run each coat across the very tip of the nail to seal it against moisture.
Manicure Cost Breakdown: DIY vs. Salon
| Expense | DIY At Home | Professional Salon |
|---|---|---|
| Basic set | $15 – $35 (reusable supplies) | $45 – $75 (standard gel manicure) |
| Hand-painted art | $5 – $15 (brush set, dotting tools) | $6 – $40 (about $3–$10 per accent nail, usually 2–4 nails) |
| Specialty powders or magnets | $8 – $16 | $15 – $30 (chrome or cat-eye upgrade) |
| Total estimate | $28 – $66 initial investment (tools last 8–10+ sets) | $66 – $145+ per set (plus tip) |
Salon prices vary by location, artist experience, nail length, and whether you’re working over natural nails or extensions. DIY costs reflect one-time tool purchases that serve many manicures.
Frequently Asked Questions
Can I recreate these Halloween nail designs on very short natural nails?
Yes. Floating Ghost French Tips, Micro Pumpkin Polka Dots, Minimalist Jack-o’-Lantern Smiles, and Matte & Glossy Black French all look proportional on short, natural nails. Keep lines delicate and scale motifs down so they don’t overwhelm a small nail bed.
How do I stop nail art from smearing when I apply top coat?
Let hand-painted regular polish art air-dry for at least 10 minutes. Thicker art can need longer. Use a generous bead of top coat and float the brush over the surface without dragging the bristles through the design.
What is the easiest Halloween design for a total beginner?
Micro Pumpkin Polka Dots and Floating Ghost French Tips are the easiest. Both rely on simple dotting with a dotting tool or toothpick and need no fine freehand linework.
Can I mix regular polish and gel polish in one design?
Don’t put air-dry polish under gel unless it has dried for 24 hours, because trapped solvents can make the gel bubble or peel. A safer approach is to cure a gel base, paint your art in regular polish, and finish with a regular (not gel) top coat.
Conclusion
Halloween nail art doesn’t have to feel intimidating or cost a fortune at the salon. From toothpick-dotted ghosts to high-glam chrome and velvet cat eyes, there’s a spooky set for every skill level and nail length. Pick a moody base shade, practice the linework on one accent nail, and wear your custom set all October long.
Save your favorite design to your Pinterest board so you have it ready when your next manicure appointment comes around.