
Short nails get skipped over more often than they should when people search for a manicure that looks pulled together and pricey.
The truth is a lot of what makes an expensive-looking set work has nothing to do with length. It’s one gold hairline instead of five, a marbled swirl instead of a busy pattern, restraint over more.
This roundup pulls together 30 short nail designs ideas that borrow directly from what’s actually working on real hands right now: hand-painted florals sized down to fit a smaller canvas, chrome and glazed-glass finishes that do all the talking, tiny pearl clusters, and color-blocked splits with a razor edge.
Every idea here fits a short nail bed without losing any of the polish. Scroll through and find the one worth booking next.
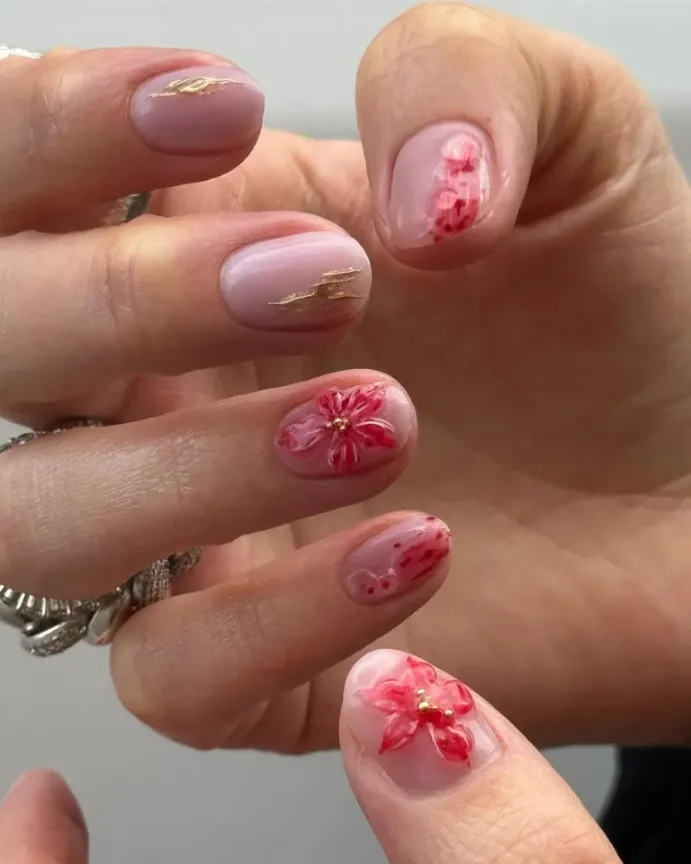
1. Mix Mauve-and-Gold-Foil Nails With Hand-Painted Berry Blooms
@chummy.nails)
This set skips a single polish color and treats each nail like its own small canvas.
Two nails get a soft mauve-taupe base with a crackled swipe of gold foil across the tip, so the metallic reads unplanned rather than lined up in a neat strip.
The rest stay barely-there sheer pink, one left almost plain, one dotted with fine red ink speckles like a berry stain, and two carrying a hand-painted five-petal flower with a tiny gold bead at its center.
Nothing here needs rhinestones or a full-set appointment to feel special, just a fine detail brush and a steady hand for the flower.
Recreate this look
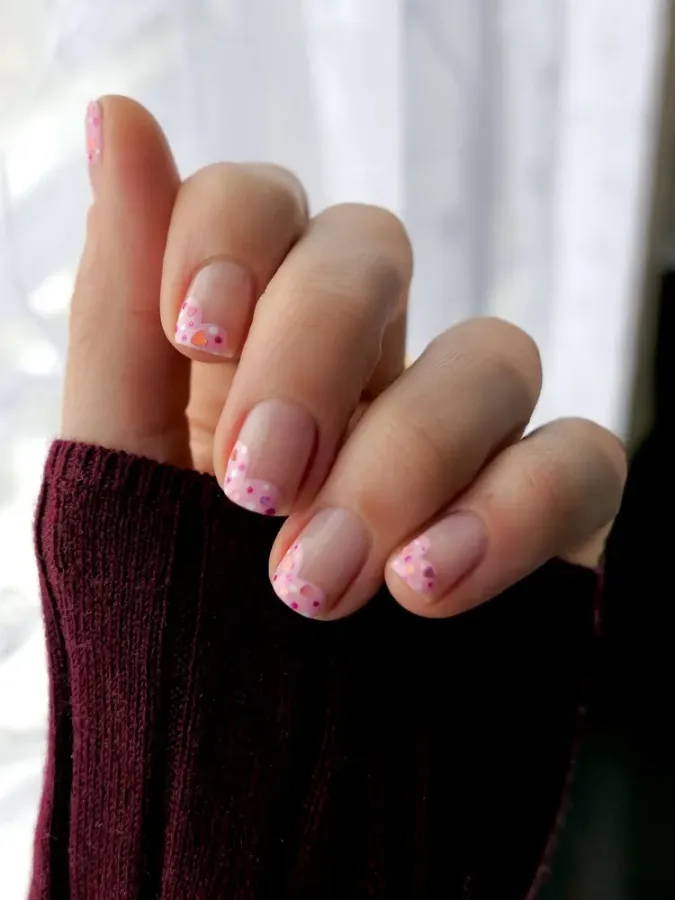
2. Swap the Straight French Line for a Scalloped Confetti Tip
@danaturenails
Short square nails get a subtle upgrade here just by changing the shape of the tip. Instead of a flat white line, the edge curves into a soft rounded scallop, almost heart-shaped at the center, before it gets sprinkled with tiny hand-dotted confetti in pink, magenta, and a touch of orange.
- Keep the nude base sheer so the confetti stays the focal point
- Curve the white tip into a gentle scallop, not a straight line
- Add confetti dots only inside the white area, not across the whole nail
- Vary dot sizes slightly so it looks scattered, not stamped
At-home nail artists can do this with just a striping brush and a dotting tool, no salon visit required.
📌 Good To Know
A curved scalloped edge reads more expensive than a razor-straight French line because it looks hand-shaped rather than machine-perfect.
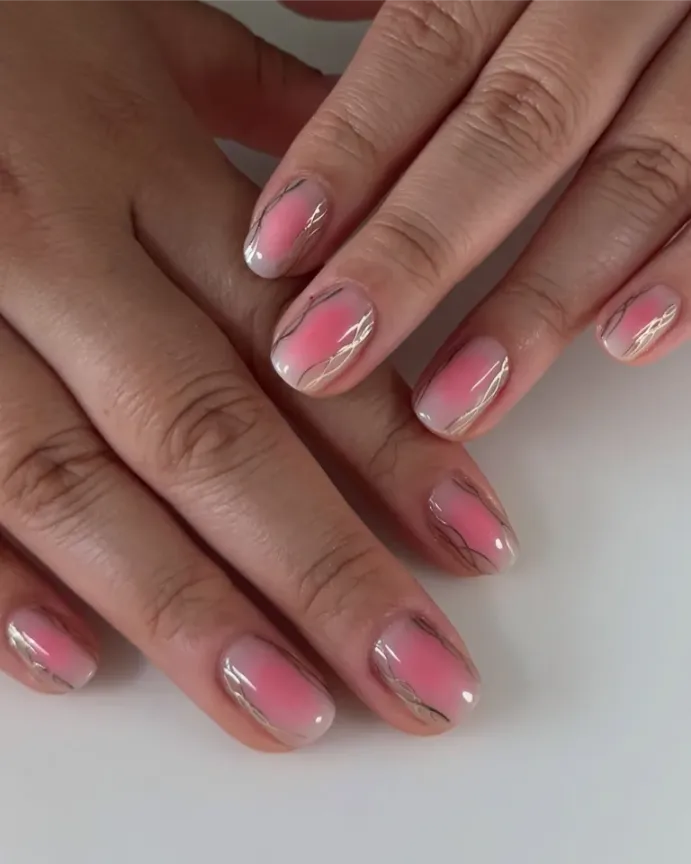
3. Layer Metallic Thread Lines Over a Blush Cloud Center
@diananailedit)
Pink that pools in the middle of the nail and fades into a nearly bare edge reads more like an airbrushed finish than a regular polish job. Getting it right takes a bit of sequencing:
- Apply a sheer nude or clear base first and let it cure or dry completely
- Blend a soft pink gradient into the center of the nail only, feathering the edges outward until it disappears
- Once that layer sets, drag fine gold thread lines diagonally across the nail in a loose, uneven pattern
Skip this one if you’re not steady with a striping brush, the thin gold lines are the part that makes or breaks the look.
4. Go All-In on One Solid Mirror-Chrome Shade Across Every Nail
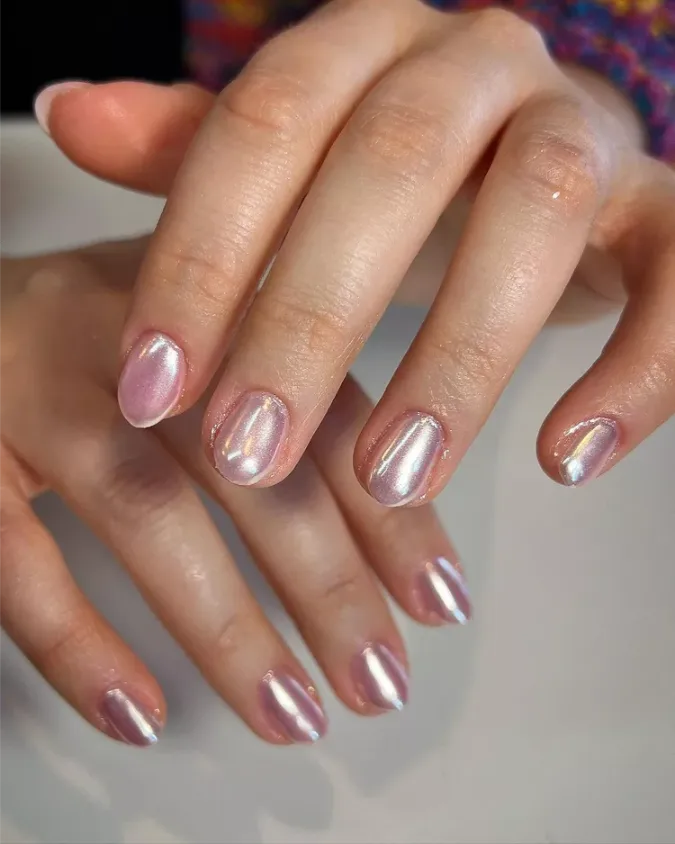
@nails_by__bridgett
Sometimes the most expensive-looking manicure has zero extra art on it at all.
Every nail here carries the same dusty mauve-lilac chrome, buffed to a mirror finish that catches light differently depending on the angle.
Getting that reflective quality means the base has to be flawlessly smooth first, any bump or ridge shows through a chrome powder.
Watch out: skipping the buffing step is the most common reason chrome nails end up streaky instead of glassy.
One flawless finish across every nail reads far more polished than five competing designs.
5. Let Curved Pastel Shapes Overlap Instead of Lining Up
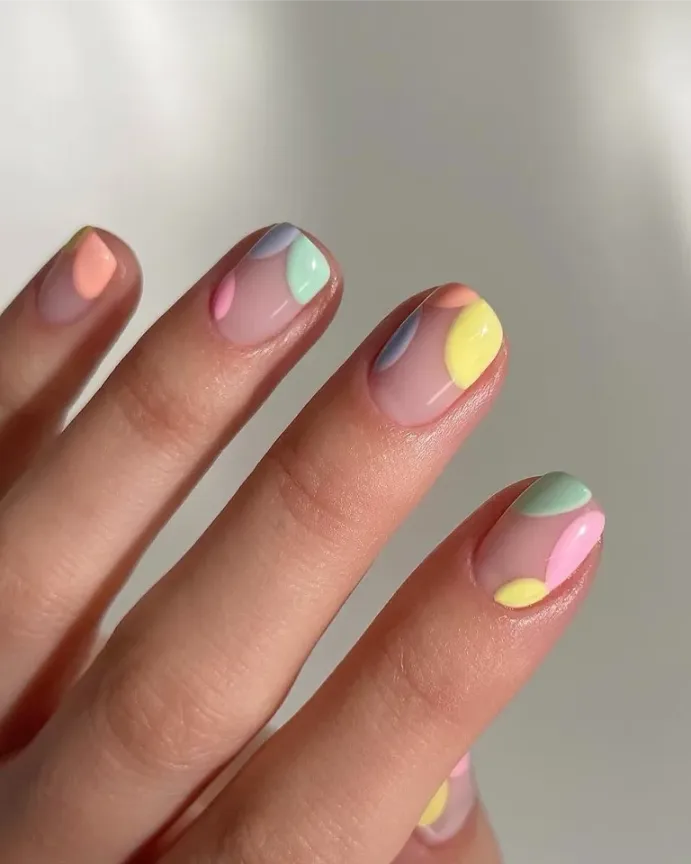
@paintbyjaz)
Five soft colors sit on this set, but none of them behave like a normal French tip or full-coverage polish.
Each nail gets two or three organic, petal-like blobs in different pastel shades that overlap right where they meet, leaving slivers of bare nail peeking through.
No nail repeats the same color combination, which is what keeps the whole hand from looking matched-set boring.
Freehand this only if you already trust your brush control, the overlap is what sells it, and a shaky edge flattens the whole effect.
6. Keep the Tip Thin and Let One Small Flower Do the Talking
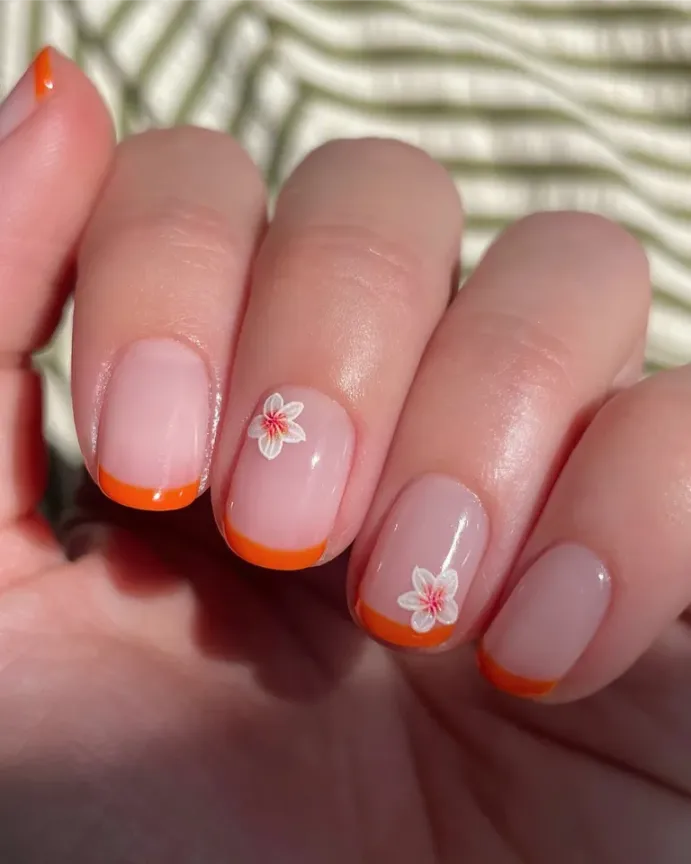
@paintbyjaz)
A bright citrus orange line only works when it stays thin, almost like it was drawn with a fine marker rather than painted with a brush.
Two nails carry that same orange edge plus a single small white flower placed mid-nail instead of tucked at the base, which keeps the eye moving without crowding the design.
Keep the tip line under 2mm thick for a crisp, hand-drawn look
Place the flower off-center, not lined up at the cuticle
Painting a thick, solid orange band across the whole tip
Repeating the flower on every single nail
7. Trace a Fine Black Outline Around a Sheer Mocha Wash
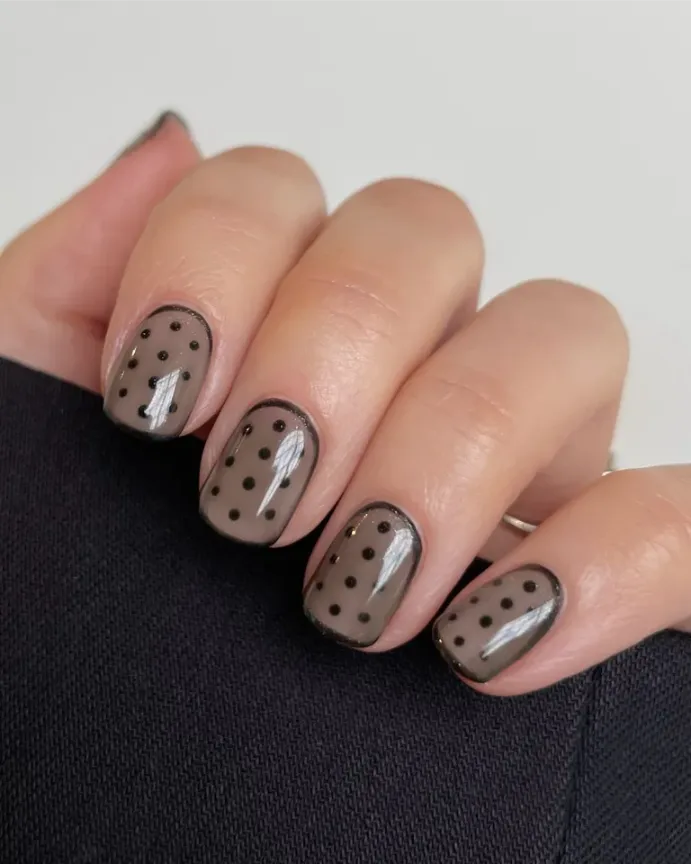
@paintbyjaz)
Black polka dots feel almost playful until they get paired with a hand-drawn outline that hugs the whole nail edge, not just the tip.
That border is what turns a soft mocha wash into something that looks framed on purpose, like the nail was sketched before it was polished.
The dots sit loosely inside the outline, no grid, no even spacing, just scattered the way freckles fall.
Apply a sheer mocha-taupe wash as the base across the full nail
Trace a thin black line around the entire nail edge once dry
Scatter black dots inside the outline at random, varying the size
8. Trade a Solid Color for a Full Tortoiseshell Print
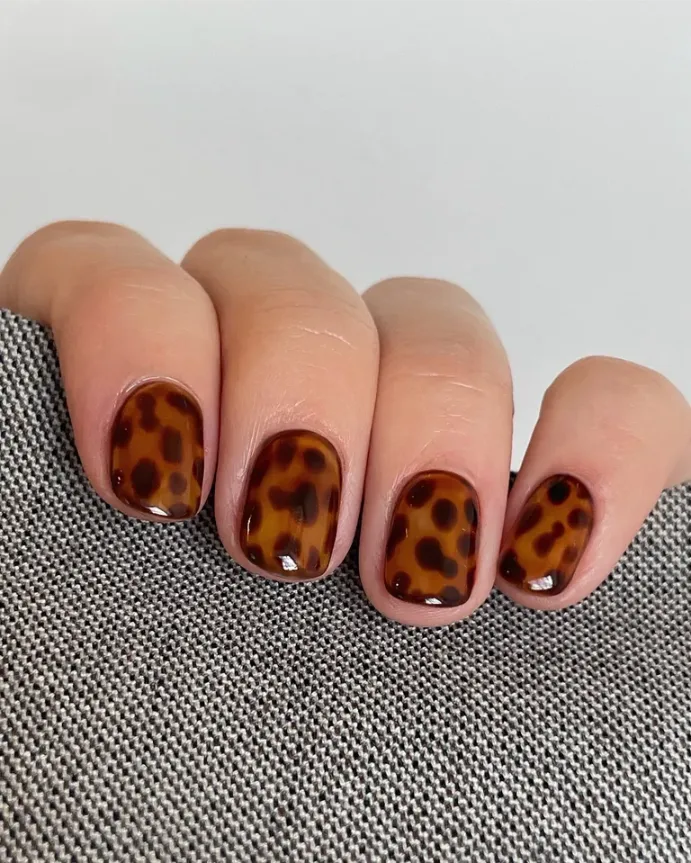
@paintbyjaz)
Amber and black blotches layered close together give this manicure the look of stained glass more than nail polish.
Every nail carries the exact same tortoiseshell pattern rather than swapping in a plain color on some fingers, which is what makes it read as one deliberate print instead of a random mix.
A plain solid amber or brown polish, flat and one-note
Layered blotches of amber, chestnut, and black under a glossy top coat
Watch out: the blotches need irregular shapes and sizes, evenly spaced spots will look more like a giraffe print than tortoiseshell.
9. Paint Tiny Citrus Fruit Instead of a Full Floral Spray
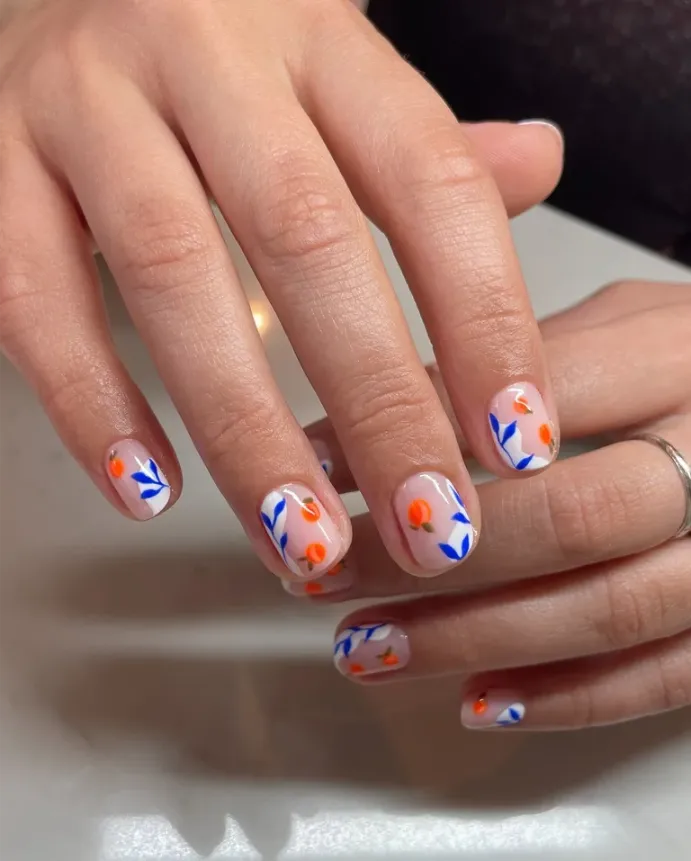
@paintbyjaz)
Cobalt blue leaves and small orange fruit dots take up less than a third of the nail here, tucked into one corner and trailing diagonally rather than centered.
That restraint is the whole trick, the motif reads clearly at a glance instead of blurring into a busy mess the way a full-nail floral often does.
- Sketch the leaf shapes in white first, then layer thin cobalt blue lines over half of each one
- Dot in small solid-orange circles as the fruit, two or three per nail is enough
- Angle the whole motif diagonally from one corner, never dead center
- Leave at least half the nail bare so the design has room to breathe
- ▸White base leaves layered with thin cobalt blue outlines
- ▸Small solid orange dots as citrus fruit, two to three per nail
- ▸Motif angled from one corner, leaving the rest of the nail bare
10. Reserve the Line Art for Just One Nail, Keep the Rest Solid
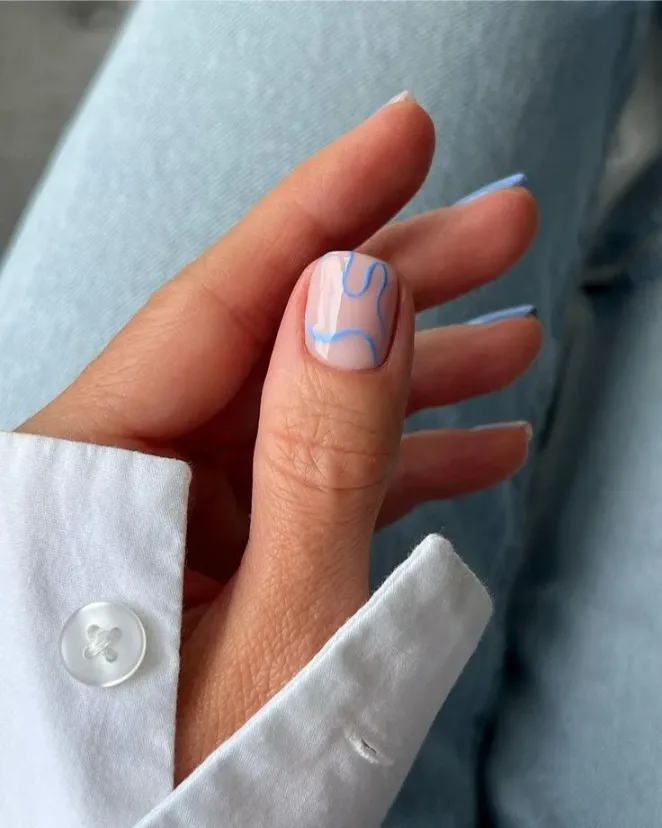
Two shades of the same blue family split this set in half without ever feeling mismatched. Every nail but one carries a flat, solid pale blue, calm and uniform.
That one holdout gets a sheer nude base instead, with a single continuous wavy line looping across it in a slightly deeper cornflower blue, never lifting the brush until the shape closes.
| Accent Nail | Rest of the Set |
|---|---|
| Sheer nude-pink base | Solid pale blue polish |
| One continuous wavy line, hand drawn | No design, flat color only |
One nail carries all the personality, the rest just hold the color steady.
11. Save the Cherry Motif for Just One Nail in a Sea of Red
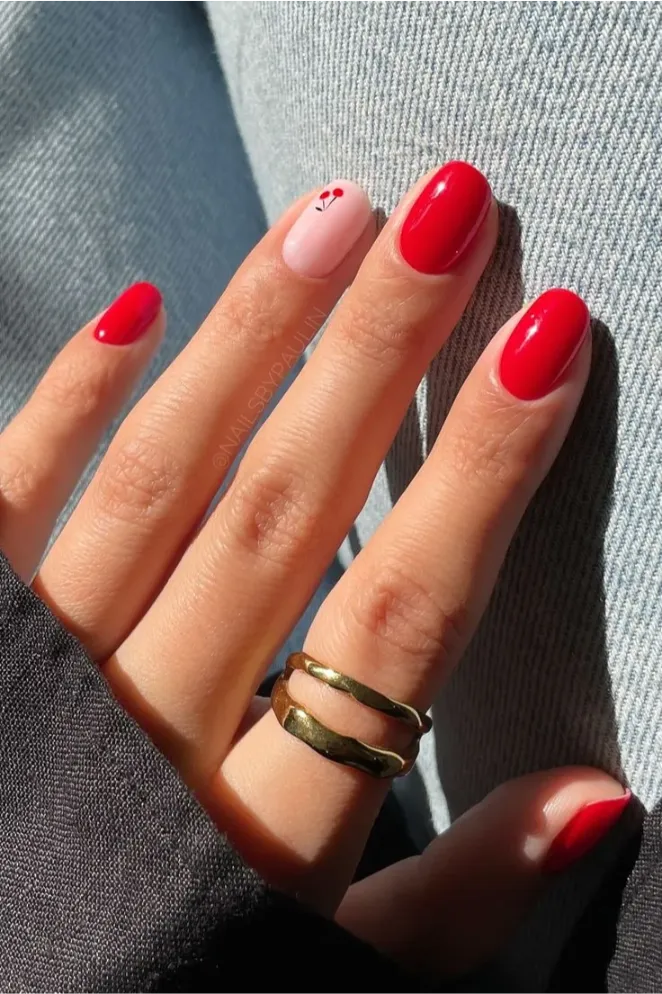
A near-neon red polish covers most of this set with a glass-like shine, but one nail breaks the pattern completely.
It swaps to a soft pale pink base and gets a tiny painted cherry pair, just two small round dots joined by a thin stem, small enough that it reads more like a signature than a centerpiece.
💡 Quick Tip
Keep the cherry pair small and centered on just one nail, the contrast against a full set of red is what makes it feel intentional instead of busy.
12. Choose a Shimmer That Shifts Color Instead of One Flat Tone
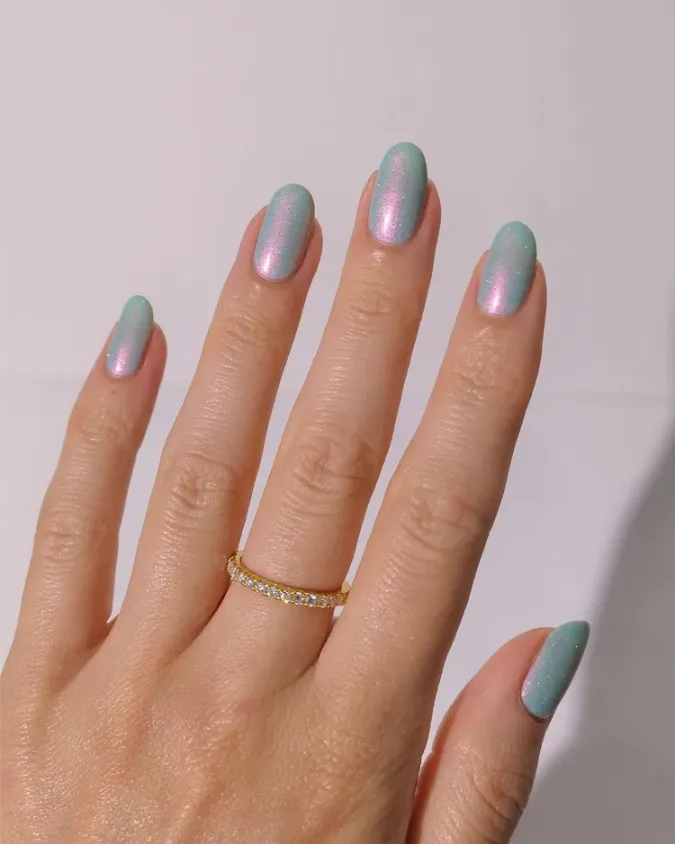
@danaturenails
A polish that looks sage green head-on and flashes soft pink-lilac at an angle does more visual work than any hand-painted design could.
Every nail here wears the same duochrome shimmer, fine glitter mixed into the formula so it catches light in tiny sparks rather than one solid mirror sheen.
The effect depends entirely on movement, still under one light it reads muted, tilt the hand and the pink comes through.
13. Alternate Two Solid Jelly Tones Instead of Picking One Color
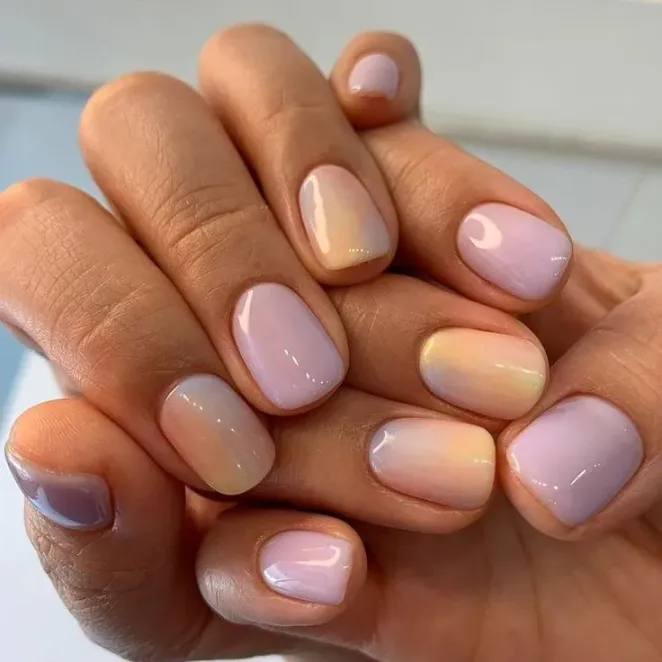
Ten nails, two colors, zero repeats side by side. Lavender and a soft honey-gold trade off from finger to finger, each one a flat jelly-glaze shade with a wet-look shine instead of a matte or shimmer finish.
The trick is in the placement, no two neighboring nails share a color, so the hand reads as a pattern rather than a random mix.
💡 Quick Tip
Map out the color order on both hands before painting so no two side-by-side nails match, that’s what makes the alternating pattern read as intentional.
14. Add One Tiny Gold Star Instead of a Full Design
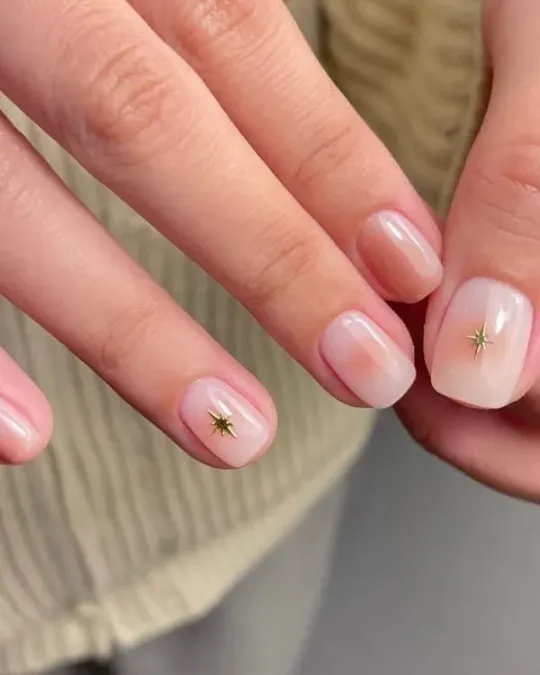
Sheer peach pooling softly near the base and fading out before it reaches the tip gives this set its warmth, no visible line, no obvious masking involved.
Two nails add a single tiny gold star charm pressed just off-center, small enough to catch light rather than announce itself.
Every other nail stays completely bare of any add-on, so the quiet aura wash carries the whole look on its own.
Skip the charm on more than two nails, that’s the difference between a subtle accent and a set that starts looking busy.
15. Rotate the Flower Color Instead of the Flower Shape
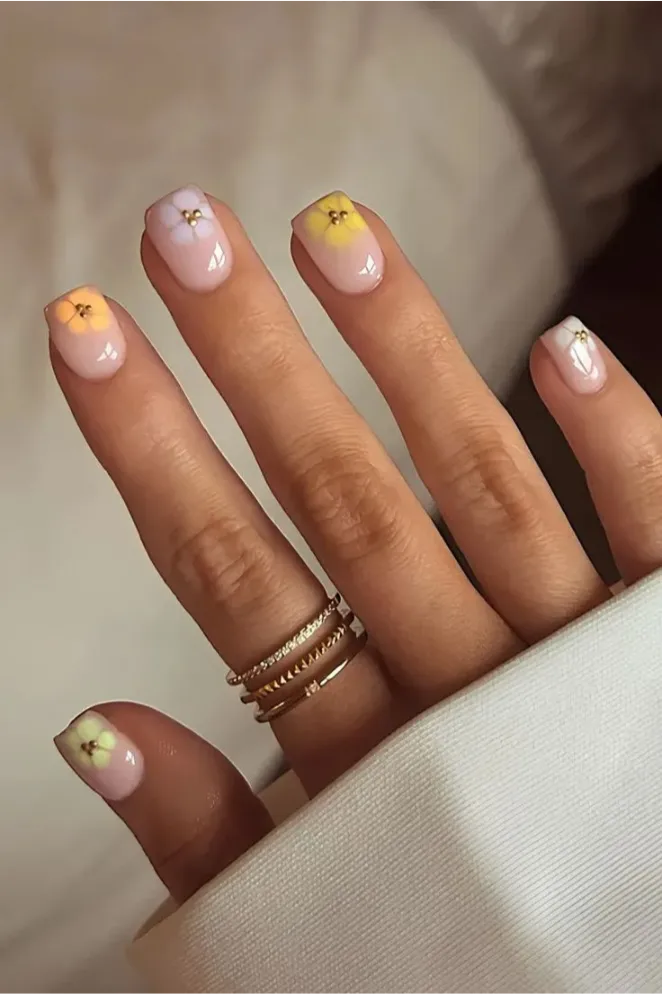
Purple, yellow, and soft green-yellow blooms take turns across this set, but the shape stays identical every time, four small petals meeting at a gold bead center, sitting right at the cuticle line like it grew there.
Keeping the flower shape locked while the color shifts nail to nail is what makes ten different nails still feel like one cohesive set instead of a grab bag of ideas.
A bare sheer nude nail with no focal point
One cuticle-line flower with a gold bead center, color rotating each nail
16. Trade the Round Fruit Dot for an Angled Lemon Wedge
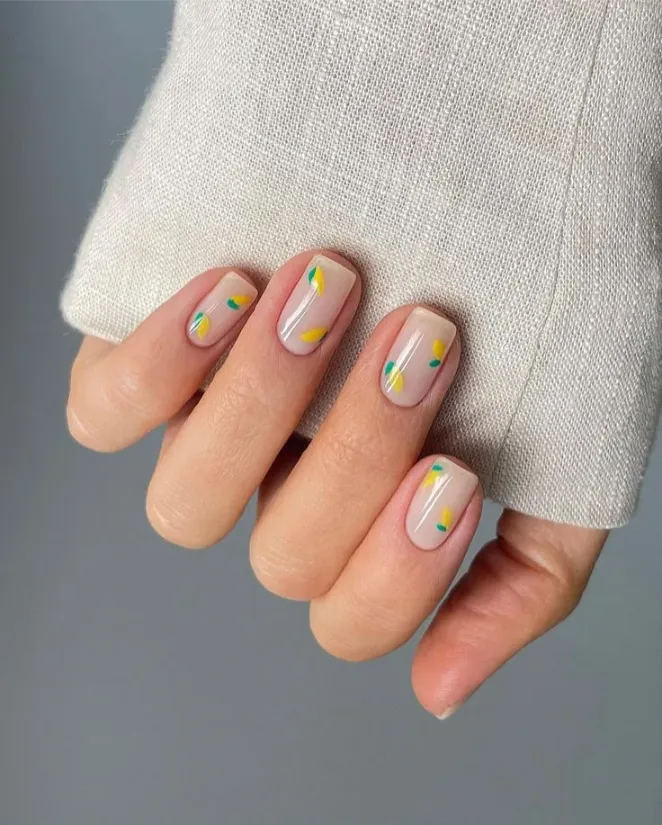
A wedge shape reads completely different from a round fruit dot, even in miniature.
This set skips the citrus circle from earlier ideas and paints a small yellow triangle instead, angled like a lemon slice caught mid-fall, with one narrow green leaf tucked beside it rather than trailing below.
- Base the whole nail in a warm beige-nude, slightly deeper than a sheer pink
- Paint a small yellow triangle wedge shape on one side of the nail, tip pointing toward the cuticle
- Add a single narrow green leaf beside the wedge, angled the same direction
Base the nail in a warm beige-nude, slightly deeper than sheer pink
Paint a small yellow triangle wedge, tip angled toward the cuticle
Add one narrow green leaf beside the wedge, matching its angle
17. Curve a Row of Shrinking Dots Along the Side, Not the Tip
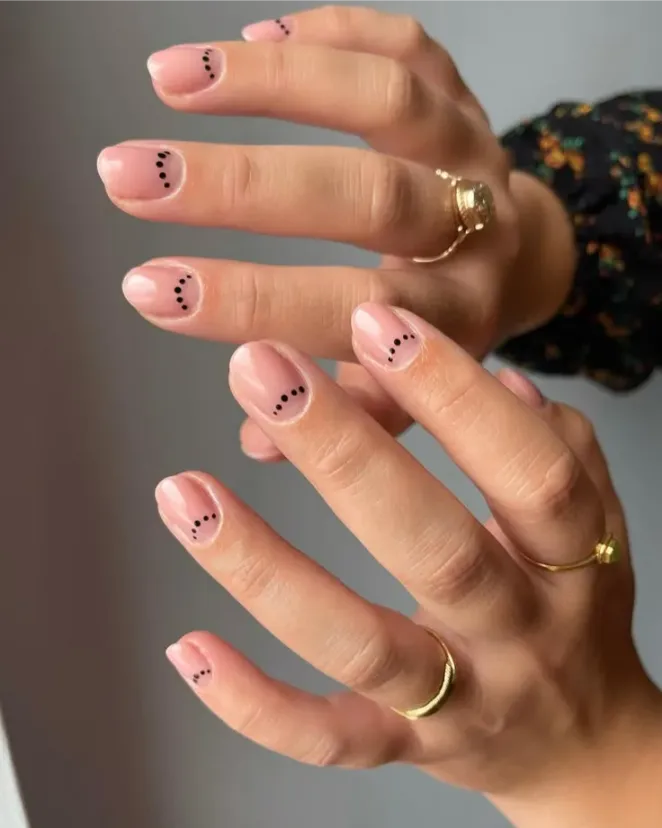
Most dotted nail art lines up along the tip, but this one runs the dots down one side edge instead, following the natural curve of the nail from base toward the corner.
Each dot gets slightly smaller than the last, five or six in total, so the row tapers off rather than stopping abruptly.
The rest of the nail stays completely bare and glossy, letting that one curved line be the only thing the eye catches.
- Start with the largest dot near the cuticle, close to the side edge
- Add each following dot slightly smaller, following the nail’s natural curve
- Stop the row before it reaches the halfway point of the nail
- Leave the rest of the nail bare, no other dots or lines
- ▸Largest dot near the cuticle, tucked close to the side edge
- ▸Each following dot shrinks slightly, curving with the nail’s edge
- ▸Row stops before the halfway mark, rest of the nail left bare
18. Draw the Whole Motif in Outline, Never Fill It In
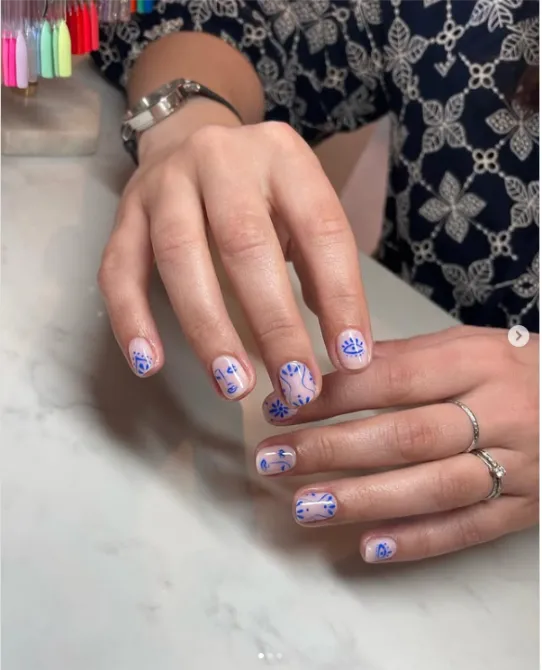
@paintbyjaz
Every nail on this hand carries its own small blue sketch, a curling vine here, a single flower there, but none of them get filled in with solid color.
The blue stays as a fine, continuous line the entire time, more like a porcelain pattern than a painted illustration.
That restraint is what keeps ten different sketches from turning into visual noise, since there’s no block of color competing for attention.
- Sketch each motif freehand in one continuous blue line, no fill
- Let the shape vary nail to nail, a vine on one, a small bloom on the next
- Keep the base sheer enough that skin tone shows through around the linework
- Center each sketch rather than pushing it to one edge
- ▸One continuous cobalt-blue outline per nail, no color fill
- ▸Motif shape changes nail to nail, vine, bloom, or curling stem
- ▸Sheer nude base left visible around the linework
19. Cluster the Pearls Into Small Triangles Instead of Scattering Them
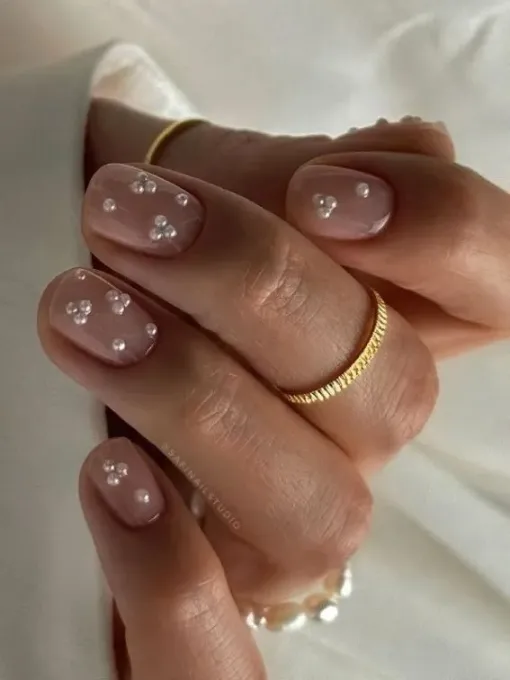
A handful of tiny pearls placed randomly across a nail can look accidental, but grouping three or four of them into a tight triangle shape reads as deliberate jewelry instead.
This set keeps the base a flat mauve-nude, no shimmer or shine competing for attention, so the clustered pearls sit like a small brooch pinned near the center of each nail rather than scattered edge to edge.
💡 Quick Tip
Group the pearls within a half-inch of each other, spacing them out flattens the cluster effect and just looks scattered.
20. Paint One Oversized Heart Instead of a Tiny One
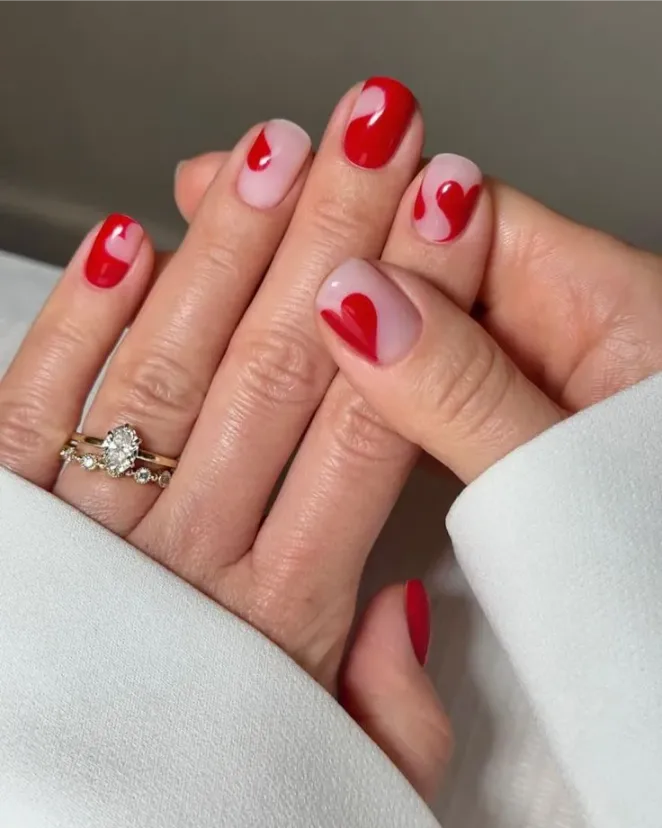
Most heart nail art shrinks the shape down to a small charm-sized accent, but this set does the opposite.
On the nude nails, a single red heart takes up nearly half the nail, drawn slightly lopsided and organic rather than perfectly symmetrical, so it reads hand-painted instead of stamped.
The rest of the set fills in with plain glossy red, no pattern, which gives the oversized hearts room to stand out instead of competing with more art.
Draw the heart slightly asymmetric, one side fuller than the other
Let it cover close to half the nail, not a tiny corner accent
Making it perfectly symmetrical, that reads stamped, not hand-drawn
Adding a heart to every single nail, it needs the plain red to contrast against
21. Trade Glossy Shine for a Milky Glazed Glass Finish
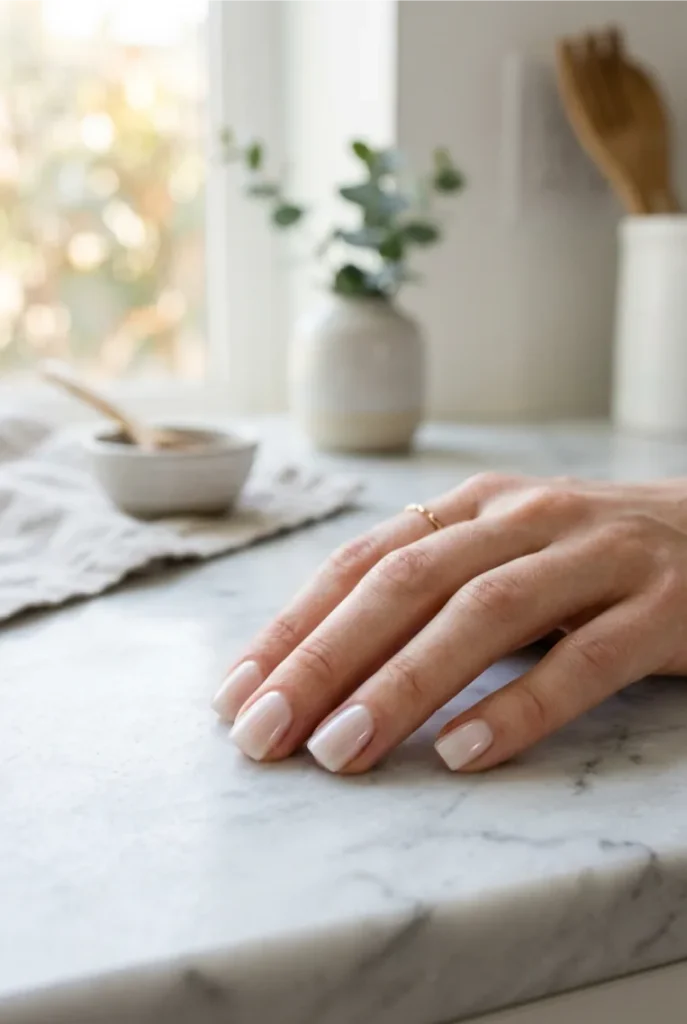
Regular top coat makes nails look wet for a second and then flat.
A glazed finish does something different, it stays semi-opaque and milky, closer to frosted glass than polish, so light diffuses through it instead of just bouncing off the surface.
No color, no art, just the texture doing the work.
A flat, opaque polish with a single glossy top coat
A milky, semi-sheer glaze that reads soft and frosted, closer to glass than paint
22. Pull a Silver Streak Through a Deep Espresso Magnetic Polish
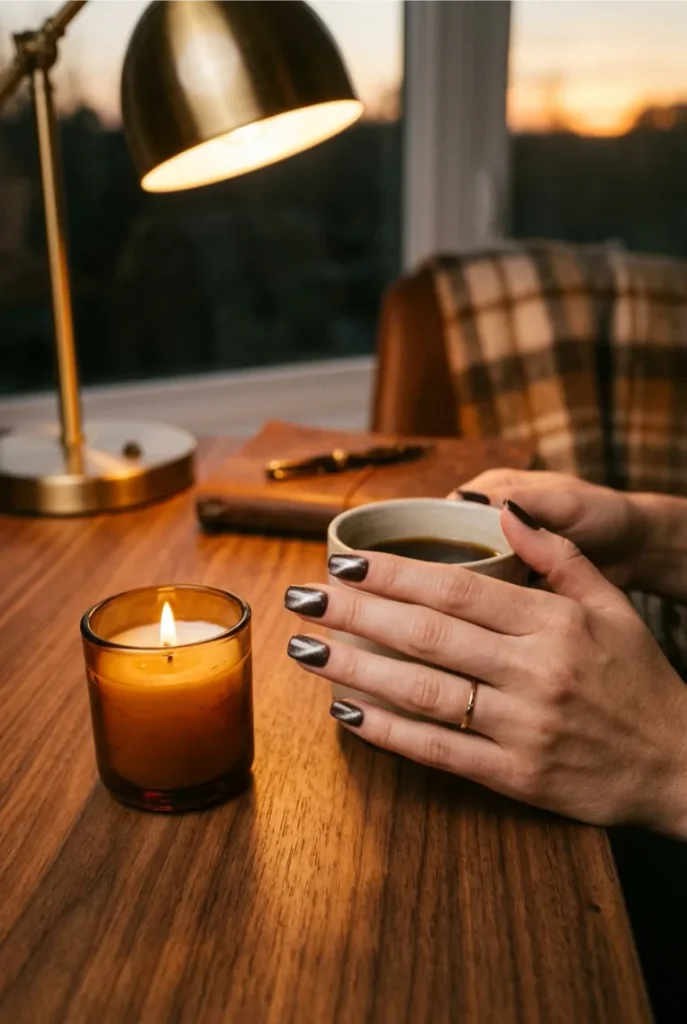
Magnetic polish works differently than any other finish on this list, the shine isn’t fixed, it’s shaped.
A rich espresso-brown base holds tiny metallic particles that a magnet pulls into one moving band of silver light before the polish cures.
Apply the magnetic espresso-brown polish evenly, keep it wet
Hold the magnet just above the surface, angled diagonally
Let the streak set for a few seconds, then cure under UV light
23. Trace Only the Cuticle Line With Baguette-Cut Rhinestones
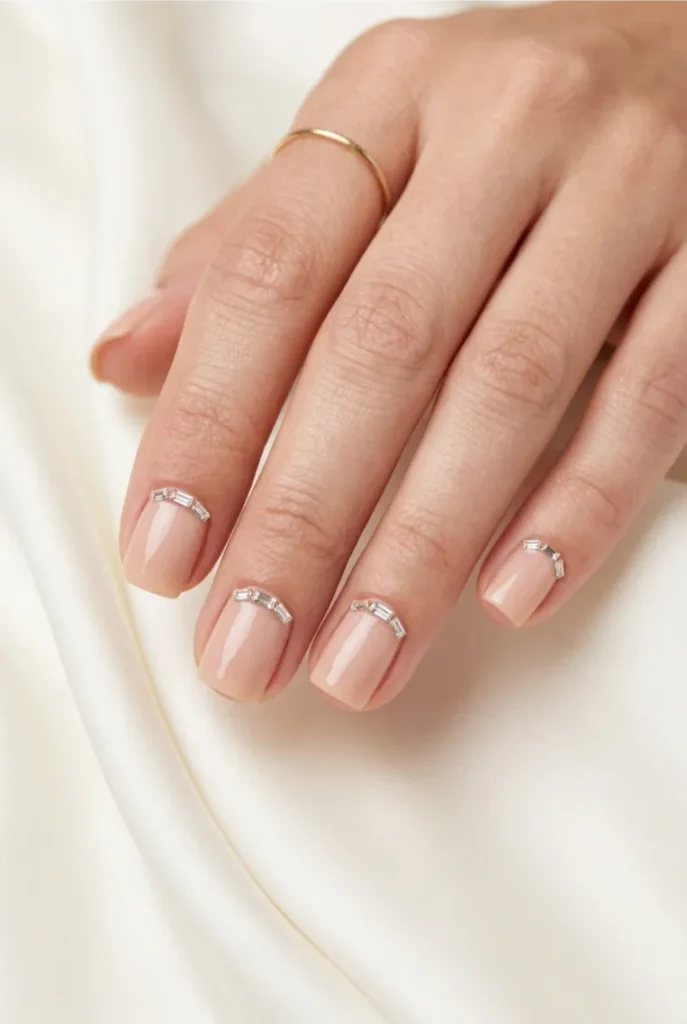
Most rhinestone nails scatter stones across the whole surface.
This one holds back, a single sparse row of tiny elongated baguette stones follows just the cuticle curve, leaving the rest of the nail bare and glossy.
Crowd the stones together and it reads costume jewelry, space them out and it reads bridal.
24. Move the French Line to the Cuticle Instead of the Tip
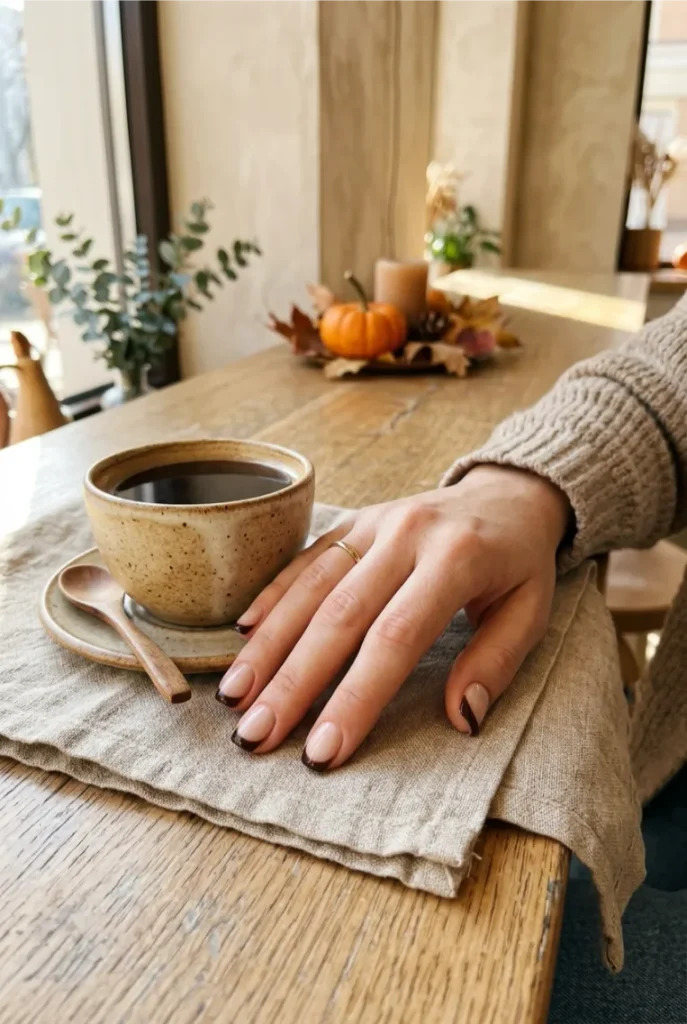
Flip the classic French manicure and the whole effect changes.
Instead of white at the tip, a deep espresso-brown pools right at the base of the nail and fades into a milky nude everywhere else.
| Classic French | Reverse Espresso French |
|---|---|
| Color sits at the tip | Color sits at the cuticle |
| Usually white or cream | Deep espresso-brown |
25. Give Each Nail Just One Raised Pearl at the Cuticle
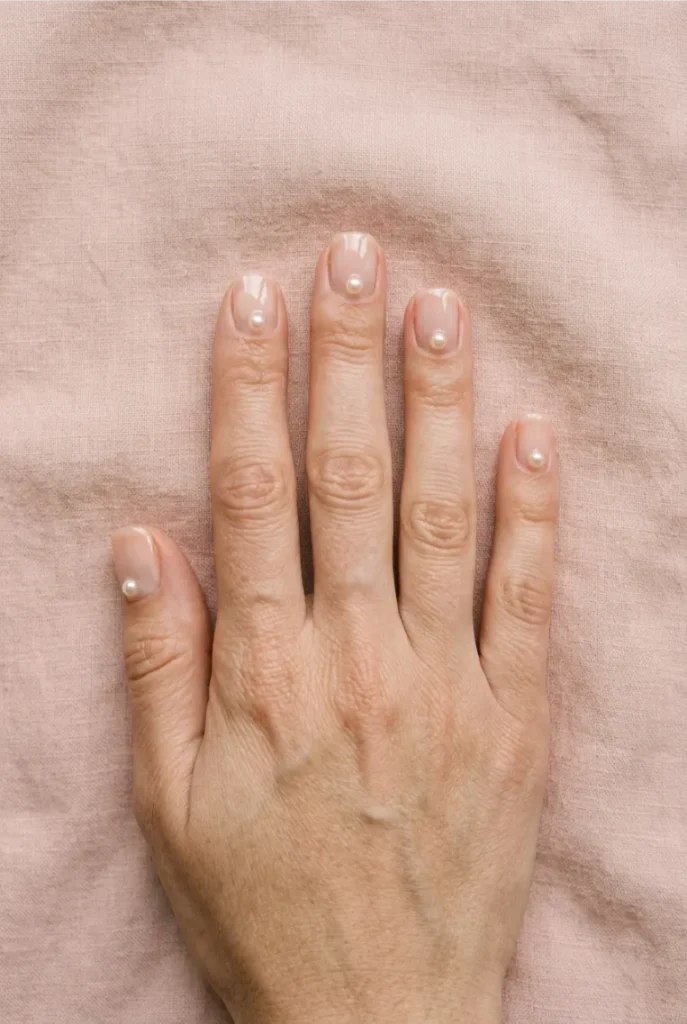
Ten nails, ten pearls, nothing else.
A sheer glass-like base stays completely bare except for one small raised pearl pressed right where the nail meets the skin, close enough to the cuticle that it almost looks like jewelry rather than nail art.
One small detail repeated with restraint reads more expensive than ten different ones competing for attention.
26. Quilt One Accent Nail With a Fine Gold Diamond Lattice
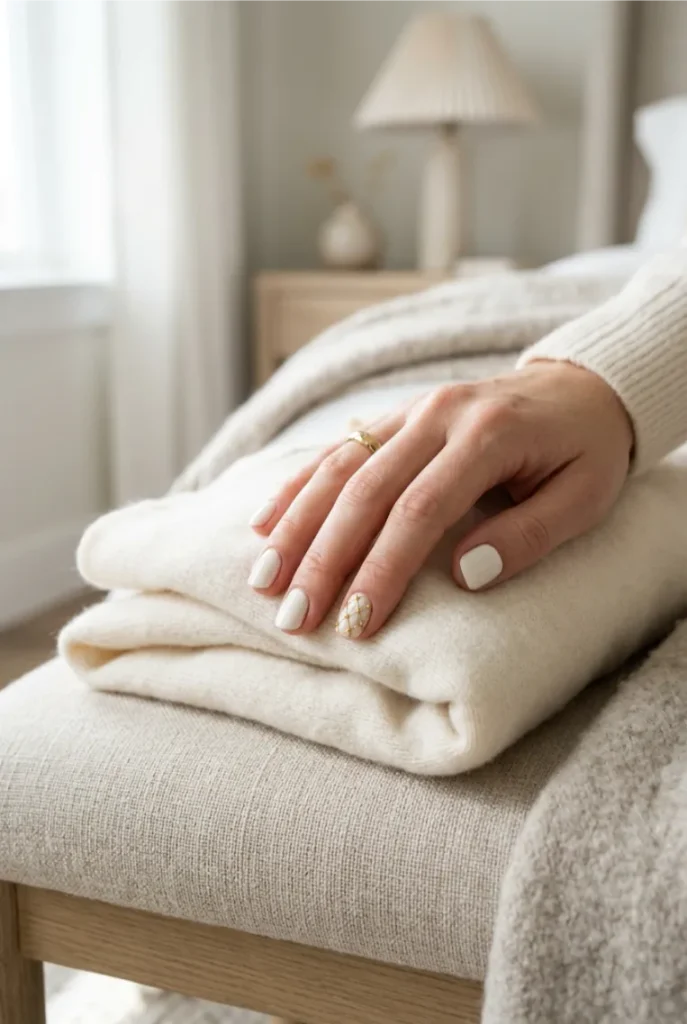
Leather stitching inspired this one more than typical nail art.
A grid of thin gold lines crosses itself diagonally across a single accent nail, forming small diamond shapes like the quilted pattern on a designer bag, while every other nail stays a plain solid cream to let that one nail carry all the detail.
💡 Quick Tip
Keep the lattice lines thin and evenly spaced, thick lines flatten the quilted illusion into a plain grid.
27. Split the Nail in Half With a Hard Diagonal Color Line
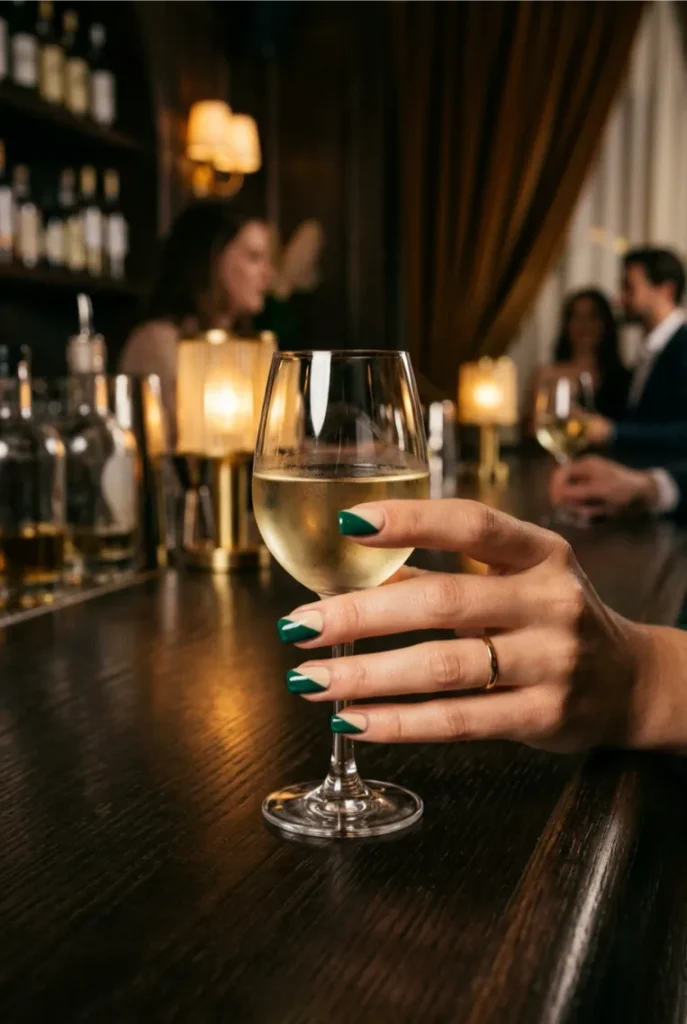
Two jewel tones meet at a crisp diagonal instead of blending into each other.
Deep emerald covers one triangular half of the nail, a warm cream covers the other, and the line between them stays razor sharp, no feathering, no gradient, just a clean edge running corner to corner.
- Tape off the diagonal line before applying the second color for a crisp edge
- Choose two colors with real contrast, a jewel tone against a neutral works best
- Keep the line running true corner to corner, not curved or wavy
- Skip a topcoat swirl or shimmer, the sharp line is the whole point
- ▸Deep emerald on one diagonal half, warm cream on the other
- ▸Sharp taped line corner to corner, no gradient blending
- ▸No added shimmer, the contrast does the work
28. Swirl White, Grey, and Beige Together Like Real Stone
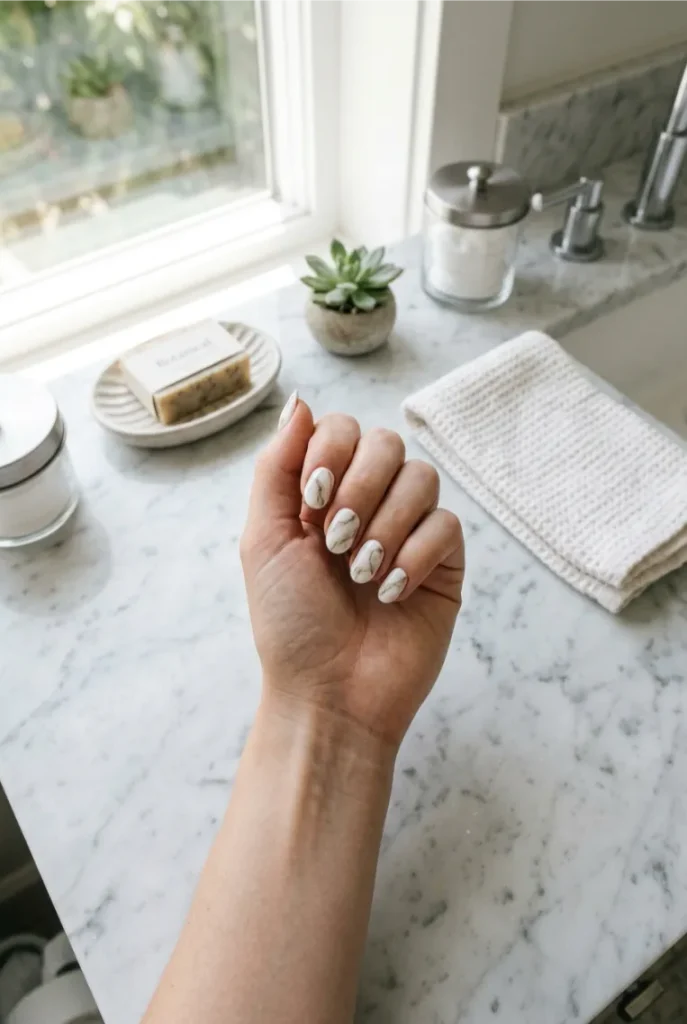
Marble doesn’t repeat itself, and neither should this manicure.
Thin veins of grey and beige drag through a milky white base in irregular, unpredictable paths, closer to a slab of Carrara than a painted pattern, with no two nails sharing the exact same vein placement.
29. Drape a Fine Gold Chain Line Across the Nail Like Jewelry
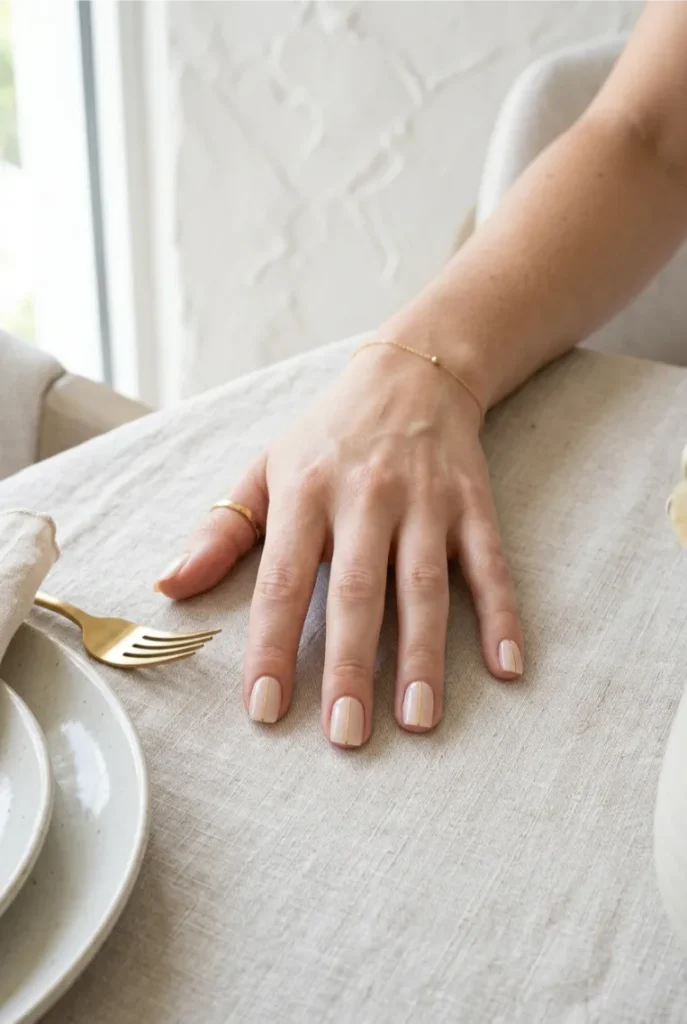
Painted gold can loop and dip the way an actual chain would rest across skin.
A single continuous line sags gently between two points on the nail instead of running straight, complete with tiny painted links along its length, so it reads as draped jewelry rather than a flat stripe.
- Mark two anchor points near opposite corners of the nail
- Paint a gently sagging curved line connecting them, dipping slightly in the middle like a real chain would hang
- Add small oval link details along the curve once the base line is dry
Mark two anchor points near opposite corners of the nail
Paint a gently sagging line between them, dipping in the middle
Add small oval link details along the curve once dry
30. Run One Fine Gold Pinstripe Straight Down the Center
Nothing else on the nail changes, just a single hairline gold stripe running vertically from cuticle to tip, dead center, over a milky nude base.
It borrows from racing stripe styling more than florals or French tips, and the precision of that one straight line is what carries the whole look.
Keep the stripe hairline thin and perfectly centered
Run it the full length, cuticle to tip, without breaks
Widening the stripe, it stops reading as a pinstripe past 1mm
Adding a second color or dot, the single line needs to stand alone
Love The End
Short nails can carry just as much personality as a long stiletto set, sometimes more, since every detail has to earn its spot on a smaller canvas. Whichever look catches your eye first, save it before your next appointment so you’re not scrolling through screenshots in the chair.
A single gold line, one oversized heart, or a full marble swirl, all of it works because nothing here tries to do too much at once.
Pin your favorites, mix two ideas if one nail wants extra attention, and keep this board close for whenever you’re ready for a fresh set.


