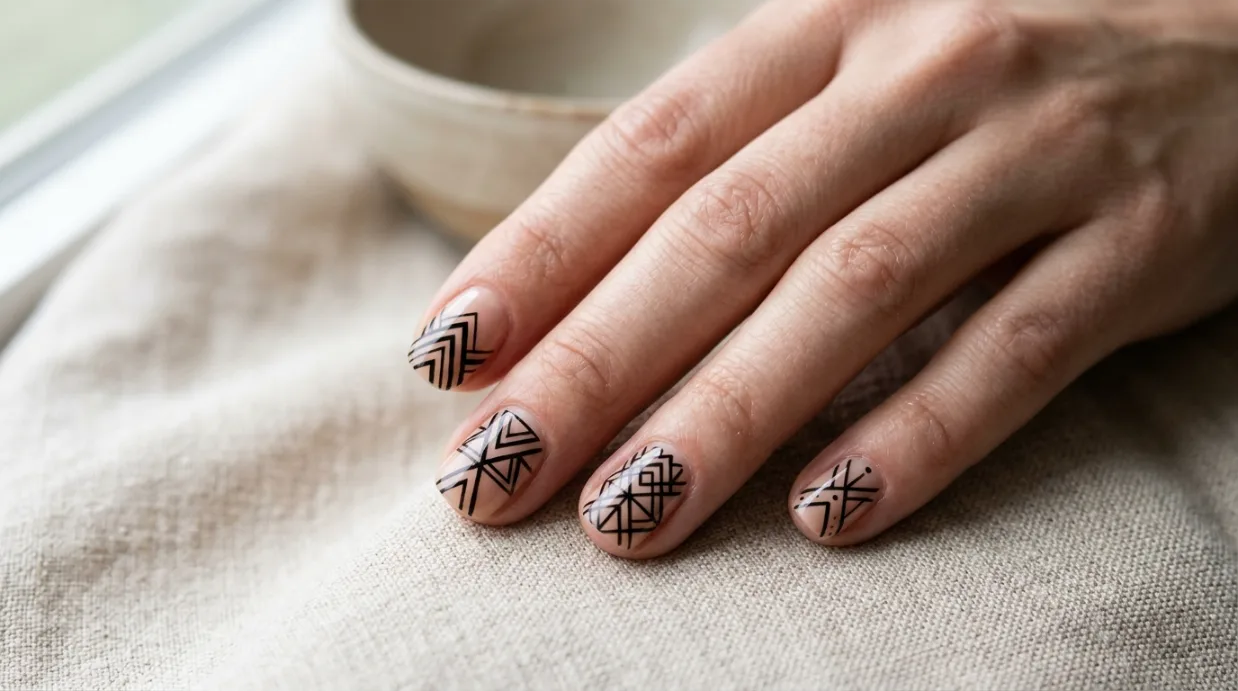
Negative space nail art is a beautiful way to create a modern manicure without covering every part of your natural nails.
By combining carefully painted shapes with intentionally exposed sections, you can achieve clean, artistic designs that feel minimal yet eye-catching.
One of the most interesting ways to wear this style is through symmetrical negative space nails. These designs use balanced lines, matching shapes, and evenly spaced patterns to create a polished appearance.
However, getting both sides of a design to look identical can be challenging, especially if you’re new to nail art. A slightly crooked line or uneven shape can change the entire look.
The good news? You don’t need advanced freehand skills to get started. With a few basic tools, some planning, and simple techniques, you can create beautiful geometric patterns at home.
In this guide, you’ll learn how to prepare your nails, create symmetrical shapes, use nail tape, and experiment with different negative space designs.
What Are Symmetrical Negative Space Nails?
Symmetrical negative space nails are nail designs that combine painted sections with intentionally uncovered areas of the natural nail. The patterns are arranged evenly to create visual balance.
For example, imagine a nail with a thin vertical stripe running down the center.
Both sides have matching colored sections, while the middle remains exposed. This creates a simple but attractive geometric manicure.
Other popular arrangements include:
- Matching diagonal lines on both sides of the nail.
- Balanced triangles near the nail tips.
- Mirrored half-moon patterns around the cuticles.
- Parallel stripes with equal spacing.
- Geometric shapes arranged around a central point.
The exposed sections are an important part of the artwork, not unfinished areas. Their placement helps define the overall pattern.
Tools You’ll Need to Create Symmetrical Negative Space Designs
The Art of
Negative Space
Create visually harmonious compositions by balancing shapes, proportions, and the empty spaces between them.
Define Your Central Axis
Start with an imaginary center line. Use it as your reference to position elements equally on both sides of the composition.
Balance Positive & Negative Space
Distribute visual elements evenly while preserving intentional empty areas that allow your design to breathe.
Use Consistent Geometric Shapes
Repeat matching shapes, sizes, and proportions to establish visual consistency across both sides.
Refine & Test Visual Symmetry
Review spacing, alignment, and proportions. Make small adjustments until the overall composition feels balanced.
Before starting, gather a few basic nail-art supplies. You can create many beginner-friendly designs without purchasing expensive equipment.
Essential nail-art tools
1. Base coat: Helps prepare the nail surface before applying colored polish.
2. Regular nail polish: Choose one or two complementary colors. Black, white, nude, burgundy, and soft pink are excellent options for minimalist designs.
3. Nail striping tape: Thin adhesive tape helps create straight lines and geometric sections.
4. Small nail-art brush: Useful for correcting small imperfections and adding fine details.
5. Tweezers: Make it easier to position and remove small pieces of nail tape.
6. Top coat: Adds shine and helps protect the finished manicure.
7. Nail polish remover and a small cleanup brush: Useful for correcting polish that accidentally touches the skin.
8. Nail file: Helps shape your nails before beginning.
Optional tools for better symmetry
A small ruler, dotting tool, and pre-cut nail-art guides can make it easier to repeat similar shapes across multiple nails.
You don’t need every tool at once. Start with striping tape, regular polish, and a top coat.
Step-by-Step Guide to Symmetrical Negative Space Nails
The easiest way to create balanced geometric nail art is to plan your design before applying polish. Follow these steps to make the process more manageable.
Step 1: Prepare Your Natural Nails
Start with clean, dry nails. Remove any old polish and gently shape your nails using a nail file.
Short square, squoval, and oval nails can all work beautifully with geometric negative space designs.
Next, apply a thin layer of base coat and allow it to dry according to the product instructions.
If you prefer a softer appearance, you can apply a sheer nude or pink polish over the base coat. This gives the exposed sections a more uniform appearance while preserving the negative space effect.
Avoid cutting your cuticles. They help protect the nail area, and unnecessary cutting can increase the risk of infection.
Step 2: Choose a Symmetrical Design
Decide which pattern you want before reaching for your colored polish.
For beginners, a central vertical stripe is one of the easiest designs to plan.
Other simple options include:
- Diagonal design: Two matching diagonal sections on opposite sides.
- Central triangle: A small triangular shape positioned near the tip.
- Double-line design: Two parallel stripes with an exposed section between them.
- Half-moon design: A balanced curved shape near the cuticle.
Try drawing your chosen pattern on paper first.
Think about where the exposed nail will appear, how wide each colored section should be, and whether the design will work with your nail shape.
Step 3: Mark the Center of Each Nail
Finding the center is one of the most important steps when creating symmetrical negative space nails.
Look at your nail from the front and identify its approximate center line, running from the cuticle toward the tip.
You can use a small dot of removable nail-art guide material or simply estimate the center visually.
For a central stripe design, place two pieces of striping tape parallel to this imaginary center line. The gap between them will become your exposed negative space.
Try to keep the distance between the tape pieces consistent.
Repeat the same placement on every nail where you want the pattern to appear.
Step 4: Apply Nail Tape Carefully
Nail tape is particularly helpful for beginners because it creates boundaries without requiring steady freehand painting.
Cut small pieces of tape before starting. Place them gently over the areas you want to keep unpainted.
Press the edges down carefully so that polish cannot easily seep underneath.
For a geometric triangle, arrange two short pieces of tape to create matching angled boundaries.
For a double-line pattern, use two parallel pieces of tape with equal spacing.
Beginner tip: Avoid stretching the tape while positioning it. Stretching can change its shape and make the finished pattern look uneven.
Step 5: Apply Your Chosen Polish
Now it’s time to add color.
Choose a shade that contrasts with the exposed nail for a more noticeable design. For example:
- Black polish with natural negative space.
- Deep burgundy with a sheer nude base.
- White polish with a clear natural section.
- Soft pink paired with a metallic accent.
- Navy blue with a clean central stripe.
Apply a thin layer of polish to the sections that should be colored.
If you need a second coat, allow the first layer to become sufficiently dry before applying it.
Avoid applying too much polish near the tape edges. Thick layers can create raised edges and make the pattern less defined.
Step 6: Remove the Tape Carefully
This step reveals the negative space pattern.
Using tweezers, gently lift one end of the tape and peel it away slowly.
Follow the polish manufacturer’s instructions and remove the tape before the polish becomes completely hard. The ideal timing can vary depending on the polish and the thickness of the coat.
Do not pull the tape sharply across the nail.
If you notice a small uneven section, allow the polish to dry before correcting it with a fine nail-art brush.
Step 7: Repeat the Design Across All Nails
To make the manicure look balanced, repeat the same basic pattern across your nails.
You don’t necessarily need identical designs on every finger. Instead, use a consistent visual theme.
For example:
- Use central stripes on your index and ring fingers.
- Add matching diagonal patterns to your middle fingers.
- Keep the thumb and little finger simple with one narrow accent line.
Pay attention to the width of the exposed areas and the placement of the colored sections.
If you’re creating a mirrored design, compare the corresponding fingers on both hands.
Step 8: Finish With a Top Coat
Once the design is sufficiently dry, apply a thin layer of top coat.
Use gentle strokes to avoid disturbing the painted sections.
The top coat helps protect the polish and creates a smoother finish across the design.
Allow everything to dry according to the product instructions before returning to everyday activities.
5 Easy Symmetrical Negative Space Nail Designs to Try
Once you’ve mastered the basic technique, experiment with these beginner-friendly variations.
1. Minimalist Center Stripe
This is a simple starting point for anyone learning geometric nail art.
Keep a narrow vertical section of the natural nail exposed while painting the two outer sections in a contrasting color.
Black, white, and nude combinations work especially well.
2. Mirrored Diagonal Lines
Create matching diagonal sections that follow the same angle on each side of the nail.
A combination of white polish and a sheer nude base creates a soft, modern appearance.
3. Geometric Triangle Tips
Use two angled pieces of tape to create a small triangle near the nail tip.
Paint around the triangle while leaving the center exposed.
This design looks particularly attractive on short square or squoval nails.
4. Double-Line Negative Space
Create two thin painted lines with an exposed section between them.
You can position the lines vertically, horizontally, or diagonally.
For a subtle manicure, try a soft beige or muted pink shade.
5. Symmetrical Half-Moon Design
Leave a curved section near the cuticle uncovered and paint the remaining nail surface.
For a more geometric look, use a clean semicircle rather than an irregular freehand curve.
This style is a lovely alternative to traditional French manicures.
Practical Tips for Achieving Better Symmetry
Even small adjustments can make geometric nail art look more balanced.
Use the same tape width: Cutting tape into consistent widths helps create matching lines.
Work with a reference design: Keep a picture or sketch nearby so you can follow the same pattern on every nail.
Start with simple shapes: Straight lines and basic triangles are easier to repeat than complicated abstract patterns.
Check the design from different angles: Look at your nails from above and from the front to identify uneven sections.
Use thin polish layers: Thick polish can create messy edges and make tape removal more difficult.
Allow enough drying time: Rushing between coats can cause smudging and uneven finishes.
Keep the design proportional: A narrow negative space section may look better on shorter nails, while longer nails can accommodate larger geometric patterns.
Common Mistakes to Avoid
Uneven spacing
If the exposed section is wider on one side, the design may look unbalanced.
Solution: Mark the center of the nail before placing the tape.
Polish bleeding underneath the tape
Loose tape edges can allow polish to seep underneath.
Solution: Press the tape down gently, especially along the edges, before applying color.
Removing tape too late
If the polish has completely hardened, removing the tape may pull at the edges of the design.
Solution: Follow the polish instructions and remove the tape at the appropriate stage.
Using too many colors
Multiple colors and complicated shapes can make a minimalist design look crowded.
Solution: Begin with one main color and add a second accent shade only when needed.
Ignoring nail shape
A design that looks balanced on long square nails may appear different on short oval nails.
Solution: Adjust the size and direction of your geometric shapes to suit your natural nail shape.
Frequently Asked Questions
1. What are symmetrical negative space nails?
They are nail-art designs that combine intentionally exposed natural nail sections with painted geometric patterns arranged in a balanced or mirrored way.
2. Can beginners create negative space nail designs at home?
Yes. Beginners can use nail striping tape, regular nail polish, and simple geometric patterns to create attractive negative space manicures without advanced freehand skills.
3. What nail shape works best for symmetrical negative space designs?
Square, squoval, oval, and almond nails can all work. The best choice depends on the pattern. Straight lines often look particularly clean on square and squoval nails.
4. How do I make both hands look symmetrical?
Plan your design before painting, use consistent tape widths, mark the center of each nail, and repeat the same measurements as closely as possible. Working on corresponding fingers can also help.
5. Can I create negative space nails without nail tape?
Yes. A fine nail-art brush can be used to paint geometric shapes freehand. However, nail tape or adhesive guides generally make straight lines easier to achieve, particularly for beginners.
Conclusion
Symmetrical negative space nails are a beautiful way to explore minimalist and geometric nail art. Their appeal comes from the balance between painted shapes and intentionally exposed natural nail sections.
You don’t need complicated tools or advanced techniques to create them. Start with a simple central stripe, experiment with diagonal patterns, and gradually move toward more detailed geometric designs.
Remember to plan your pattern, use nail tape carefully, apply thin layers of polish, and pay attention to spacing. With practice, you’ll find it easier to create clean, balanced designs that suit your personal style.
Whether you prefer subtle nude combinations or bold black-and-white patterns, symmetrical negative space nail art offers plenty of room for creativity.