If you’ve ever looked at beautiful nail art on Pinterest and wondered how people create those designs so neatly, you’re not alone.
Getting started with nail art can feel a little intimidating, especially when you don’t have professional tools or much experience painting your own nails.
But here’s the good news: you don’t need advanced skills to create pretty nails at home.
Some of the most attractive nail designs use nothing more than a few polish colors, a simple dotting tool, or a little tape.
The secret is to start small. Instead of attempting complicated patterns, try easy nail designs for beginners that use simple shapes, dots, lines, and color combinations.
These techniques help you become more comfortable with nail polish while giving you plenty of opportunities to experiment.
Whether you have short natural nails or prefer a simple manicure, these beginner-friendly ideas will help you find a style you enjoy.
What Do You Need to Start Doing Nail Art at Home?
Easy Nail Designs
for Beginners!
New to nail art? No worries! A few simple techniques and a little creativity are all you need to get started.
01. Prep Your Nails
Start with clean, dry nails. Gently shape the edges, push back cuticles, and apply a base coat for a smooth canvas.
02. Keep Designs Simple
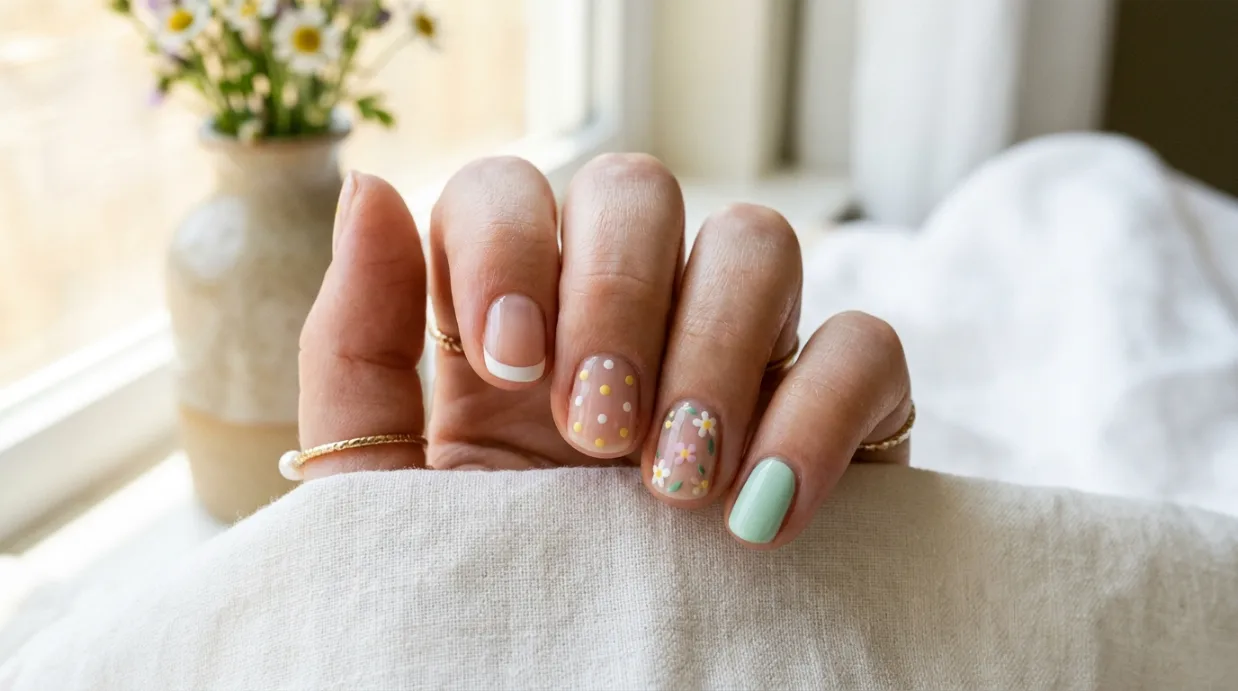
Try easy patterns like polka dots, tiny flowers, stripes, or French tips. Simple designs are perfect for building confidence.
03. Apply Thin Coats
Use small amounts of polish and apply thin, even layers. Let each layer dry before adding another for a neater finish.
04. Seal the Look
Finish with a clear top coat to add shine, protect your nail art, and help your manicure last longer.
Before trying your first design, gather a few basic supplies. You don’t need to purchase an expensive nail art kit. A small collection of everyday manicure essentials is enough to get started.
Basic nail art supplies
- Nail polish: Start with two or three colors that complement each other.
- Base coat: Apply it before your color polish as part of your manicure.
- Top coat: Use it to finish and seal your design.
- Nail file: Shape your nails and smooth rough edges.
- Dotting tool: Create dots, flowers, and other small details.
- Thin nail art brush: Helpful for drawing stripes and simple lines.
- Nail polish remover: Clean up mistakes around the nail.
- Cotton pads: Useful for removing polish and correcting small errors.
You can also use a bobby pin for larger dots or a small piece of tape to help create straight edges.
Beginner tip: Start with regular nail polish rather than buying several specialized products. It is easy to experiment with and remove when you want to try another design.
12 Easy Nail Designs for Beginners to Try at Home
You don’t need to master every nail art technique at once. Choose one design that looks manageable and practice until you feel comfortable.
Here are 12 simple ideas worth trying.
1. Classic Polka Dot Nails
Polka dot nails are an excellent first project because they don’t require precise brush movements. You can create a playful design using just two polish colors.
How to create the design:
- Apply a base coat and let it dry.
- Paint your nails with a light or neutral polish.
- Allow the color to dry before adding the dots.
- Dip a dotting tool or bobby pin into a contrasting polish.
- Gently place small dots across the nail.
- Finish with a top coat after the design has dried sufficiently.
Color ideas: White dots on nude nails, black dots on pale pink, or colorful dots on a white base.
For a softer appearance, place just three or four dots on each nail instead of covering the entire surface.
2. Simple French Tip Nails
French tips are a lovely option if you prefer a clean and timeless manicure. You can recreate this look without needing perfectly steady hands.
How to create the design:
- Apply a base coat.
- Add one or two thin coats of sheer pink or nude polish.
- Let the base color dry completely.
- Use a thin nail art brush to paint a small line across each nail tip.
- Adjust the width of the tip according to your nail length.
- Apply a top coat when everything is dry.
Color ideas: White tips with a nude base, pastel pink tips, or soft lavender tips.
If painting a straight line feels difficult, try nail tip guides or thin adhesive guides designed for manicures.
3. One-Color Accent Nails
If you are not confident with detailed nail art yet, accent nails are a simple way to make your manicure more interesting.
The idea is to paint most nails in one color and choose one nail for a different shade or finish.
How to create the design:
- Choose two coordinating nail polish colors.
- Paint four nails in your main color.
- Apply the second color to your ring fingernail.
- Repeat on the other hand if you like a balanced look.
- Finish with a top coat.
Color ideas: Beige with gold, pink with white, or lavender with silver.
This design is especially useful when you want something pretty without spending too much time on details.
4. Minimalist Line Art Nails
Thin lines can turn a simple manicure into something modern and stylish. You don’t need to create complicated artwork.
How to create the design:
- Apply a neutral base color.
- Allow the polish to dry.
- Use a thin nail art brush to draw one or two lines.
- Try horizontal, vertical, or slightly curved lines.
- Keep the design minimal.
- Seal it with a top coat.
Color ideas: Black lines on nude nails, white lines on soft pink, or gold lines on a milky base.
If your lines look uneven at first, use fewer strokes and keep the design simple.
5. Tiny Flower Nail Designs
Small flowers are a cute choice for anyone who loves soft, feminine nail art. The easiest version uses five dots arranged around one central dot.
How to create the design:
- Apply a light-colored base polish.
- Let it dry completely.
- Use a dotting tool to place five small dots in a circle.
- Add a contrasting dot in the center.
- Repeat on one or two nails.
- Finish with a top coat once the design is dry.
Color ideas: White flowers on pink nails, yellow flowers on pastel blue, or pink flowers on a nude base.
You can make the flowers different sizes for a relaxed, playful appearance.
6. Two-Tone Color Block Nails
Color blocking is a simple way to experiment with multiple shades without drawing complicated patterns.
How to create the design:
- Choose two contrasting polish colors.
- Apply your first color as the base.
- Let it dry completely.
- Use nail tape to mark off a section of the nail.
- Paint the exposed section with your second color.
- Carefully remove the tape and finish with top coat.
Color ideas: Pink and white, beige and brown, or lavender and pale yellow.
You can divide the nail diagonally, vertically, or horizontally.
7. Glitter Accent Nails
Glitter polish makes it easy to add sparkle without drawing individual designs.
How to create the design:
- Apply your chosen base color.
- Let it dry.
- Apply glitter polish to one accent nail or just the tips.
- Add another thin layer if the coverage needs building.
- Finish with a suitable top coat.
Color ideas: Rose gold glitter on nude nails, silver glitter on pale pink, or gold glitter on beige.
For everyday wear, a little glitter on one or two nails is often enough.
8. Heart Nail Art
Tiny hearts can make a simple manicure look sweet and playful. You can create them with two small dots and a little shaping.
How to create the design:
- Apply a neutral or pastel base color.
- Allow it to dry.
- Place two small dots close together using a dotting tool.
- Use a fine brush or toothpick to pull the lower edges together into a heart shape.
- Repeat with a few small hearts.
- Finish with top coat after drying.
Color ideas: Red hearts on pale pink, white hearts on nude, or pink hearts on a cream base.
Start with one heart on each accent nail rather than trying to decorate every nail.
9. Simple Ombre Nails
Ombre nails blend two or more shades to create a soft gradient. Although the finished result can look complicated, you can experiment with a simple two-color version.
How to create the design:
- Apply your lighter polish as the base.
- Let it dry.
- Place two polish colors next to each other on a small makeup sponge.
- Gently dab the sponge over the nail.
- Repeat with light layers until the gradient looks blended.
- Clean up the surrounding skin and apply a top coat.
Color ideas: Pink fading into white, lavender fading into pale blue, or nude fading into peach.
A little patience is important because the first sponge application may look uneven.
10. Negative Space Nails
Negative space designs leave part of the natural nail visible. They are a great choice if you enjoy minimalist nail art.
How to create the design:
- Apply a clear base coat.
- Allow it to dry.
- Use nail tape to cover the areas you want to leave unpainted.
- Apply a contrasting polish to the uncovered sections.
- Carefully remove the tape.
- Finish with a clear top coat.
Color ideas: Black and clear, white and nude, or pastel pink and natural nail tones.
Simple diagonal shapes and half-moon patterns are good starting points.
11. Half-Moon Nail Designs
Half-moon nails feature a curved shape near the base of the nail. You can create a simple version using small round manicure guides.
How to create the design:
- Apply your base coat.
- Paint the nail in your chosen base shade.
- Let it dry completely.
- Position a round guide near the base of the nail.
- Paint the exposed nail with a contrasting shade.
- Remove the guide carefully and finish with top coat.
Color ideas: Nude with burgundy, pale pink with white, or cream with chocolate brown.
This design looks particularly pretty with soft, coordinated colors.
12. Simple Rainbow Nails
If you enjoy colorful manicures, rainbow nails are a fun way to practice using different shades.
How to create the design:
- Choose five coordinating or contrasting polish colors.
- Paint each nail a different shade.
- Keep the colors in a similar tone for a coordinated appearance.
- Apply a top coat after the polish has dried.
Color ideas: Pastel rainbow, bright summer colors, or muted earthy shades.
You can also use one base color and add a small rainbow detail to just one accent nail.
How to Make Beginner Nail Designs Look Neater
A simple design can look much better when the manicure underneath is neat. You don’t need professional skills, but a few habits can make your results more consistent.
1. Start with clean, shaped nails
Remove old polish and gently file rough edges. Keep your preferred nail shape consistent across your fingers.
2. Apply thin layers of polish
Thick layers can take longer to dry and may become uneven. Apply thin coats instead, allowing appropriate drying time between layers.
3. Let the base color dry
One common beginner mistake is adding nail art while the base polish is still wet. This can cause dots, lines, and other details to smear.
4. Practice on one nail first
Before decorating every nail, try the design on one nail. This helps you understand the technique and adjust the size or placement.
5. Keep a small cleanup brush nearby
A small brush dipped in nail polish remover can help tidy up polish around the nail. Avoid getting remover or polish on irritated or broken skin.
6. Don’t rush the top coat
Allow the design to dry sufficiently before applying top coat. Use gentle strokes to reduce the chance of dragging your artwork.
Common Nail Art Mistakes Beginners Should Avoid
Even simple nail designs can be frustrating when small mistakes affect the finished look.
Here are a few things to watch out for:
- Using too much polish: Heavy coats can create bumps and take longer to dry.
- Choosing complicated designs too early: Start with dots, stripes, and accent nails.
- Decorating wet polish: Give each layer enough time to dry.
- Using too many colors: Two or three coordinating shades are often enough.
- Pressing tools too hard: Gentle movements help create cleaner details.
- Ignoring nail care: Healthy nail habits make regular manicures easier to maintain.
Remember that practice matters more than perfection. Your first attempt may not look exactly like your inspiration photo, and that’s perfectly normal.
Frequently Asked Questions
1. What is the easiest nail design for beginners?
Polka dot nails are one of the easiest designs to try. You only need a base color, a contrasting polish, and a dotting tool or bobby pin. The technique involves placing small dots on a dry nail surface.
2. Can I do nail art at home without professional tools?
Yes. You can create several simple designs using everyday items. A bobby pin can make dots, a toothpick can help with tiny details, and tape can create straight lines or geometric shapes. Use clean tools and avoid anything sharp that could injure your skin.
3. What nail designs look good on short nails?
Polka dots, minimalist lines, tiny flowers, accent nails, micro French tips, and simple color-block designs can all work beautifully on short nails. Small patterns and delicate details are particularly suitable when nail space is limited.
4. How many nail polish colors should a beginner start with?
Two or three coordinating colors are enough for your first designs. A neutral base shade, a white or black polish, and one accent color give you plenty of combinations to explore.
5. How can I make my nail art last longer?
Start with clean, dry nails and apply thin layers of polish. Use a base coat and finish with a compatible top coat. Avoid picking at the polish and wear gloves when doing household cleaning or washing dishes to reduce repeated water and chemical exposure.
Final Thoughts
Learning nail art doesn’t have to be complicated. Start with designs that use simple shapes, small details, and just a few colors. Polka dots, French tips, accent nails, and tiny flowers are excellent places to build your confidence.
Once you become comfortable with these techniques, you can experiment with color blocking, ombre, negative space, and other creative styles.
Most importantly, choose designs that suit your nails, personal style, and everyday routine. You don’t need an expensive kit or a perfect first attempt to enjoy creating beautiful nail art at home.
Start with one design, take your time, and let your creativity grow one manicure at a time.