
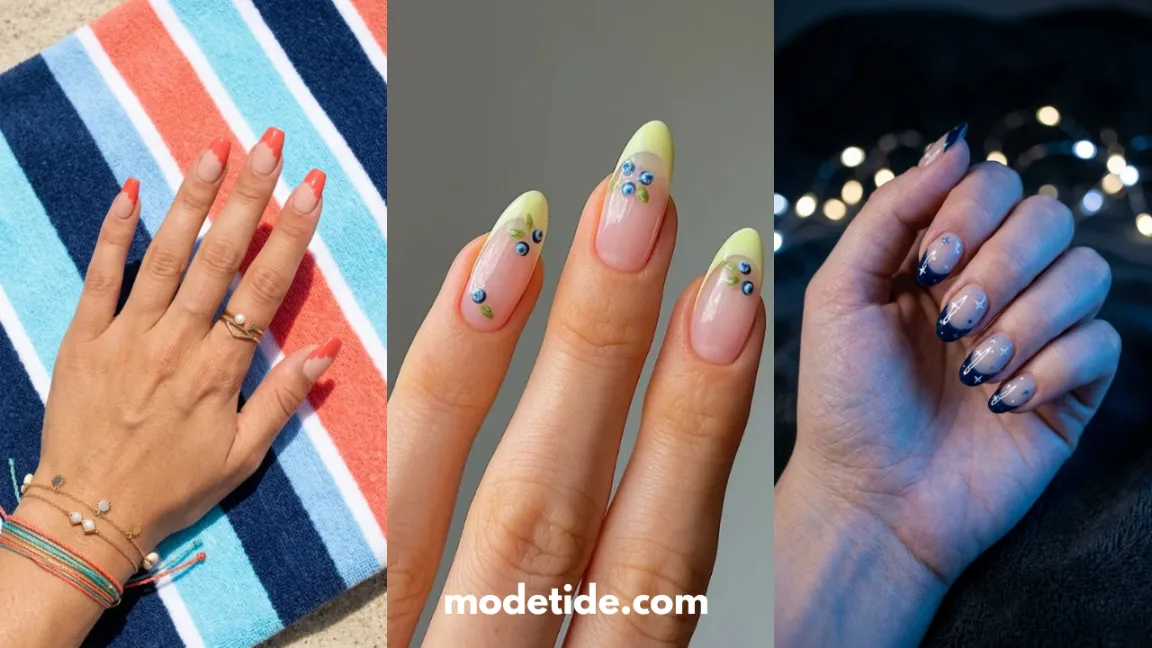
The straight-across French tip has had its moment, and honestly, it’s starting to look a little tired on every hand you scroll past.
Tilt that line even slightly and something shifts, the whole nail suddenly reads sharper, more deliberate, less like a default choice and more like an actual decision.
That’s the pull behind diagonal french tips right now, one small angle change that turns a classic into something worth screenshotting.
This roundup pulls from real manicures spotted online and fresh ideas built just for this list, covering everything from bare minimalist lines to chrome finishes, marbled textures, and full color pairings.
Some keep it quiet with a single thin stripe, others go bold with glitter, pearls, or a reversed angle that shortens the whole look.
Whatever your usual style, cautious or loud, short nails or long, there’s a version here that still feels like you, just angled a bit differently.
Scroll through, save the ones that catch your eye, and bring a screenshot to your next appointment.
1. Diagonal French Tips with a Rhinestone Accent
@maagic.naailsss
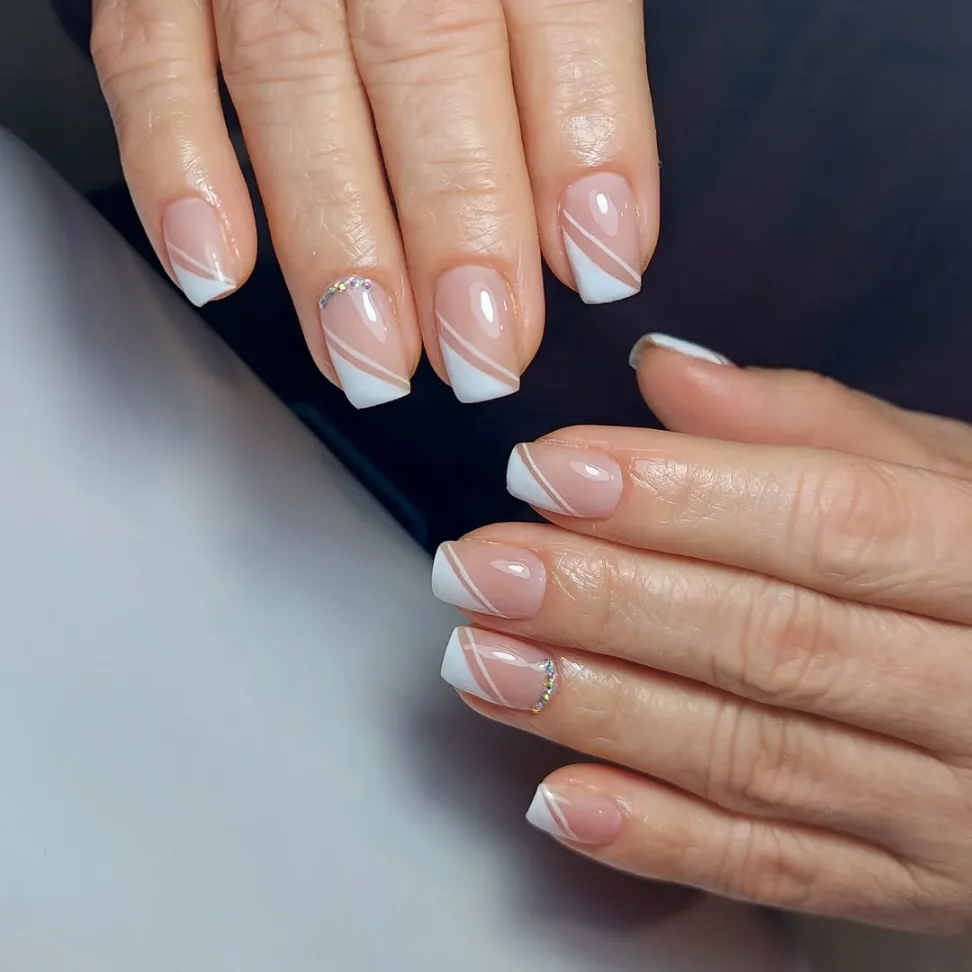
Two thin lines meet at an angle instead of following the nail’s natural curve, and that small shift changes the whole look.
- The base stays sheer and natural, almost like bare nail with a glossy shine
- A slim rose gold line runs just above the white tip, giving the diagonal edge extra definition
- One nail on each hand skips the tip entirely and gets a small cluster of rhinestones near the cuticle instead
- Square tips keep the shape simple so the diagonal lines stay the star
Small and sparkly, this is the kind of detail people notice up close.
2. Diagonal French Tips with a Starlight Accent Nail
@myubeauty
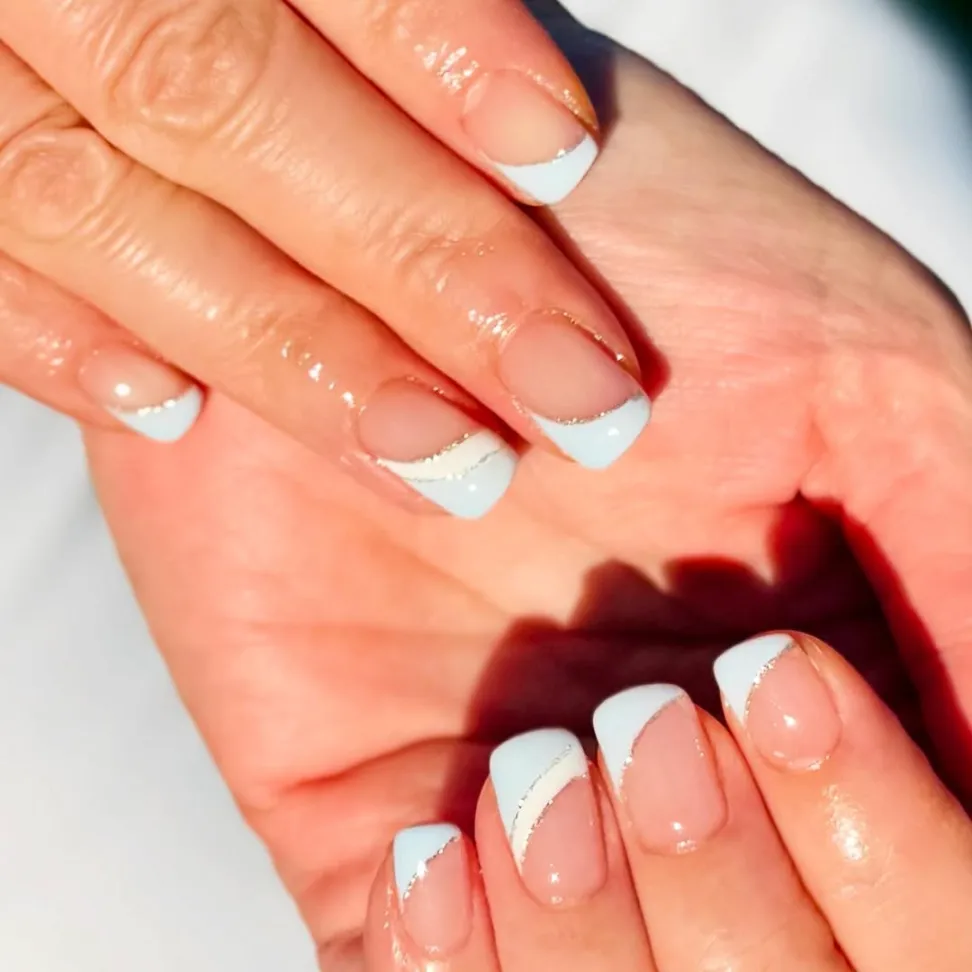
Not every nail in this set follows the same rule. Most fingers get a clean diagonal split, white on top and a thin gold shimmer line tracing the edge, set against a sheer nude base with a high gloss finish.
The ring finger breaks the pattern completely: no tip at all, just a soft four-point sparkle and a scatter of tiny white dots near the center, almost like a clear night sky caught mid nail.
Almond shaped tips stretch the whole look longer without adding bulk.
That one different nail is what keeps the set from feeling repetitive.
Recreate this look
3. Forest Green Swoosh French on Every Nail
@bloomnailspahoboken
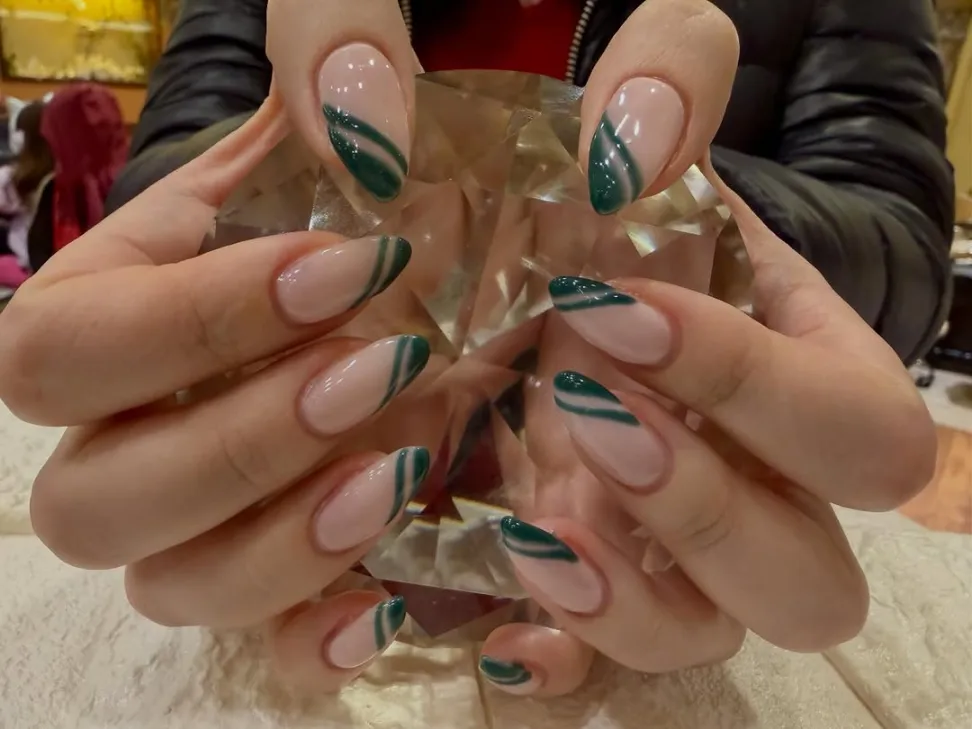
Sheer nude polish stays glossy and clean across all ten nails, and instead of a straight tip line, a single deep forest green stroke curves diagonally from the cuticle toward one corner of the tip.
Every nail gets the exact same swoosh, no accent nail breaking the rhythm, which makes the set feel cohesive rather than scattered.
Almond shaped tips give the green line room to curve instead of running straight, so it reads more like a brushstroke than a border.
Good To Know: a curved swoosh needs a steady hand or thin brush, a straight diagonal tip is much easier to freehand.
4. Butter Yellow Tips with Painted Blueberries
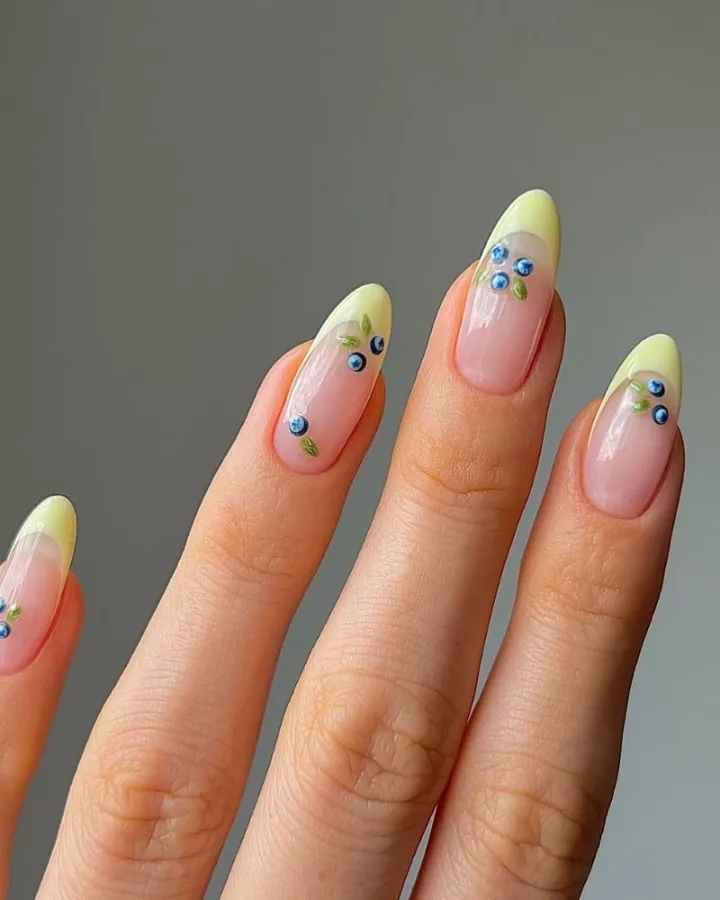
@thehotblend
Soft butter yellow covers just the very tip of each almond shaped nail, following the nail’s natural curve on a sheer pink-nude base.
Near the side of the tip, a tiny cluster of hand-painted blueberries sits with a couple of thin green leaf strokes, small enough to look delicate rather than busy.
Not every nail carries the fruit detail, which keeps the set feeling light instead of overloaded. The glossy top coat makes the yellow look almost translucent in places.
A pastel color like this reads soft in photos but still shows up clearly against skin tone.
📌 Good To Know
Pastel tips like butter yellow show best with almond or oval shapes, since the rounded tip line softens the color instead of cutting it off sharply.
5. Split Diagonal Tips in Neon Pink and Yellow
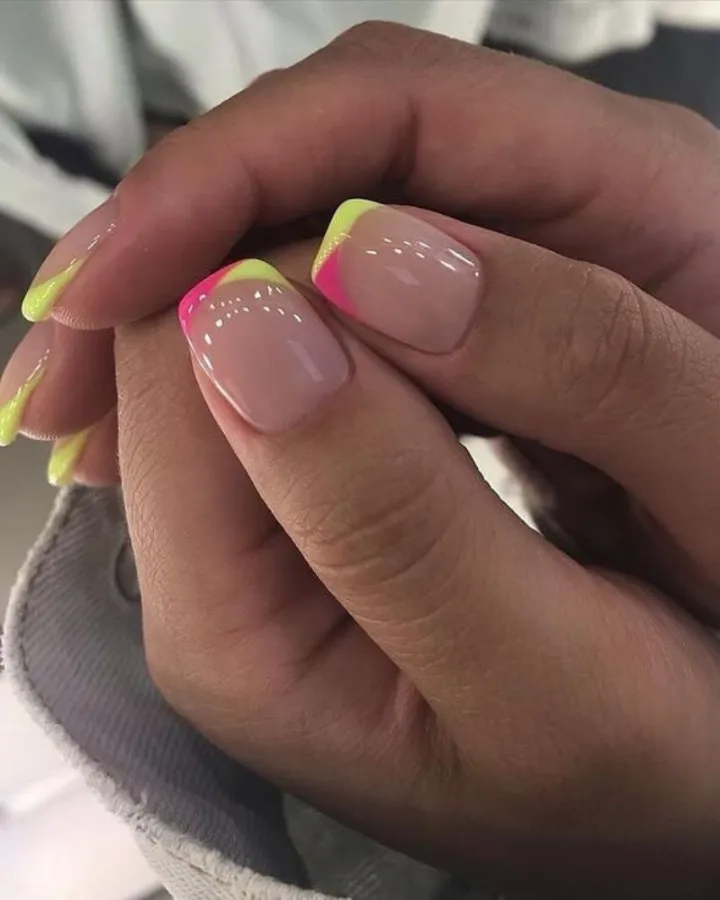
@fashion_profi.ru
Neon pink and neon yellow share one nail, meeting in a soft diagonal line instead of splitting the tip straight down the middle.
A scatter of tiny white dots sits right where the two colors meet, adding a bit of texture without covering either shade.
The rest of the set keeps it simpler, solid neon yellow diagonal tips on a glossy nude-beige base, so the two-tone nail reads as the accent rather than the rule. Square tips with rounded corners keep the diagonal lines crisp.
Two neon shades on one hand sounds loud, but the nude base holds it together.
| Pink Side | Yellow Side |
|---|---|
| Hot neon pink, cuticle side. | Bright neon yellow, tip side. |
| Meets yellow along one diagonal. | Tiny white dots mark the seam. |
6. Baby Blue Diagonal Tips with a Silver Swoosh
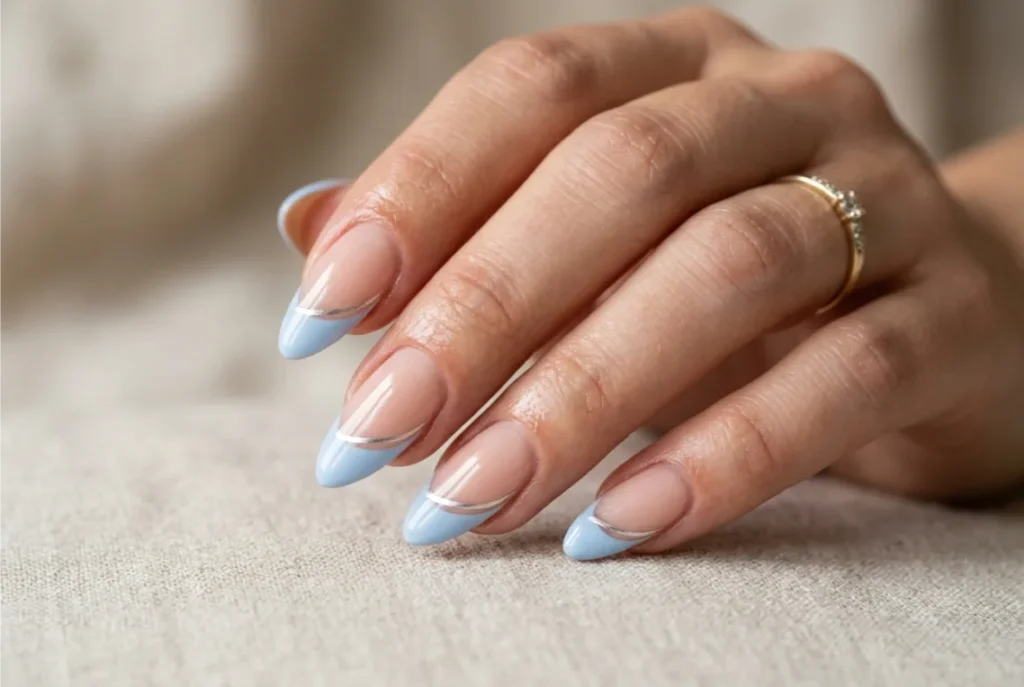
A soft baby blue tip cuts across each nail on a straight diagonal, not following the nail’s rounded edge, which gives the whole set a cleaner, more geometric feel.
A thin silver line traces just inside the blue on most nails, and one nail per hand swaps the plain diagonal for a wavy silver-and-white swoosh instead, breaking the pattern just enough.
The glossy finish and sheer nude base keep it looking fresh rather than heavy.
Quick Tip: tape off the diagonal angle first, then freehand the silver line once the tape is pulled.
Keep the diagonal line straight and crisp.
Add a thin metallic line for contrast.
Letting the tip curve back to a rounded shape.
Using the same swoosh on every single nail.
7. Corner Diagonal Tips with Iridescent Gold Trim
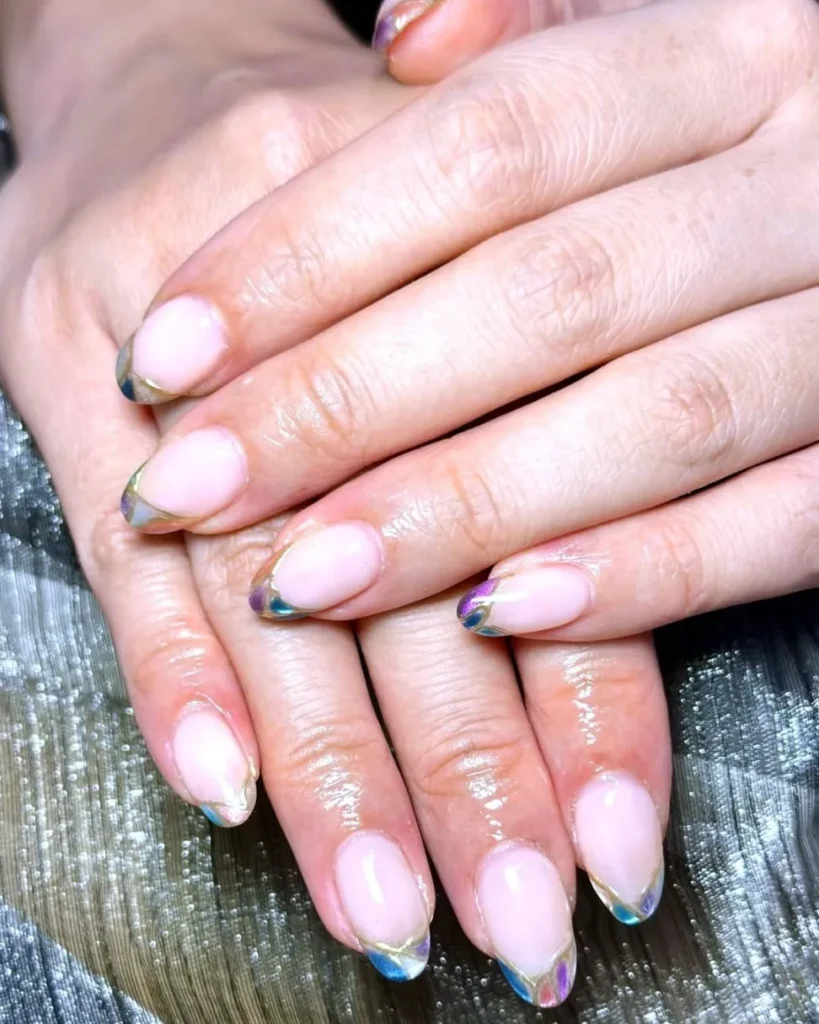
@nailsgoodcomy
Gold traces a small diagonal corner on each nail, tucked into one side instead of stretching across the whole tip.
Underneath, an iridescent finish shifts between blue, lavender, and soft pink depending on the light, so the same set looks different from every angle.
A sheer pink base and rounded almond shape keep everything else calm, letting the metallic corner do all the talking.
Small doesn’t mean plain here, the color shift is what makes it work.
Paint a sheer pink base and let it cure.
Trace a thin gold line diagonally near one corner.
Fill the corner with iridescent color, blending the shifting tones.
8. Chrome Silver Diagonal Tips for a Futuristic Edge
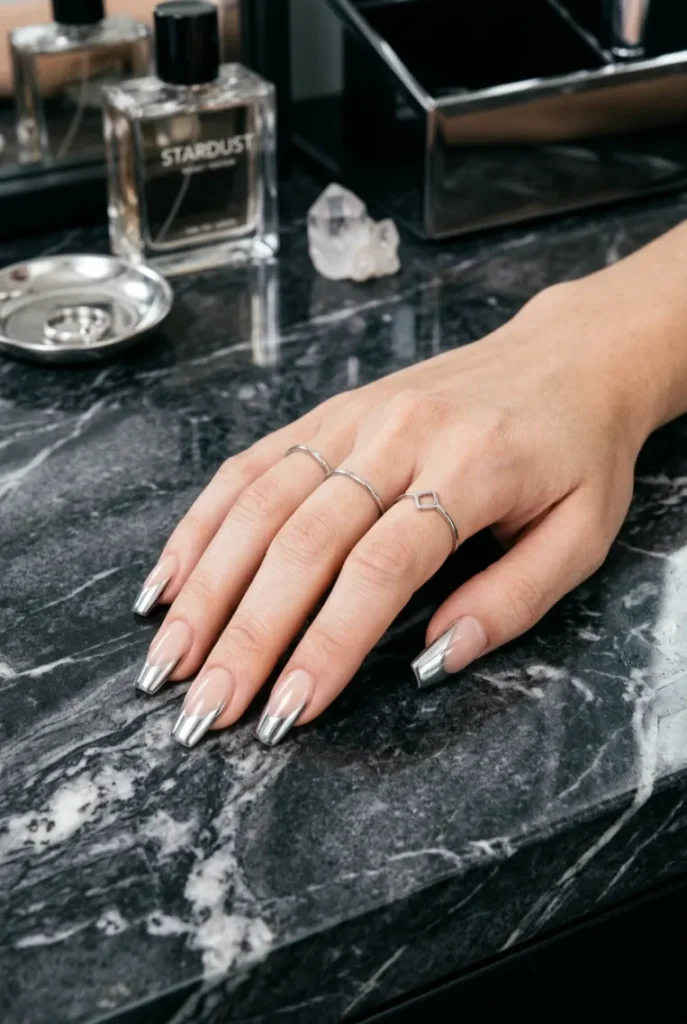
Mirror chrome catches every bit of light along a sharp diagonal line, turning a plain tip into something almost metallic.
- Full mirror-chrome finish applied only past the diagonal, base stays sheer pink
- Coffin shaped nails give the diagonal a long runway to shine
- Works best under natural or bright light, dim rooms mute the mirror effect
- No glitter or extra detail needed, the chrome does all the work
Skip a matte top coat over the chrome section, it kills the shine instantly.
9. Diagonal Color-Block Tips in Black and White
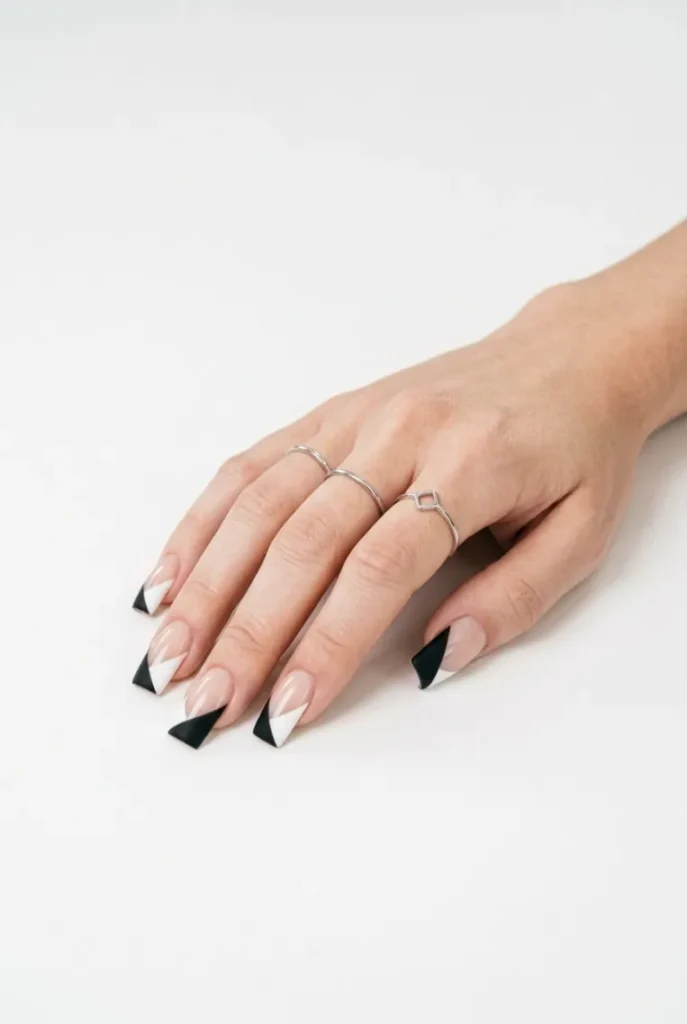
Two solid colors meet along one diagonal line instead of blending into each other, so the tip reads as a bold graphic shape rather than a soft transition. Black covers the lower half of the nail near the cuticle, white takes the tip, and the seam between them stays razor sharp with no fade or texture softening the edge.
Square nails give the straight line somewhere flat to sit, and a glossy top coat keeps both colors looking crisp under light.
| Black side | starts at the cuticle, matte or glossy |
| White side | covers the tip, same finish as black |
| Black Side | White Side |
|---|---|
| Covers the lower half near the cuticle. | Covers the tip, straight to the edge. |
| Meets white on a single straight diagonal. | No blending, hard edge only. |
10. Negative Space Diagonal Cutout Tips
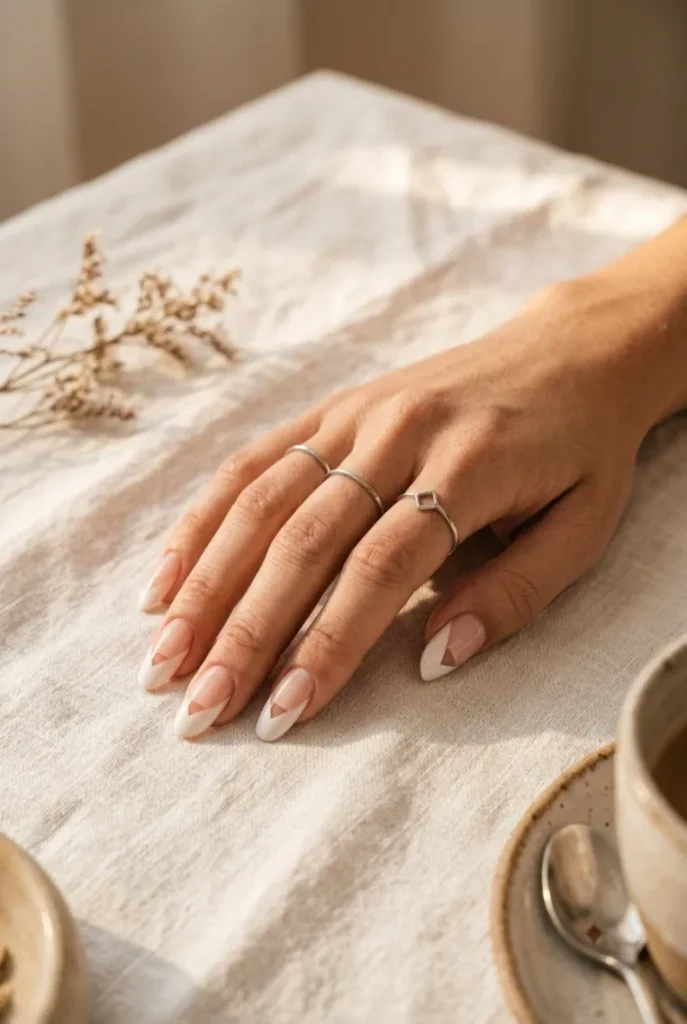
Milky white polish covers most of the nail, but instead of a solid diagonal tip, a small triangle of bare nail peeks through right at one corner, edged with a whisper thin white outline.
The effect works in three steps: paint the milky white base first, mask off a small triangular corner before the second coat, then trace the exposed edge with a fine liner brush once the tape lifts.
Oval nails keep the cutout looking soft instead of harsh, and the bare patch catches light differently than the polish around it.
Recreate this look
11. Reverse Diagonal Tips in Deep Wine Red
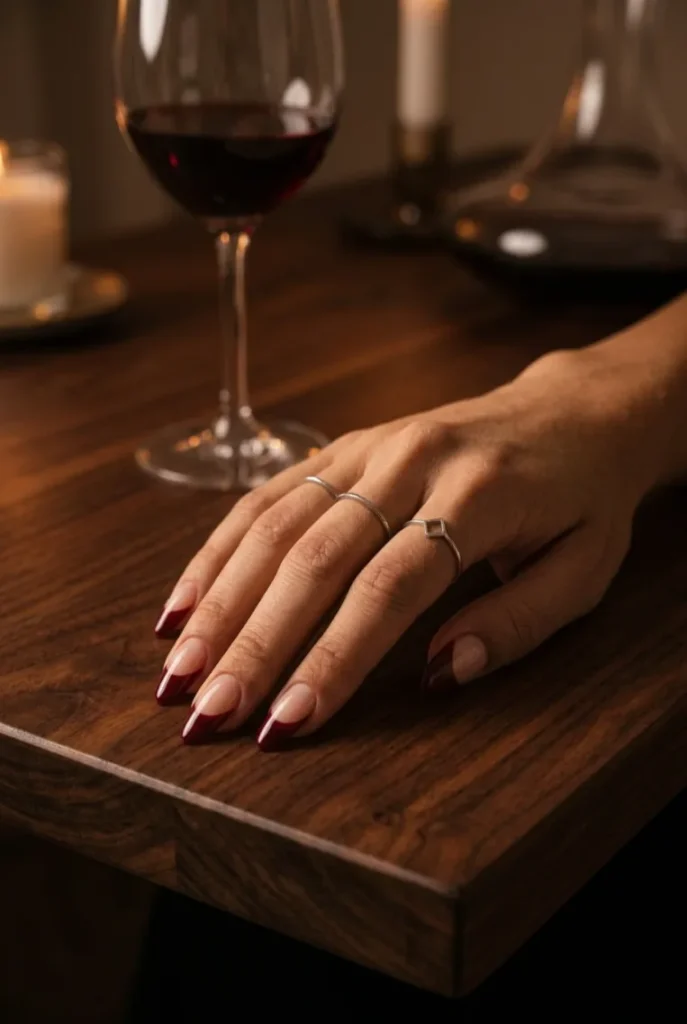
Instead of angling from the cuticle out toward the tip like most diagonal French designs, this line flips direction, starting wide near the tip and narrowing back down toward the base.
Quick Tip: the reversed angle visually shortens the nail, so it suits anyone who wants a diagonal look without going ultra long.
Deep wine red against a glossy nude base gives the reversed line a rich, grown-up finish, and square nails keep the geometry sharp instead of soft.
Flipping the diagonal’s direction draws the eye downward, making the nail read shorter and more refined.
12. Sunset Ombre Diagonal Tips
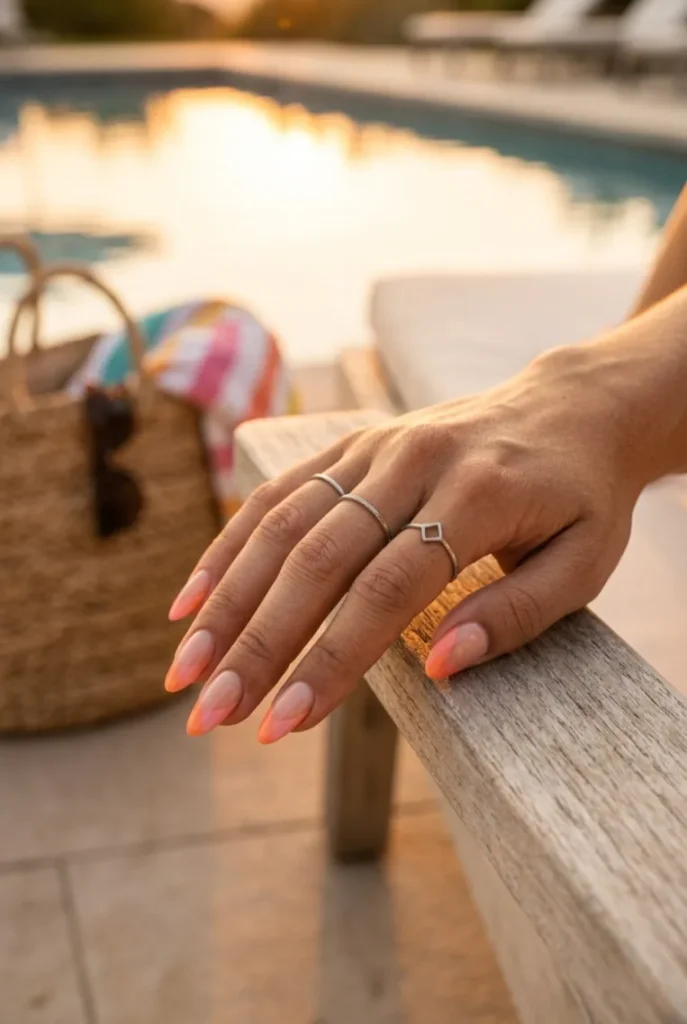
A single diagonal band blends from warm orange near the base to soft pink at the very tip, so the color shifts along the line itself instead of staying one flat shade.
Stiletto nails stretch the gradient out, giving the fade more room to move from one tone to the next.
The rest of the nail stays bare and glossy, letting the warm colors sit against natural nail rather than a painted base.
Two colors blended while still wet, nothing more, is what makes the fade look effortless.
Blend the two colors while both are still wet.
Keep the diagonal angle consistent tip to tip.
Layering too much pigment at once, it turns streaky.
Using more than two colors, it muddies the fade.
13. Matte Black Diagonal Tips with Gold Foil Flecks
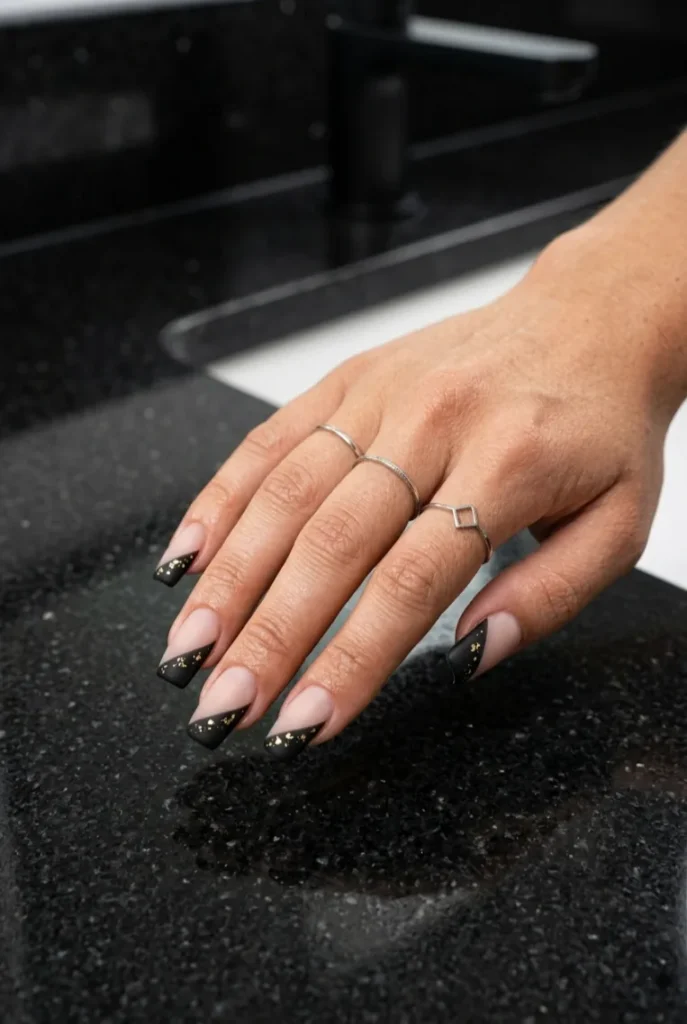
Matte black covers the diagonal section, flat and shadowy against a glossy nude base, so the finish shift becomes part of the design itself.
Tiny gold foil flecks scatter near the tip’s edge, catching light in a way the matte black never does, giving each nail a tiny spark without going full glitter.
Square nails hold the sharp diagonal line well, and the contrast between matte and shine keeps the whole set feeling intentional rather than flat.
⚠️ Watch Out: matte top coat scuffs faster than gloss, so this set needs a fresh coat sooner if hands stay busy.
⚠️ Watch Out
Matte finishes show wear faster than glossy ones, especially on hands that type or wash dishes often. Keep a matte top coat on hand for quick touch-ups.
14. Double Diagonal Stripe Tips in Lilac and Cream
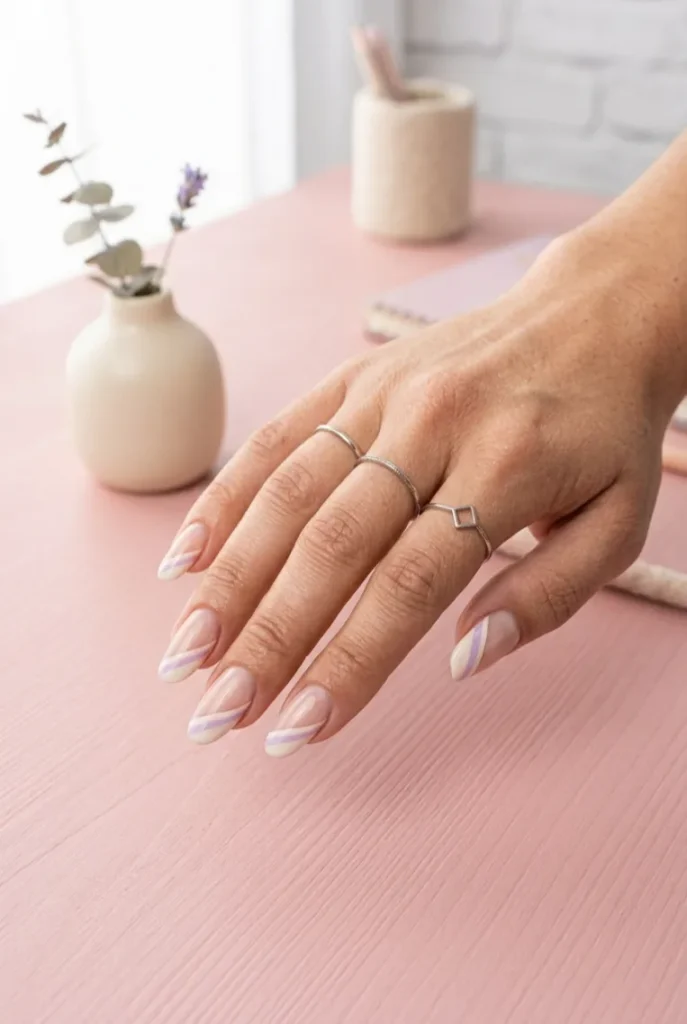
Two thin diagonal lines run parallel to each other near the tip instead of one solid band, leaving slivers of bare nail showing between them.
Lilac takes the outer stripe, cream the inner one, both set against a sheer pink base that keeps the pastel palette soft rather than loud.
Almond nails give the double lines enough length to read clearly instead of blurring together.
| Style | double stripe |
| Palette | pastel |
| Effort | moderate |
15. 3D Pearl Trim Diagonal Tips
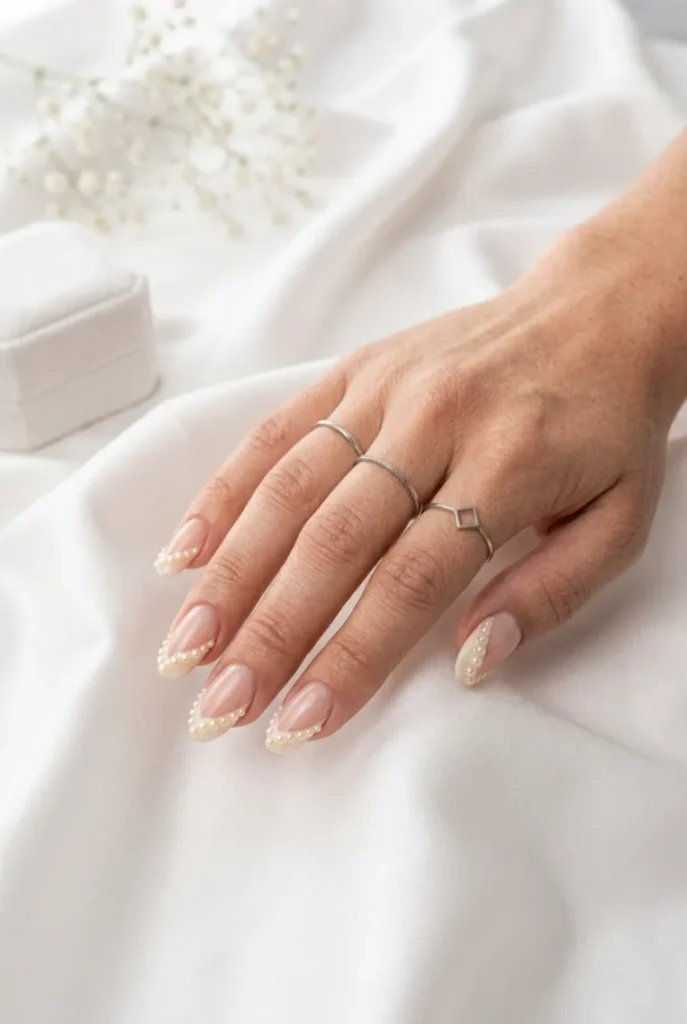
Tiny half-pearls line up along the diagonal edge, pressed into wet gel one at a time before curing so they sit slightly raised off the nail.
Getting the placement even takes patience more than skill.
- Paint the diagonal tip base color and cure it fully.
- Apply a thin strip of clear gel along the diagonal line only.
- Press pearls into the wet gel one by one, then cure once more to lock them in place.
Oval nails give the pearl line a gentle curve to follow, and the rest of the nail stays glossy and plain so the texture stands out.
Paint the diagonal tip base color and cure fully.
Apply a thin strip of clear gel along the diagonal line.
Press pearls into the wet gel, then cure to set them.
16. Diagonal Tips with a Single Line Art Swirl
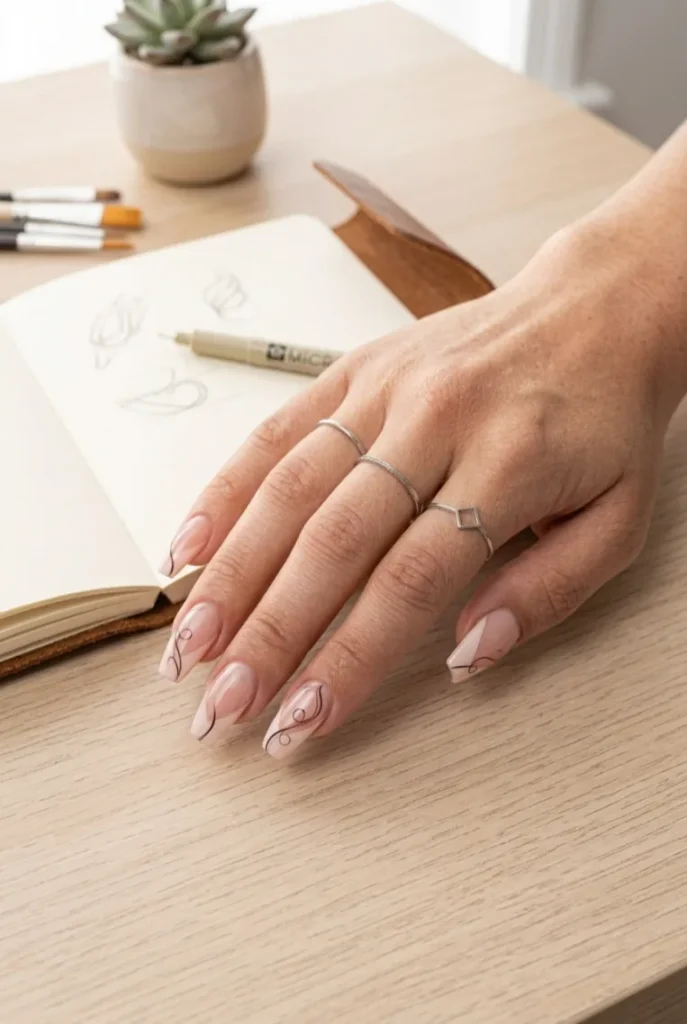
A plain diagonal tip alone already looks clean, but this version adds one thin swirl of line art curling from the edge of the diagonal back toward the cuticle.
The swirl stays hand-drawn and slightly imperfect on purpose, giving it a sketched feel rather than a printed one.
Coffin nails give the line room to curl without hitting the nail’s edge, and keeping everything else bare and glossy keeps the swirl the clear focal point.
Just the straight tip line, no extras.
A single hand-drawn swirl extends from the diagonal edge.
17. Holographic Diagonal Tips with a Rainbow Shift
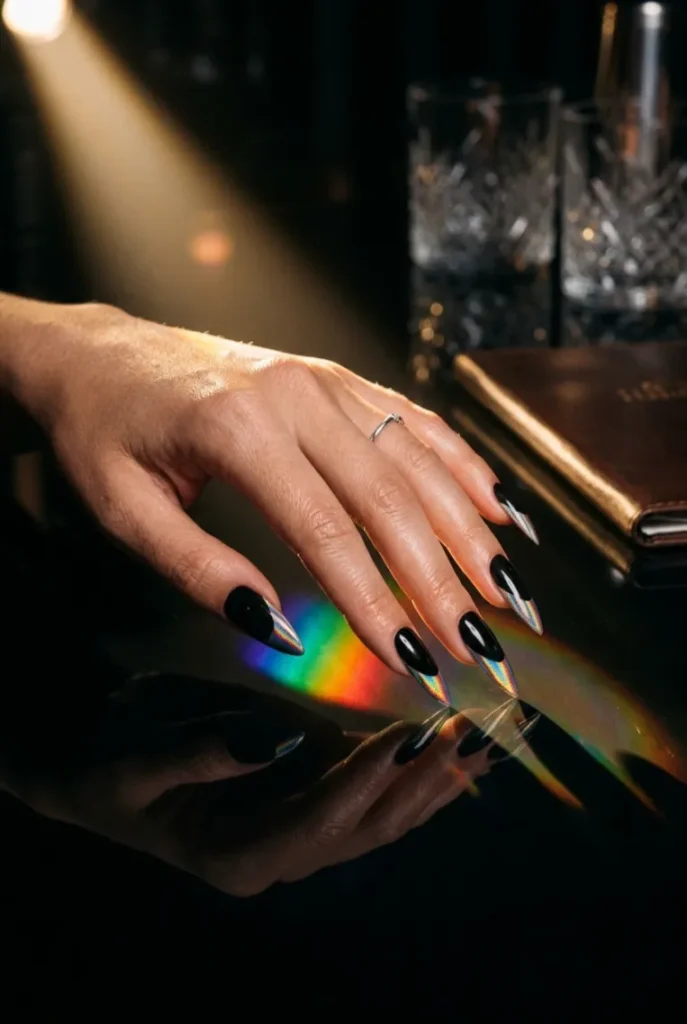
Under direct light, this diagonal tip flashes through pink, blue, and green in quick succession, then settles back into a soft silver when the hand goes still.
The holographic pigment sits over a black base, which makes the color shift read stronger than it would over white or nude.
Stiletto nails stretch the diagonal line long enough for the rainbow shift to move visibly across the whole tip as the hand turns.
18. Marble Diagonal Tips in Black and White
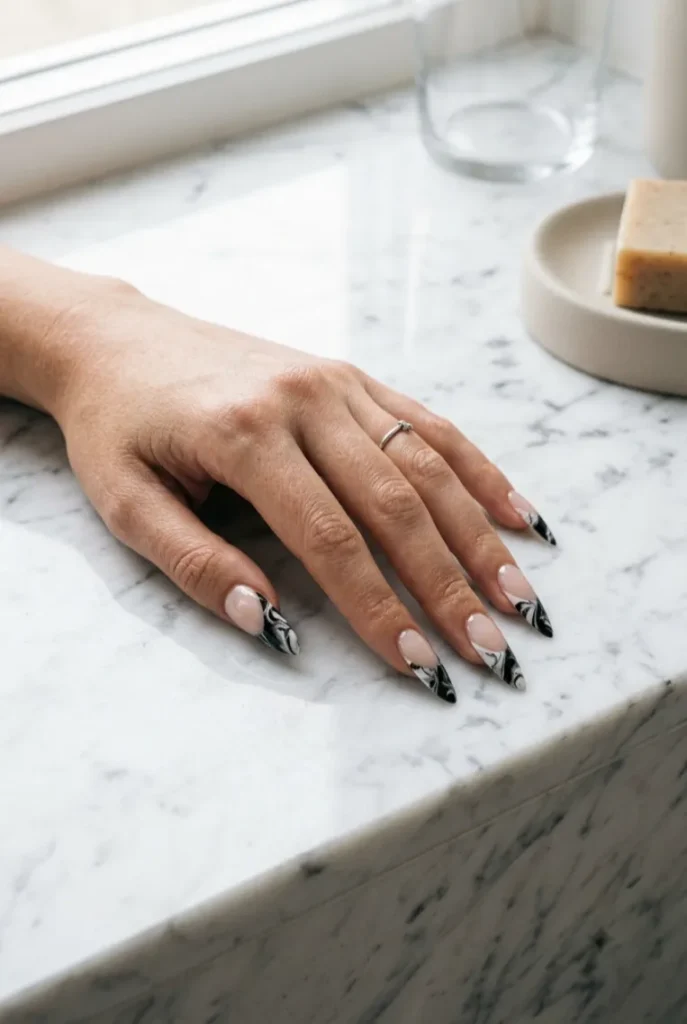
Thin veins of black swirl through white polish across the diagonal section, mimicking the look of polished stone rather than a flat color block.
The marbling stays contained to the tip area only, dropped into water or dragged with a fine brush before the polish sets, so no two nails end up with the exact same pattern.
A glossy nude base underneath keeps the rest of the nail simple.
| Texture | swirled marble |
| Placement | diagonal tip only |
| Marble Detail | What To Know |
|---|---|
| Black and white swirl | No two nails match exactly |
| Contained to tip only | Rest of nail stays clean nude |
19. Cat-Eye Magnetic Diagonal Tips in Emerald Green
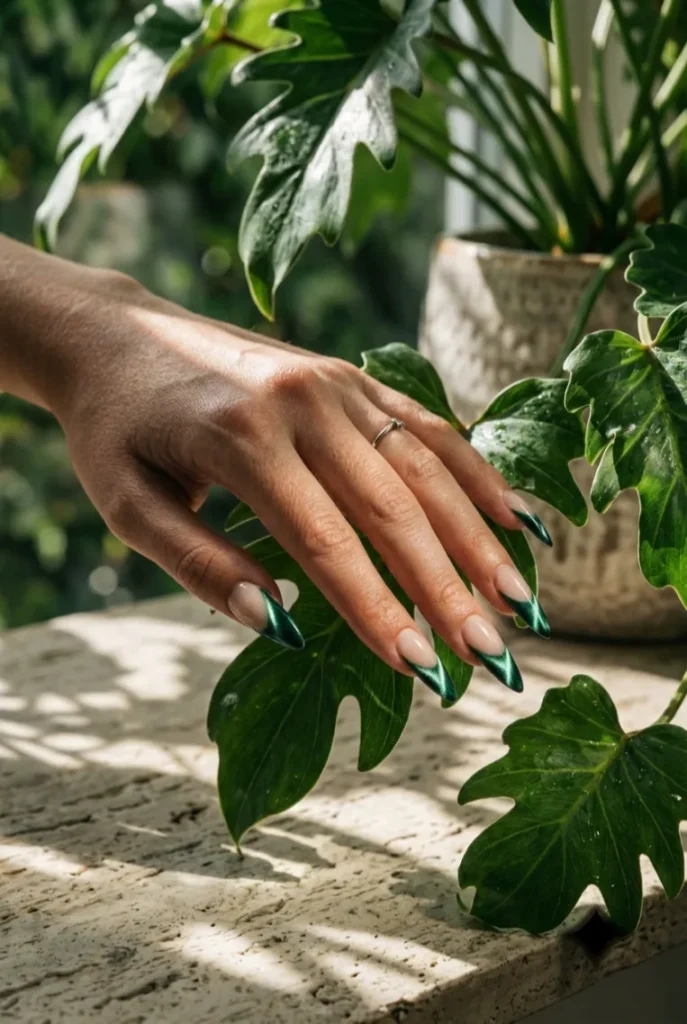
🚫 Skip a flat brush here, cat-eye polish needs the magnetic tool held close without touching the nail.
✅ Do drag the magnet slowly across the wet polish before curing to pull the metallic particles into a glowing line.
Emerald green cat-eye polish fills the diagonal section, and the magnetic pull creates a bright streak of light that shifts position depending on the angle of the hand.
Hold the magnet close without touching the polish.
Cure right after the streak appears.
Dragging the magnet too fast, the streak blurs.
Waiting too long before curing, the effect fades.
20. Latte Ombre Diagonal Tips

📌 Good To Know: warm brown tones photograph best in natural daylight, artificial light can flatten the fade.
Three shades of brown fade into each other along the diagonal, darkest near the tip and lightening toward the cuticle, like the layers in a coffee drink settling before they mix.
A glossy finish keeps it looking rich rather than dull, and oval nails let the fade curve gently instead of cutting off sharp.
📌 Good To Know
Warm brown tones photograph best in natural daylight, artificial light can flatten the fade and make the shades blend into one flat brown.
21. Scalloped Edge Diagonal Tips in Coral
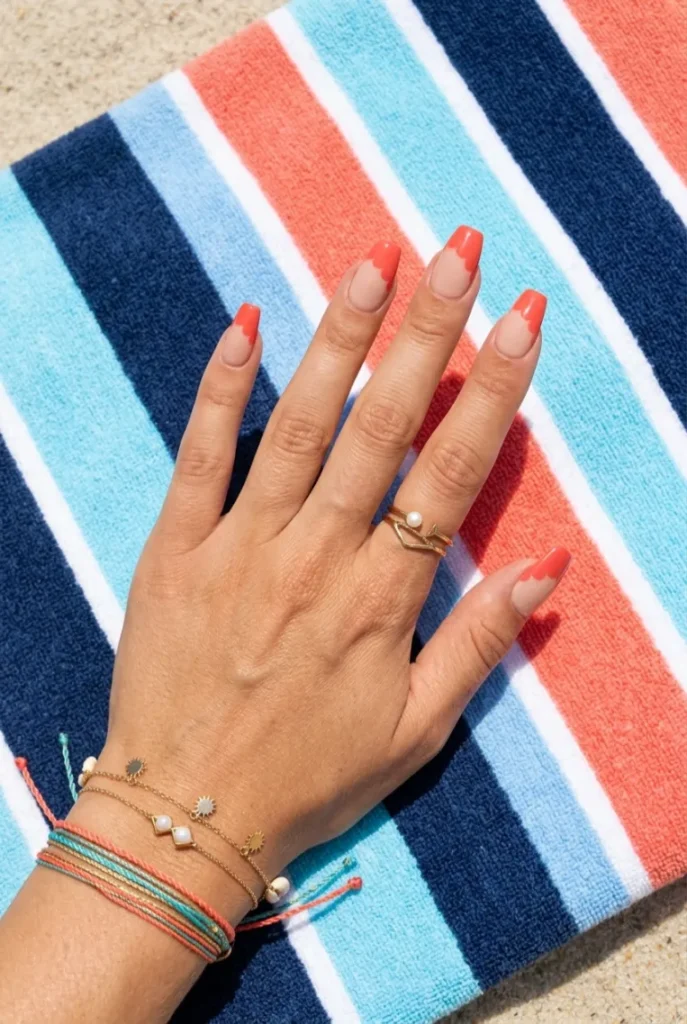
Instead of a razor straight line, this diagonal tip ends in a row of small scalloped bumps, like the edge of a seashell traced along the angle.
Coral polish fills the scalloped section against a glossy white base, giving the whole set a playful, summery feel without adding any extra color.
Round nails suit the scalloped shape better than square ones, since the curved corners echo the bumpy edge instead of fighting it.
Small imperfections in the scallop spacing actually make it look hand done, not printed.
22. Classic Red Diagonal French for Everyday Wear
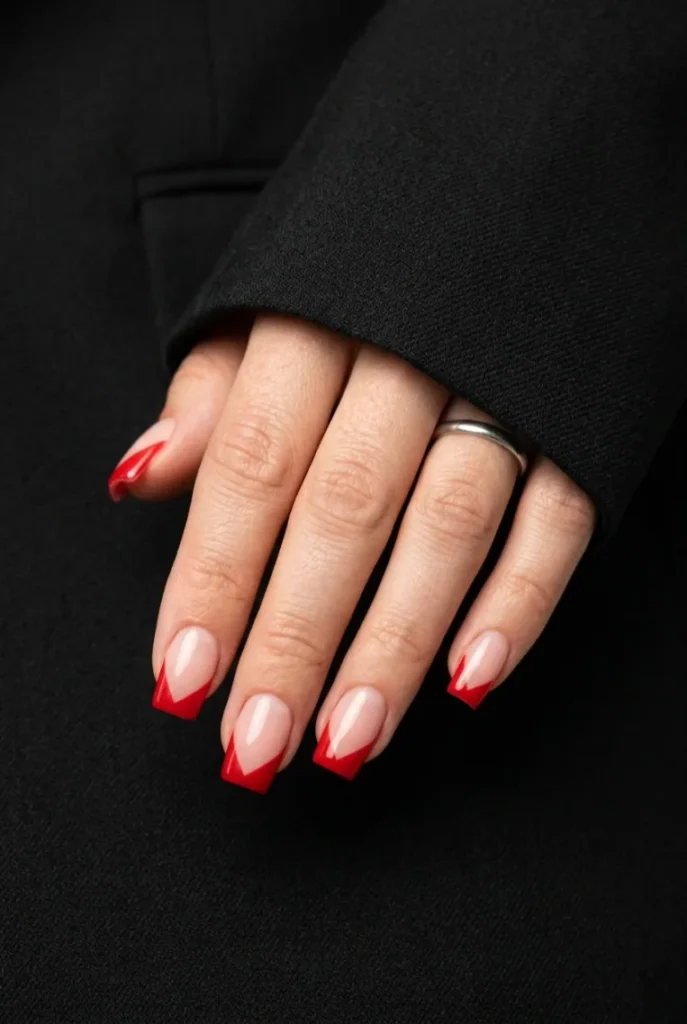
Not every diagonal design needs a twist. Solid classic red covers the tip in one clean angled line, no shimmer, no second color, no added texture, just a confident shift from the usual straight or curved tip.
Square nails keep the line crisp, and the deep glossy red reads polished enough for work while still feeling a little different from a standard french manicure.
- Paint a sheer pink or nude base and let it dry.
- Tape off the diagonal angle from corner to corner.
- Fill with two coats of glossy red, then peel the tape while still slightly wet.
Paint a sheer pink or nude base and let it dry.
Tape off the diagonal angle from corner to corner.
Fill with red, then peel the tape while still slightly wet.
23. Rose Gold and Silver Two-Metal Diagonal Tips
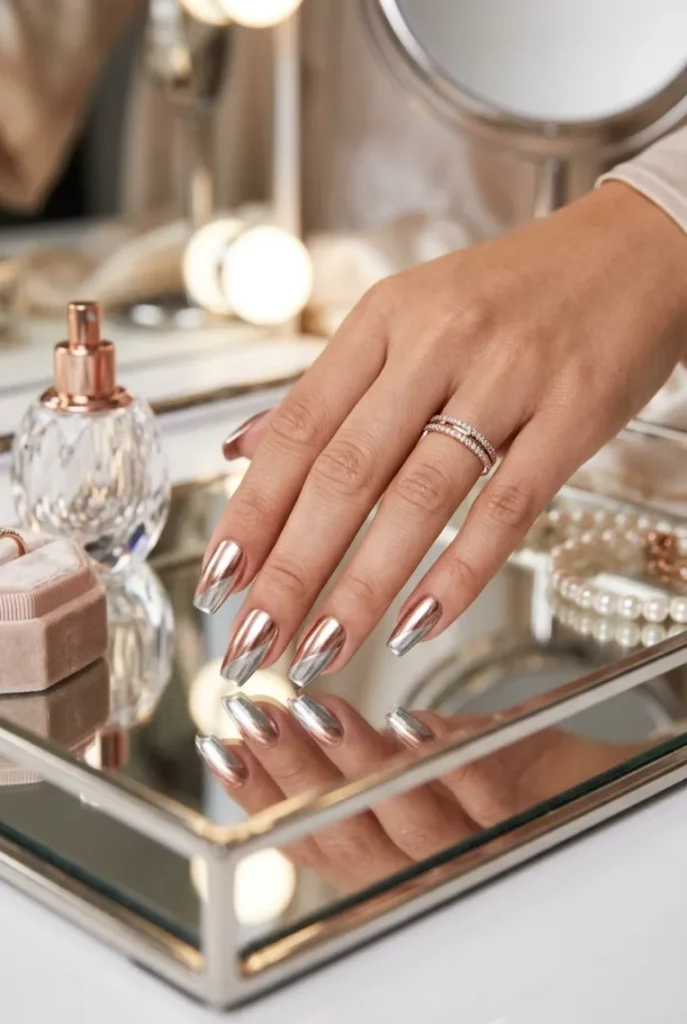
Two different metallics sit side by side here instead of blending together. Rose gold covers half the diagonal tip, silver the other half, meeting at a soft seam with no color underneath either one, just polished metal shine against bare glossy nail.
Coffin nails give both metallics enough surface area to catch light separately as the hand moves, so the two tones never fully merge into one.
24. Jelly Clear Overlay Diagonal Tips in Berry Pink

A layer of translucent jelly polish sits over the diagonal tip instead of a fully opaque color, letting a hint of the natural nail show through the berry pink shade.
The jelly finish looks almost like colored glass, glossy and see-through at the edges, thickest right where the color meets the bare base.
Almond nails suit the soft translucent look, since the rounded tip lets light pass through the edges more evenly.
Quick Tip: two thin jelly coats build better translucency than one thick one.
Recreate this look
25. Sage Green Diagonal Tips with a Thin Brown Line
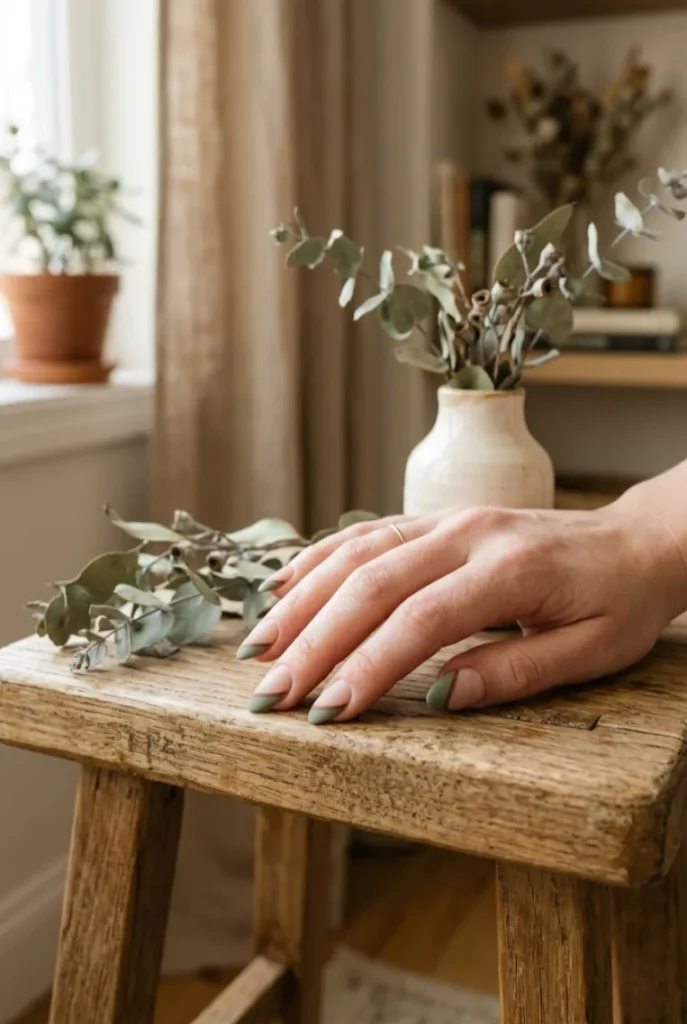
Muted sage green covers the diagonal section, quiet and earthy rather than bright, with a single thin brown line tracing just above where the color starts.
The two tones sit close on the color wheel, so the line reads more like a shadow than a hard border.
Oval nails keep the whole look soft, and a matte finish over the sage adds to the grounded, natural feel.
The pairing works because both colors already exist together in nature, nothing about it fights.
Sage and brown sit close on the color wheel, so the thin line reads as a shadow rather than a hard border.
26. Confetti Glitter Accent Diagonal Set
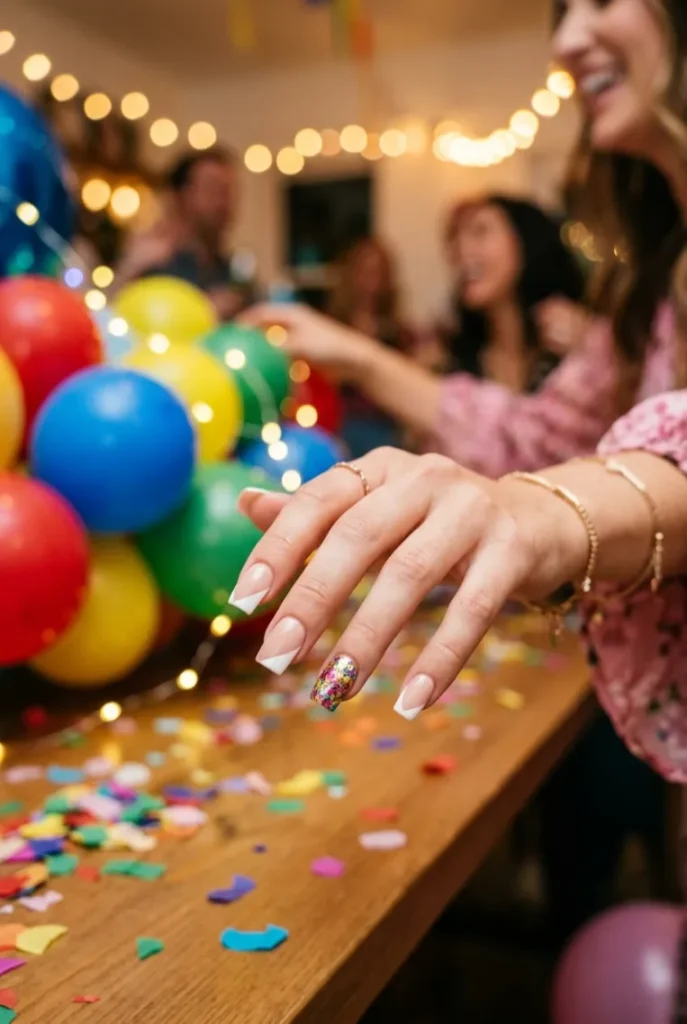
Most nails in this set keep a plain, solid color diagonal tip, but one nail per hand swaps the flat color for a scatter of chunky confetti glitter instead, mixed shapes and sizes suspended in clear polish.
That single glittery nail becomes the centerpiece, while the rest stay calm enough to let it stand out rather than compete.
Square nails keep the confetti pieces from curling with the nail’s edge.
- Solid color diagonal on most nails
- One accent nail per hand gets chunky confetti glitter
- Clear polish holds the glitter pieces in place
- Glossy top coat seals everything smooth
- ▸Solid color diagonal tip on most nails.
- ▸One accent nail per hand gets chunky confetti glitter.
- ▸Glossy top coat seals the glitter pieces flat.
27. Tiny Crystal Line Diagonal Tips
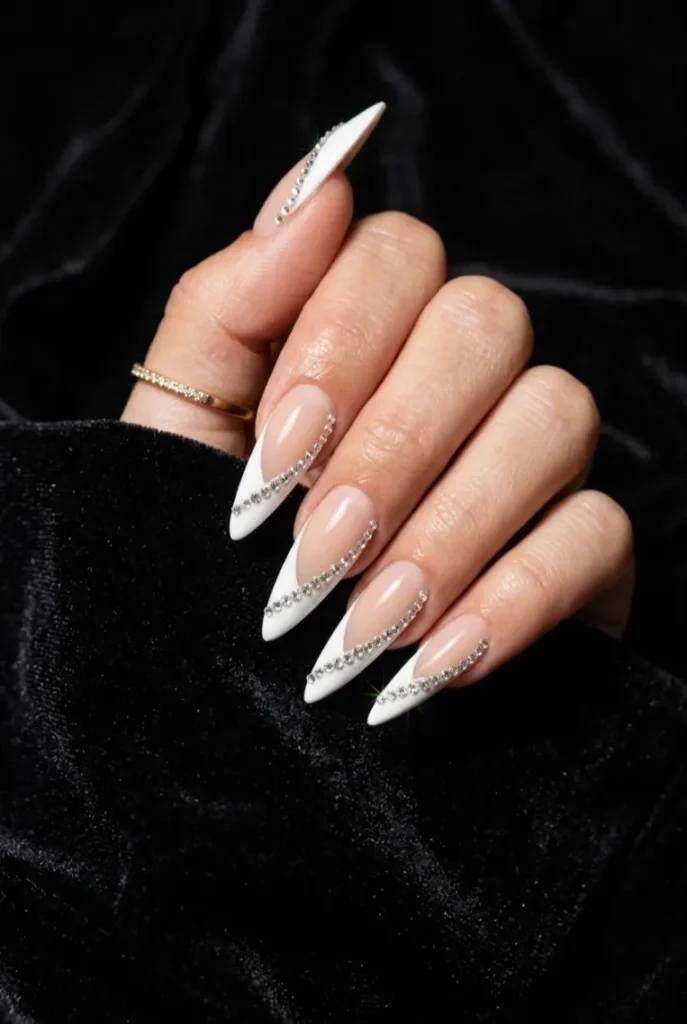
A row of small clear crystals runs the full length of the diagonal line, set close together so they catch light almost continuously rather than in scattered sparkles.
The nail underneath stays a plain glossy nude, letting the crystal line sit as the only decoration instead of competing with color or pattern. Stiletto nails give the line the most length to shine across.
28. Celestial Star-Dust Diagonal Tips in Midnight Blue
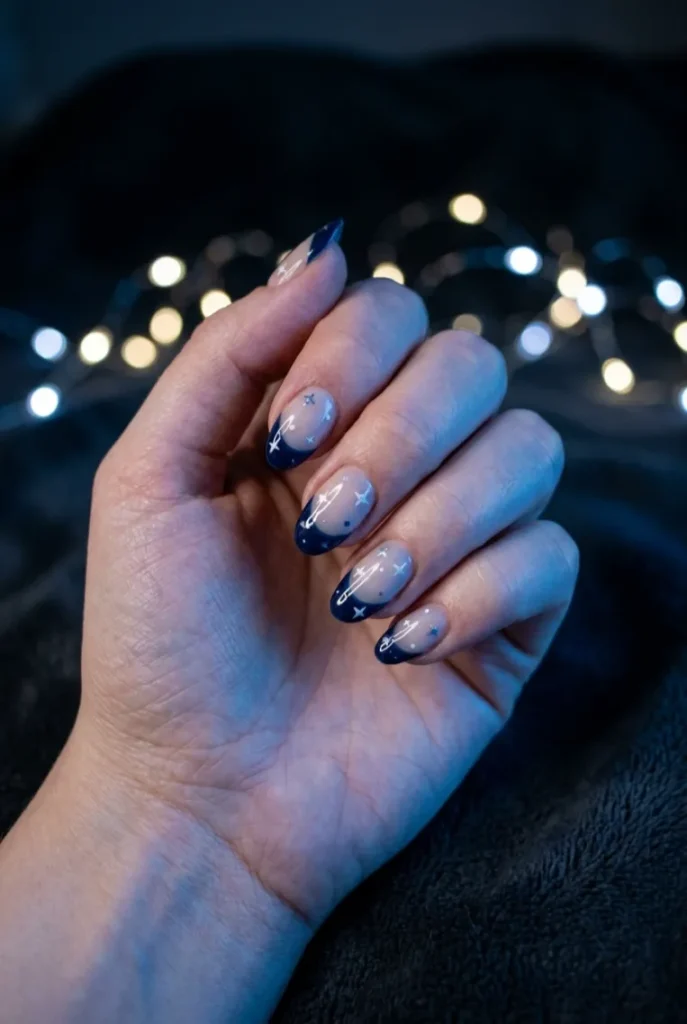
Deep midnight blue fills the diagonal section, and scattered across it sit tiny hand-painted white dots of varying sizes, some barely visible, some slightly larger, mimicking how stars actually look scattered unevenly across a night sky.
A few dots trail past the diagonal line onto the bare nail, softening the edge instead of stopping abruptly. Almond nails give the star scatter a natural curve to follow.
Quick Tip: vary the dot sizes on purpose, evenly spaced dots read more like polka dots than stars.
💡 Quick Tip
Vary the dot sizes on purpose. Evenly spaced, same-size dots read more like polka dots than scattered stars.
29. Alternating Color Diagonal Tips, Blue and Blush
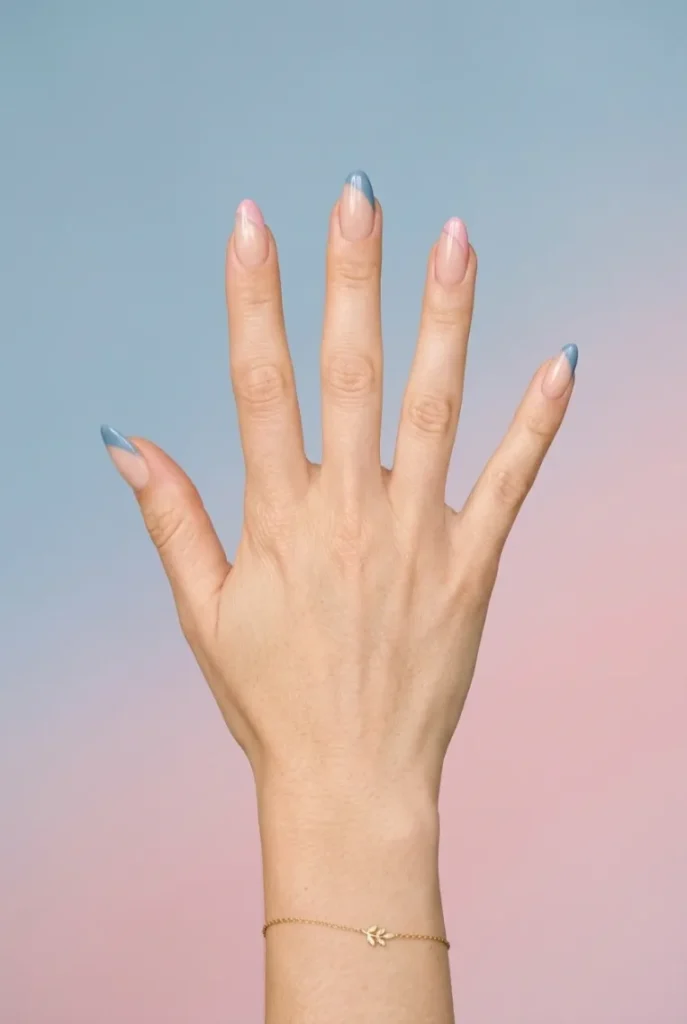
Instead of one color across all ten nails, this set alternates whole nails between two shades, dusty blue on some fingers, soft blush on others, both still using the same diagonal tip angle for consistency.
The alternating pattern keeps the hand visually balanced rather than random, usually thumb and middle finger sharing one color, the rest split evenly. Round nails keep the two-tone pattern feeling soft rather than graphic.
| Blue nails | dusty blue, glossy |
| Blush nails | soft blush, glossy |
| Blue Nails | Blush Nails |
|---|---|
| Dusty blue diagonal tip. | Soft blush diagonal tip. |
| Same angle as blush nails. | Same angle as blue nails. |
30. Copper Foil Marbled Diagonal Tips

Copper foil pieces get pressed into wet top coat across the diagonal section, then swirled slightly with a dotting tool before it sets, so the metallic breaks into an uneven marbled pattern rather than sitting flat.
The warm copper tone pairs well against a glossy caramel nude base, keeping the whole palette autumnal without leaning into a full seasonal theme. Coffin nails give the foil marbling the most surface to spread across.
Foil never looks the same twice, that unpredictability is the appeal here, not a flaw.
The End
Diagonal lines sound like a small detail until you see them on your own hands, that one tilt changes the whole energy of a manicure without asking for a total redo.
Whether it’s the quiet chrome version, the loud confetti accent, or the plain classic red, there’s room to make it yours.
Try one on your next fill, or save a few and rotate through them over the season. Either way, it beats another straight-across set.
Pin this for your next nail appointment 📌
💡 Quick Tip
Screenshot two or three favorites before your appointment, your nail tech can usually blend elements from more than one idea into a single set.


