
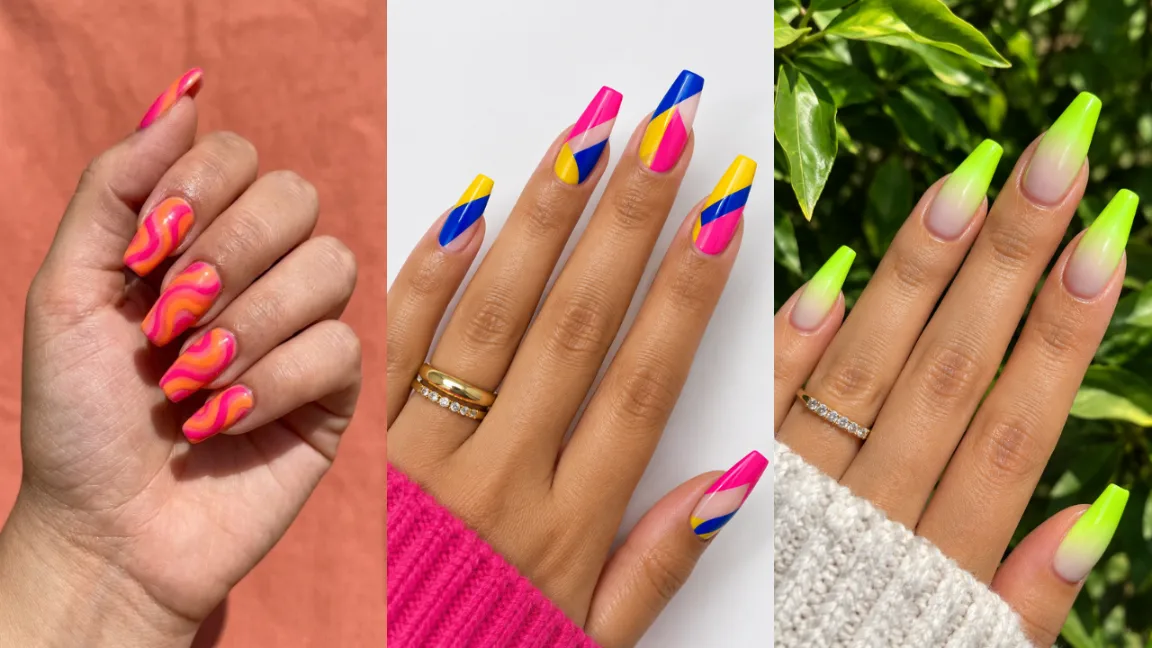
Coffin nails give you the longest, flattest canvas on the nail bar, and that space deserves more than a plain color.
These twenty coffin nail shape ideas push color, texture, and pattern as far as they can go, from chrome cherry red to hand painted flames. Each one is built to turn heads, not blend in.
1. Chrome Cherry Red Coffin Nails for a Mirror Finish That Turns Heads
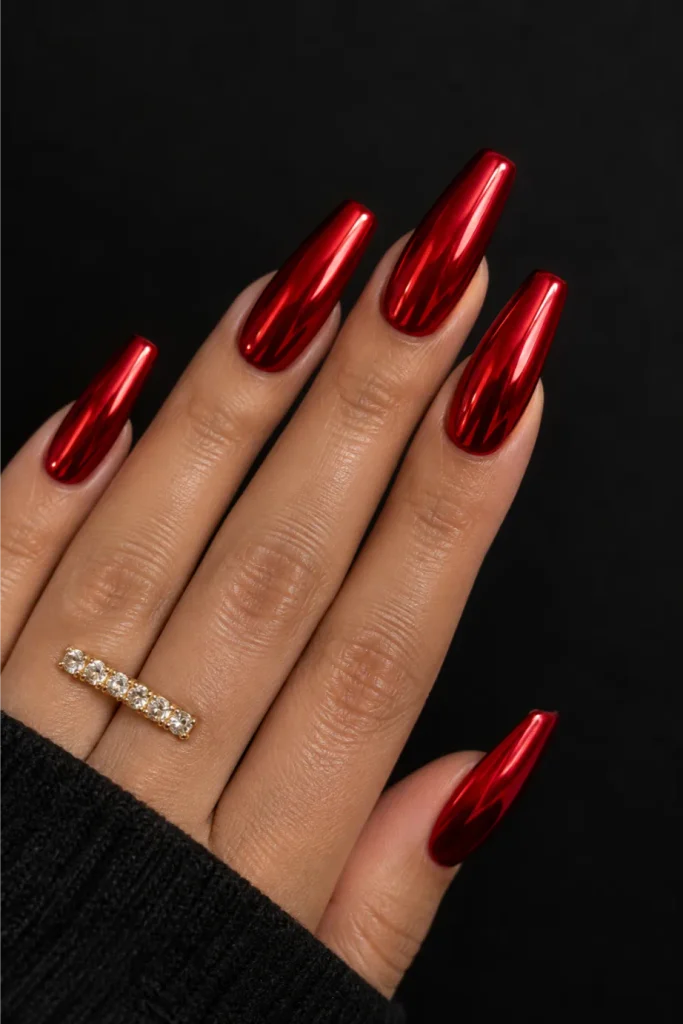
Cherry red chrome pushes coffin nails past ordinary and into full statement territory.
The mirror finish catches every bit of light, so the color shifts from deep wine to bright candy apple depending on the angle. What makes this look work on a long coffin shape:
- The flat, wide tip gives the chrome pigment more surface to reflect light
- A high-gloss top coat keeps the mirror effect from dulling within days
- Cherry red reads bold without needing extra art or charms
Ask for a chrome powder application rather than chrome polish. Powder holds the reflective finish far longer and resists the streaking that polish versions often show after a week.
2. Black and Gold Geometric Coffin Nails for a Graphic Line Look
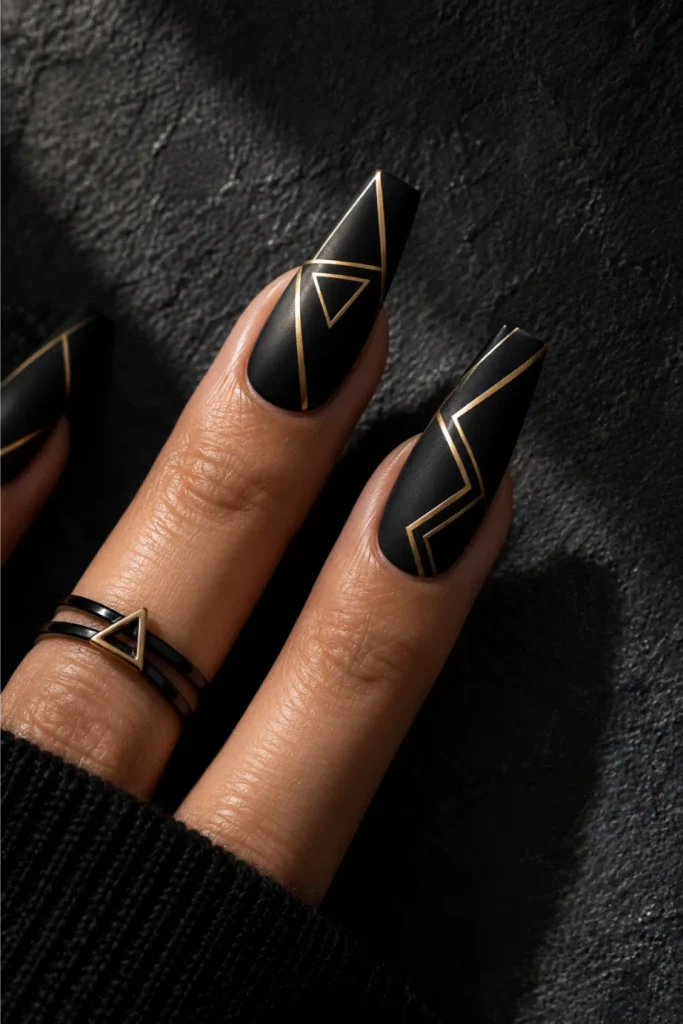
Geometric line art turns a plain black coffin nail into wearable art without covering the whole nail. Gold striping tape or a fine liner brush traces triangles, zigzags, and open squares across a matte black base, and the negative space does half the work. Getting the graphic effect clean comes down to three steps.
- Paint two matte coats of black and let it cure fully before any line work.
- Use a thin gel liner or striping tape for straight edges, gold works best in a metallic gel formula.
- Seal everything with one glossy top coat so the matte and metallic contrast pops.
Skip the top coat on a section if you want a matte and shine mix within the same nail.
💡 Quick Tip
A fine detail brush gives cleaner geometric lines than striping tape on the curved coffin tip, where tape tends to lift.
3. Neon Lime Ombre Coffin Nails for a High Voltage Fade
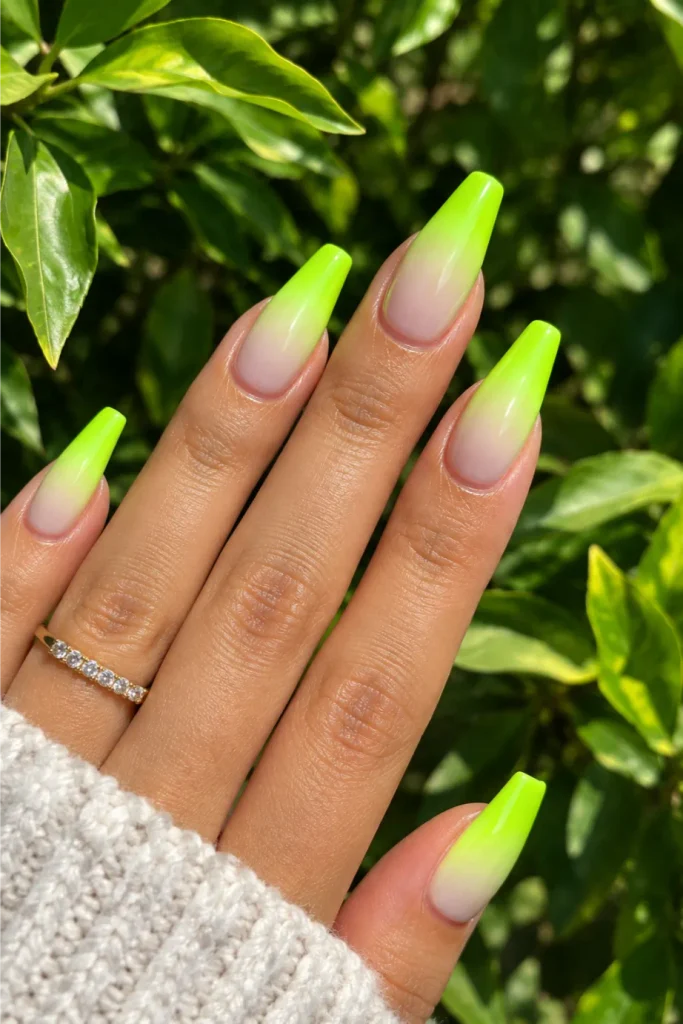
A lime green fade that goes from pale chartreuse at the cuticle to a saturated neon tip reads loud in the best way on a coffin shape, since the flat tip holds the darkest part of the gradient like a color block.
Sponge blending gives the smoothest transition, and a UV-reactive top coat makes the whole set glow under blacklight, which is a small detail that makes this design pop even harder at parties or festivals. Watch out for muddy blending though.
Wipe the sponge clean between dabs or the colors turn grey instead of staying bright.
4. Cobalt Blue Coffin Nails with Cracked Gold Leaf Accents
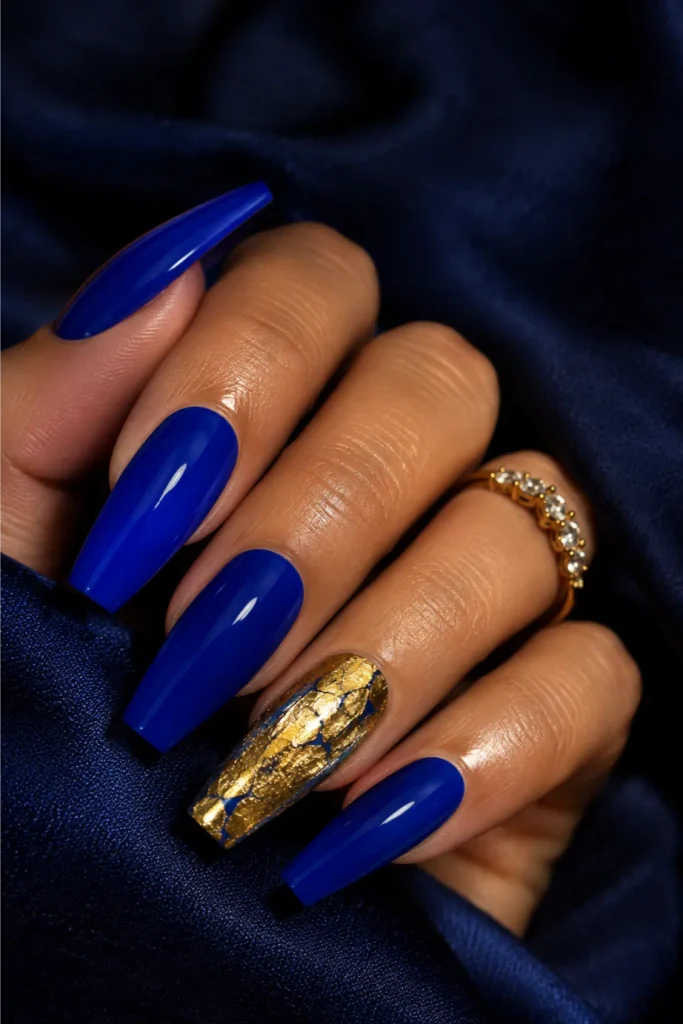
Cobalt is one of the few blues that reads as genuinely bold rather than pastel, and pairing it with cracked gold leaf on one or two accent nails keeps the whole set from feeling flat.
There are two ways to place the gold leaf, and each gives a different result.
Full accent nail: cover one nail entirely in cracked gold leaf over a clear base, so it stands out fully against the cobalt set.
Scattered fragments: press small gold leaf pieces onto the cuticle edge of every nail instead, which spreads the shimmer without any single nail stealing focus.
Either approach needs a thick top coat to lock the fragile leaf down for more than a few days.
Apply two coats of cobalt blue gel and cure fully.
Brush a thin layer of gold leaf adhesive where the leaf will sit.
Press the gold leaf on, then seal with a glossy top coat.
5. Bold Orange and Black Leopard Print Coffin Nails
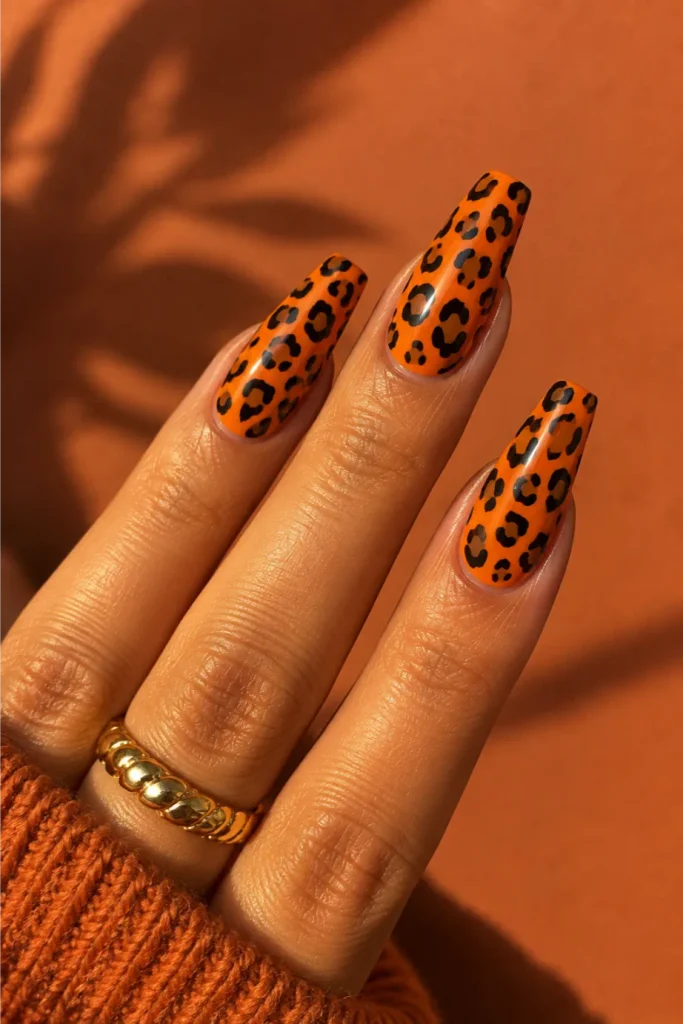
Leopard print in orange and black skips the usual beige and tan combo entirely, which is what makes it read as a statement instead of a basic animal print set.
The spots sit on a bright orange base, and black outlines with a soft brown fill inside each spot keep the pattern looking hand painted rather than stamped on. A few things keep the print looking intentional instead of messy:
- Vary the spot sizes across the nail
- Leave uneven gaps instead of spacing spots evenly
- Angle some spots toward the cuticle and others toward the tip
Freehand the spots with a dotting tool rather than a stamping plate for a print that looks organic instead of repeated.
Vary spot size and spacing across the nail.
Use a warm orange base for contrast.
Evenly spaced, same-size spots.
A stamping plate for the whole set.
6. Crystal Embellished Glam French Coffin Nails
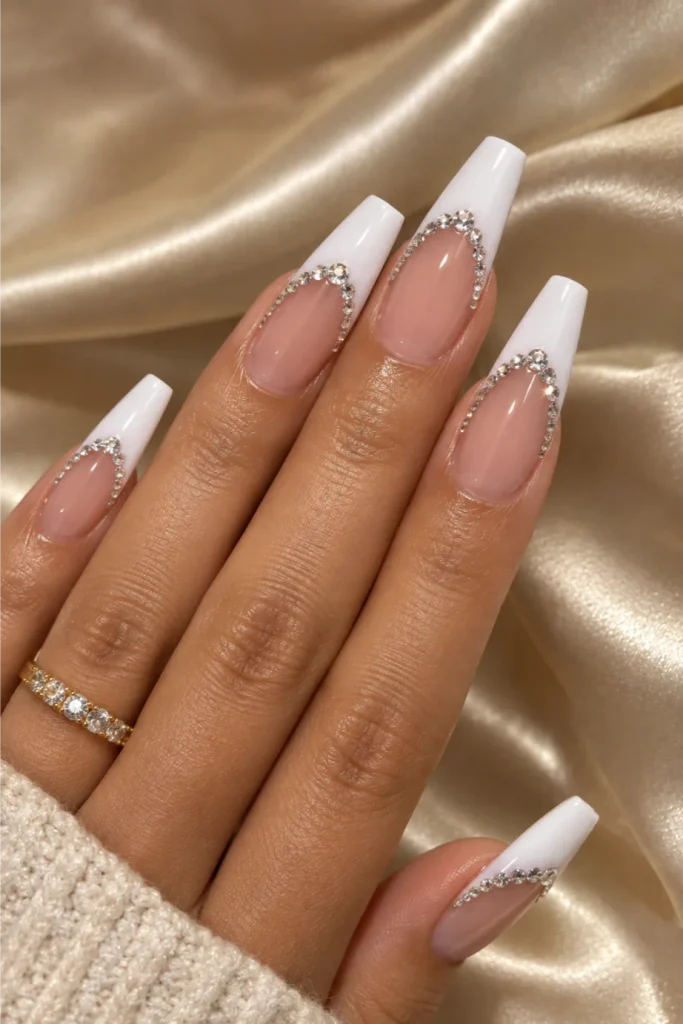
Oversized crystals along a wide French line turn a classic shape into something built for a night out.
The line itself stays thick and slightly angled rather than the usual thin curve, which gives the crystals more room to sit without crowding. Three placement choices change the whole look:
- A single row of crystals along the smile line for a clean, even sparkle
- Clustered crystals at one corner for an asymmetrical statement
- Graduated sizes, largest at the corner and smallest toward the center
Use nail glue rather than gel to set the stones, since gel can trap air bubbles under larger crystals and dull the sparkle.
Recreate this look
7. Abstract Color Block Coffin Nails in Clashing Brights
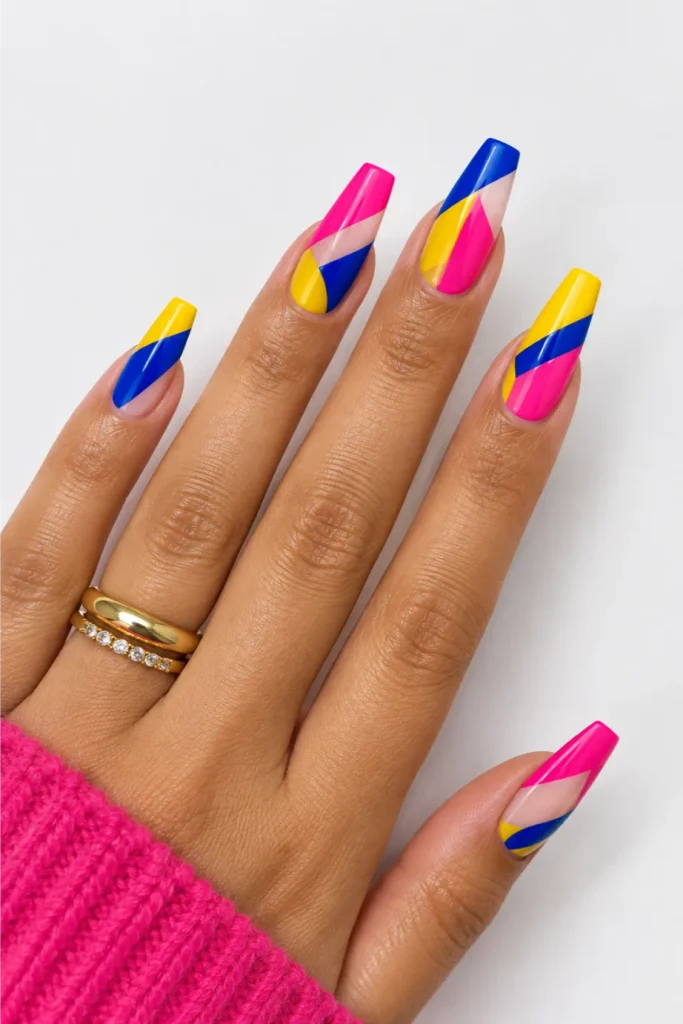
Color blocking works because it treats each coffin nail like a small canvas instead of trying to match one pattern across all ten fingers.
Hot pink, cobalt, and mustard yellow sit next to each other in hard-edged shapes, no blending, no gradients. Building the look cleanly takes a bit of masking.
- Paint the base color first and let it cure completely.
- Apply nail vinyl or tape to block off the shape for the second color.
- Paint the second color, peel the tape while it’s still slightly tacky, then cure.
Keep each nail to two colors maximum. Adding a third on every nail turns the clean geometry into visual noise fast.
Hard edges and clashing colors read as intentional design, not a mismatched manicure.
8. Metallic Purple Duochrome Coffin Nails That Shift Color
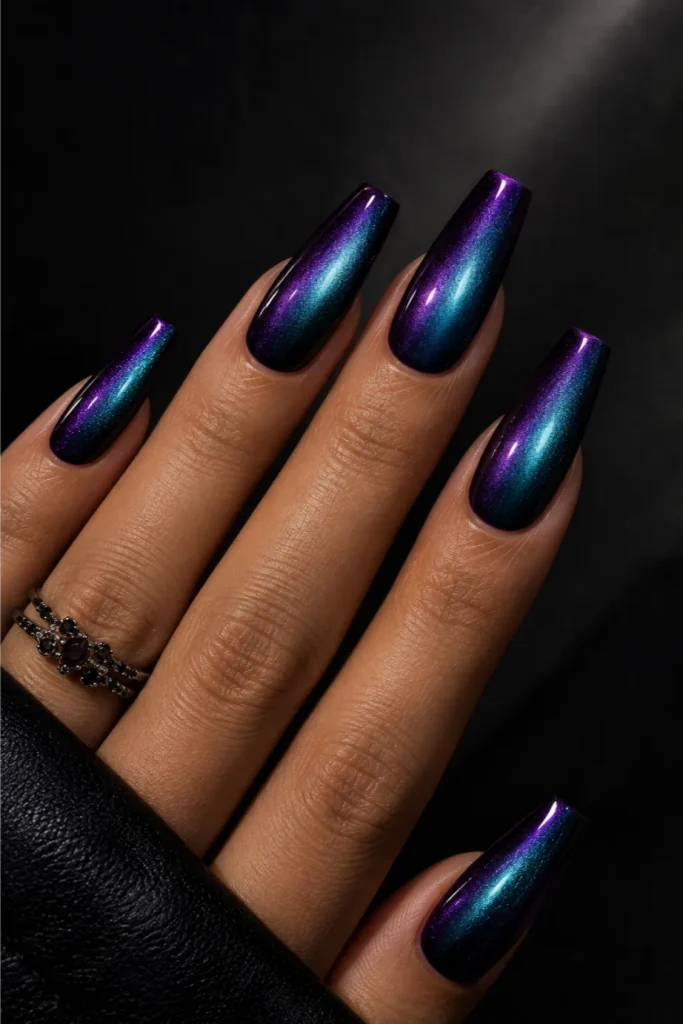
Duochrome pigment is what makes this set worth the extra step, since the polish reads violet in direct light and slides toward teal-green the moment the hand moves.
On a coffin nail the color shift is easier to see than on shorter shapes, because the flat wide tip catches light at more than one angle at once.
Apply the duochrome pigment over a black gel base rather than a light one. A dark base makes the shift more dramatic and keeps the color from washing out under indoor lighting.
| Black Base | Light Base |
|---|---|
| Strong, dramatic color shift. | Softer, more washed-out shift. |
| Reads bold in any lighting. | Loses effect under dim light. |
9. Hand Painted Red Poppy Coffin Nails for Bold Florals
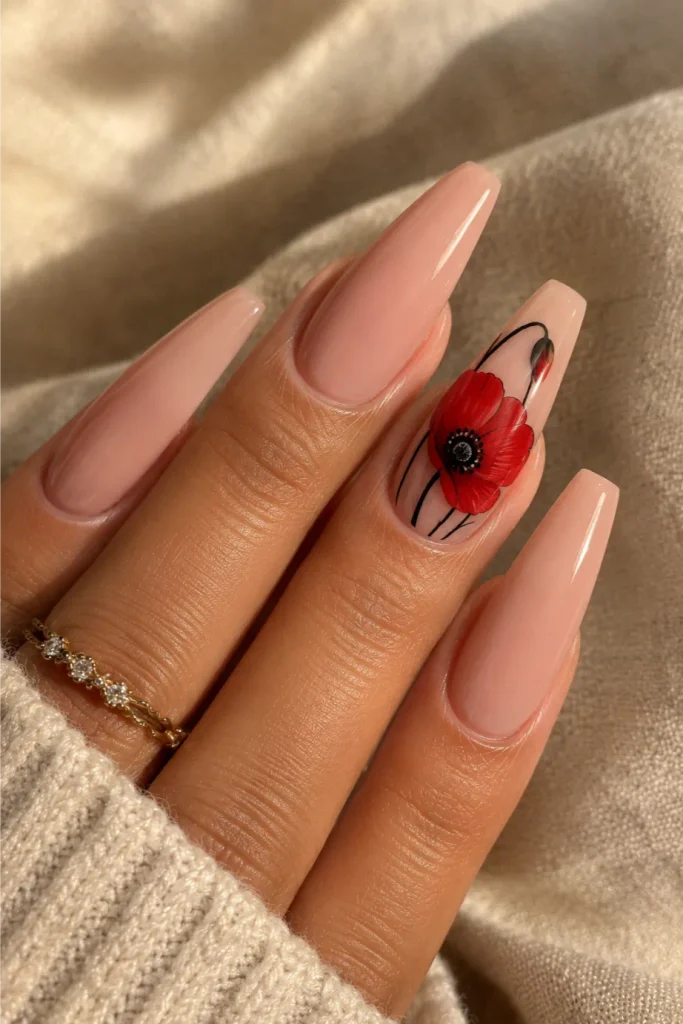
Most floral nail art shrinks the flowers down to fit, but this design does the opposite.
A single oversized red poppy takes up most of the nail bed on one or two accent fingers, with the rest of the set in a plain nude or black base to let the flower stand out. There are two ways to place the poppy.
One large bloom: centered on the nail, petals reaching close to both edges, for maximum impact.
Cropped bloom: only part of the poppy shown, as if the nail is a close-up frame, which reads more modern and editorial.
Either version needs thin black line work for the poppy’s center to keep it from looking flat.
Plain nude coffin nails with no art.
One oversized hand painted red poppy accent nail.
10. Fire Gradient Coffin Nails in Orange and Red
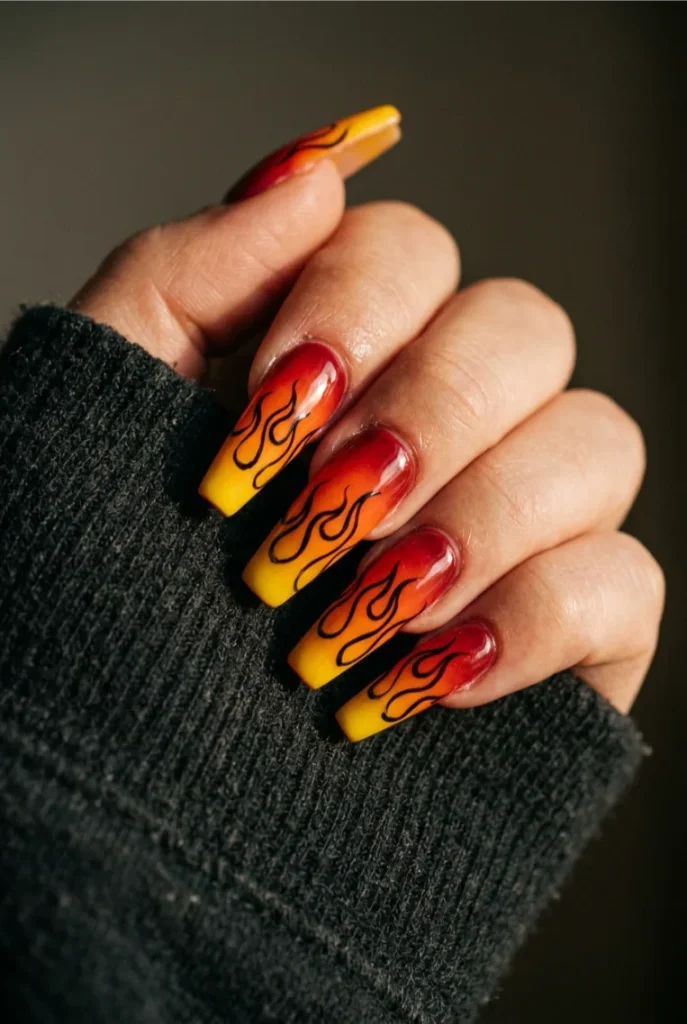
Flame art works well on coffin nails because the pointed tip mimics the natural shape of a rising flame, so the design and the nail shape reinforce each other instead of fighting.
A red to orange to yellow gradient forms the base, then black flame outlines are painted over it in a wave pattern moving up from the cuticle. A clean flame set comes down to a short checklist:
- Blend the gradient before adding any black line work
- Keep flame shapes irregular, not symmetrical
- Add a few small floating spark dots near the tip
Matte top coat instead of glossy gives the fire a smokier, less cartoonish finish.
- ▸Blend gradient before line work.
- ▸Keep flame shapes irregular.
- ▸Add floating spark dots near the tip.
11. Marbled Black and Gold Coffin Nails for a Molten Look
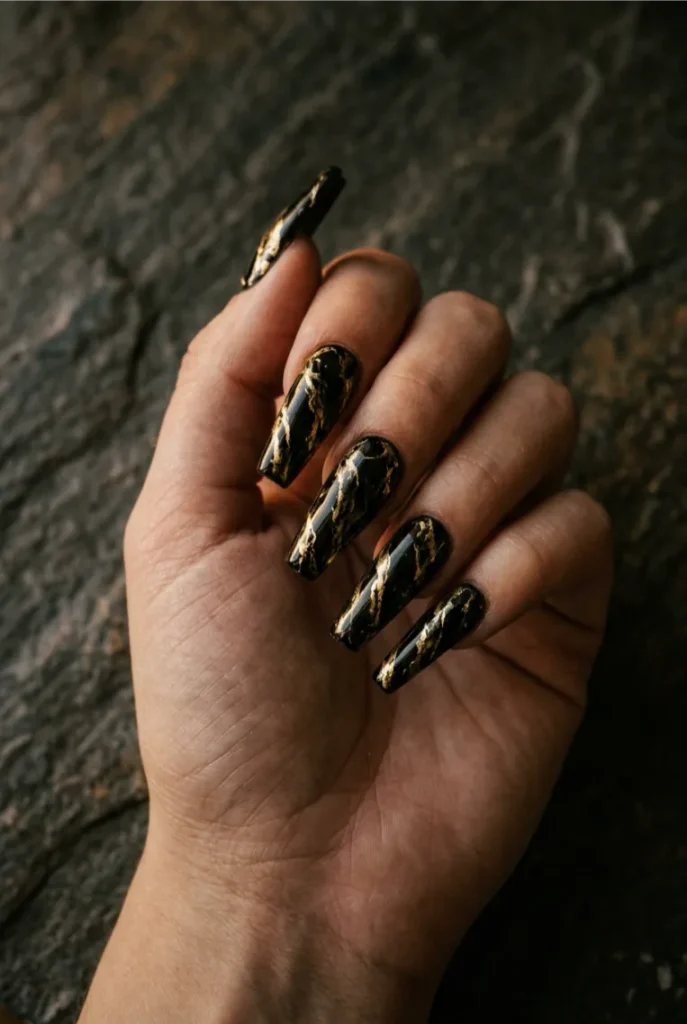
Molten gold streaks running through a black base give this set a look closer to poured metal than painted polish.
The marbling happens wet-on-wet, dragging gold through black before either color sets, so no two nails come out identical, which is part of the appeal here.
A few things make the marbling read as intentional instead of muddy:
- Use a dotting tool, not a brush, to drag the marble lines
- Keep the gold streaks thin and directional, not scattered
- Leave patches of pure black between the gold veins
Work fast. Both polishes need to stay wet at the same time for the marble effect to blend properly.
12. Electric Blue Glitter Ombre Coffin Nails
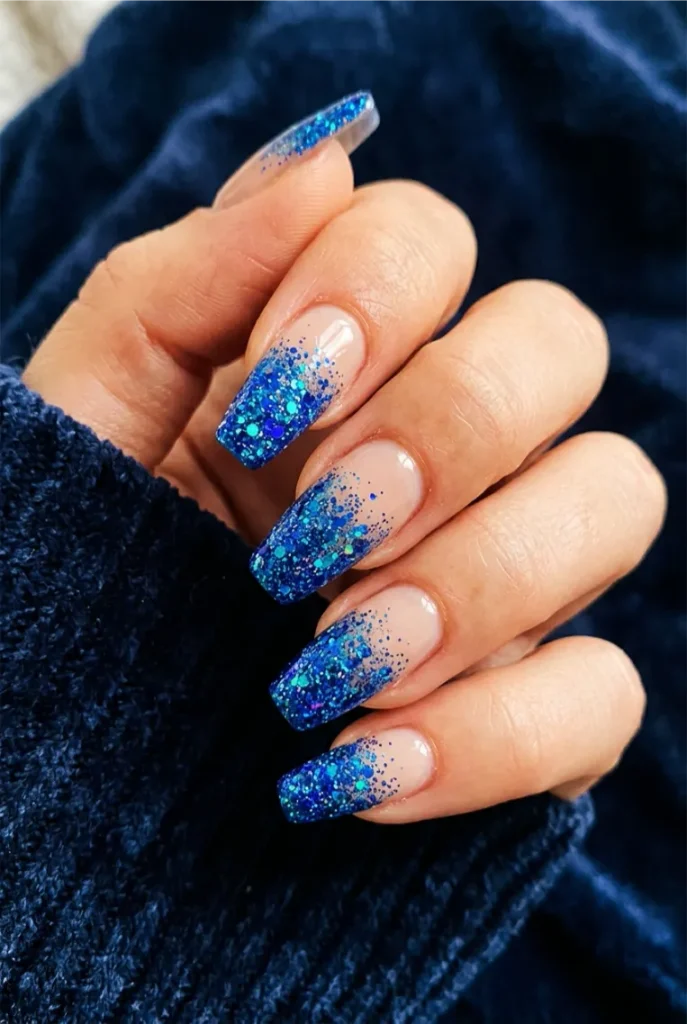
Chunky electric blue glitter packed toward the tip and thinning out toward the cuticle gives this set a fade without relying on smooth polish blending, which makes it far more forgiving for a first attempt at ombre. Building the fade in glitter form comes down to three passes.
- Apply a sheer blue base and cure.
- Dab a dense layer of chunky glitter only at the tip, using a makeup sponge.
- Add a thinner, sparser layer moving up toward the cuticle for the fade.
Seal with two coats of thick top coat, since chunky glitter needs more than one pass to lie flat and stop catching on fabric.
💡 Quick Tip
Press the sponge straight down rather than dragging it sideways, or the glitter smears instead of stacking.
13. Emerald and Black Snake Print Coffin Nails
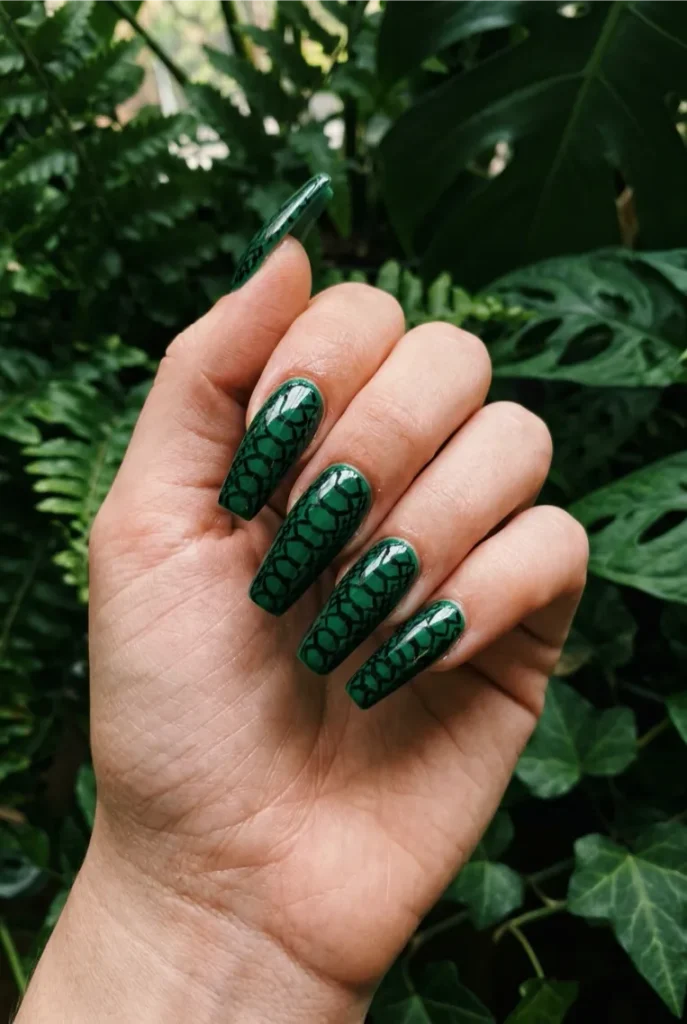
Snake print in emerald green instead of the usual brown or tan makes this set feel closer to a runway piece than a basic animal print.
The scale pattern sits over a glossy emerald base, painted in overlapping black curved lines that thin out toward the edges of each scale.
Coffin nails give the pattern room to breathe since the wide flat tip fits several full scales without cramming them.
Keep the scale sizes consistent across each nail, since uneven sizing is what makes hand painted snake print look sloppy instead of deliberate.
14. Black and White Checkerboard Coffin Nails
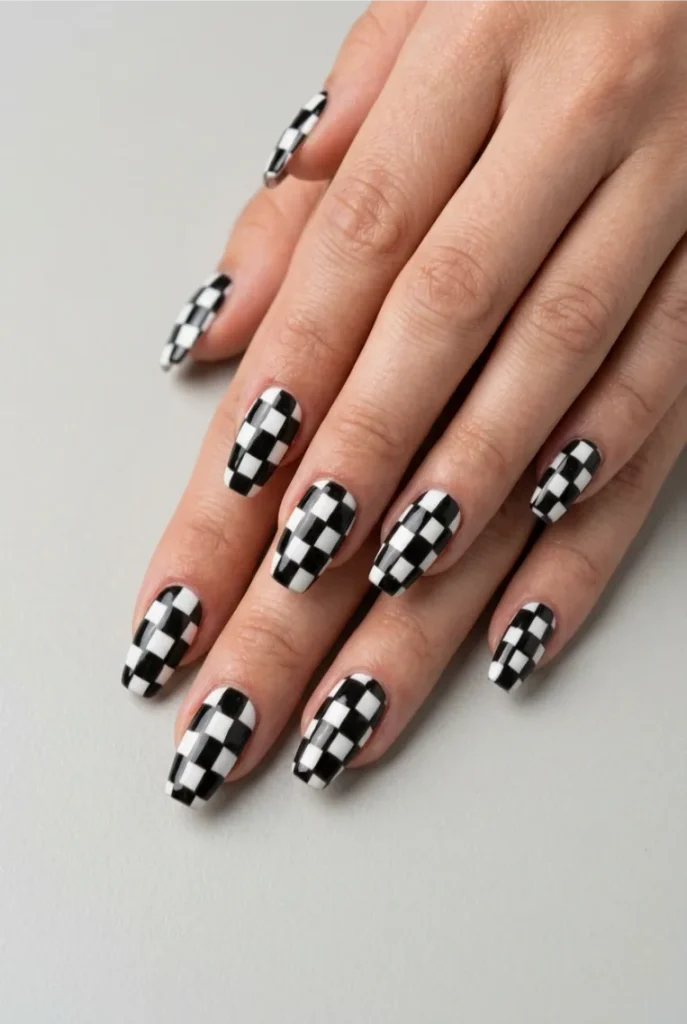
Checkerboard print has stayed a Pinterest favorite for a reason, and on a coffin shape it reads sharper than on shorter nails since the longer canvas fits a full grid instead of a cramped partial pattern.
There are two grid sizes worth trying depending on how bold the set should feel.
Large squares: four to six squares per nail, bold and graphic, easiest to paint clean.
Micro grid: a dense small checkerboard across the whole nail, more detailed but harder to keep the lines straight.
Nail vinyl stickers make either size far easier to freehand than a striping brush alone.
Paint a white base and cure fully.
Apply grid-shaped nail vinyl over the base.
Paint black over the exposed squares, then peel and seal.
15. Burgundy Velvet Matte Coffin Nails with a Glossy Line
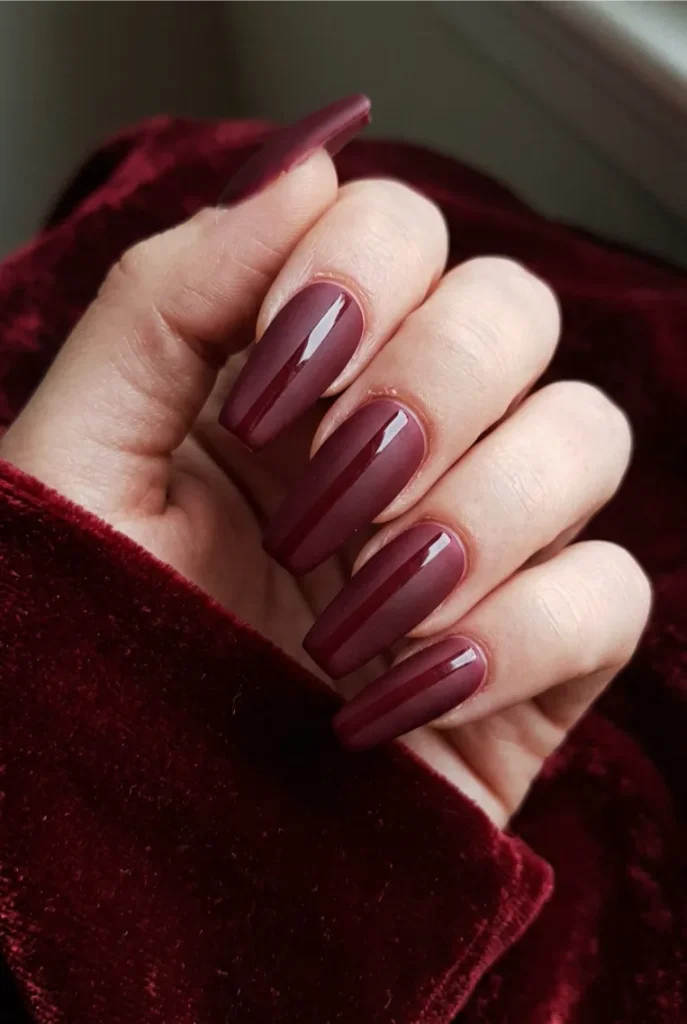
Matte burgundy on its own can read a little flat, so this version keeps most of the nail matte but paints one glossy line down the center of each nail, top to bottom. The contrast between the two finishes does more visual work than any extra color or art would. Getting the split finish clean needs a short list followed in order:
- Cure the matte top coat fully before touching the nail again
- Mask off a thin center strip with tape
- Apply a single coat of glossy top coat only inside the taped strip
Peel the tape while the gloss is still slightly tacky to avoid pulling up the matte finish underneath.
Cure matte fully before taping.
Peel tape while gloss is tacky.
Taping over wet matte polish.
Letting gloss dry fully before peeling.
16. Holographic Silver Coffin Nails with Negative Space Stars
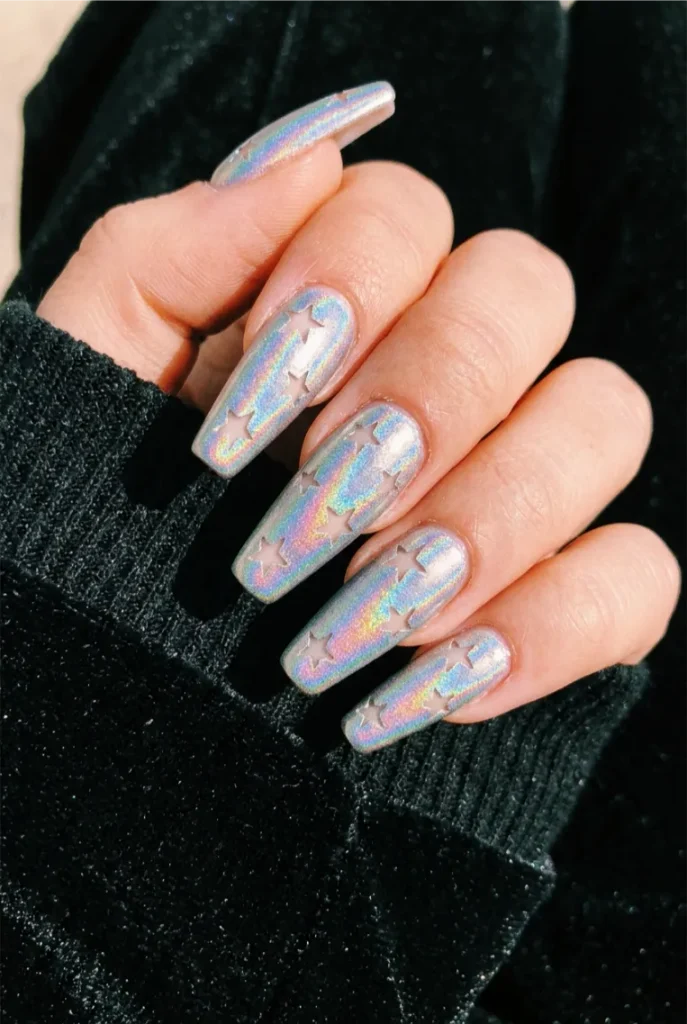
Holographic silver polish already does a lot of the heavy lifting on its own, throwing rainbow flashes across the nail in direct light, so this design keeps the art minimal and lets the finish carry most of the impact. Small star shapes are left bare, showing the natural nail underneath, scattered near the tip of each finger. A few placement notes keep the stars looking balanced:
- Cluster two or three stars per nail, never just one alone
- Keep star sizes small, no bigger than a grain of rice
- Vary the star positions instead of lining them up evenly
Seal the bare star cutouts with a matte top coat only over those spots for a subtle texture contrast against the glossy holographic finish.
Recreate this look
17. Hot Pink and Orange Swirl Coffin Nails
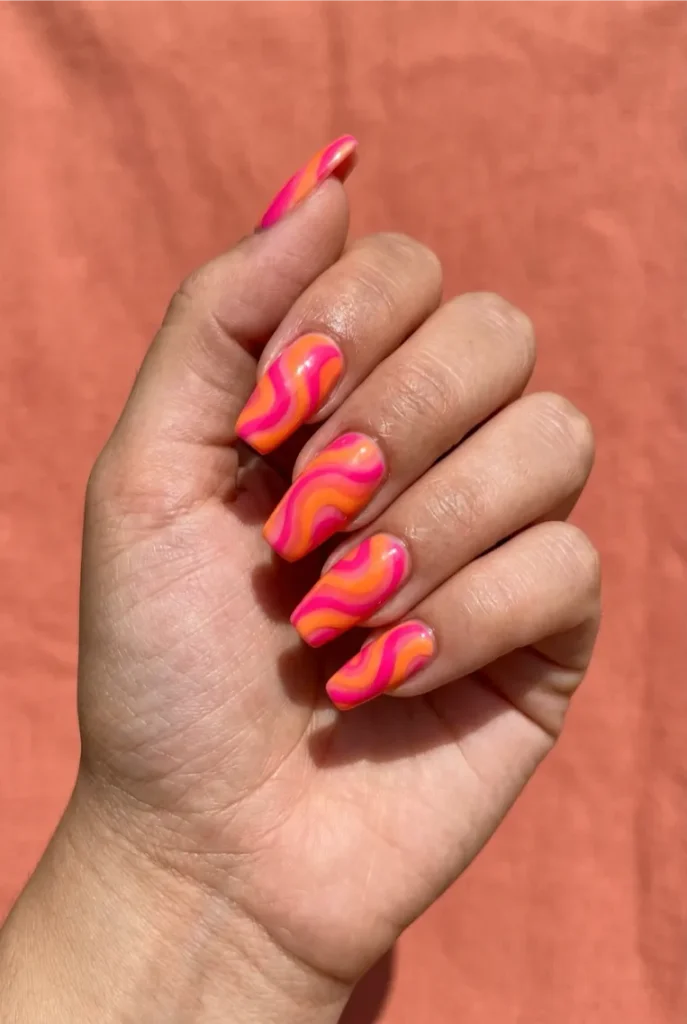
Hot pink and orange sit right next to each other on the color wheel, which is exactly why the swirl between them looks vibrant instead of clashing. Instead of a hard color block, the two shades blend into each other in loose swirling shapes that curve from the cuticle toward the tip.
Getting a swirl that looks fluid rather than stiff takes a light touch.
- Apply both colors as separate wet patches on the nail, not full coverage.
- Use a thin brush to drag one color into the other in gentle curves.
- Stop dragging as soon as the swirl looks organic, over-blending flattens the contrast.
Cure between colors if using gel, since swirling gel polish dry-on-dry gives cleaner edges than a full wet blend.
Adjacent colors on the wheel swirl together smoothly instead of turning muddy.
18. Gold Chrome Coffin Nails with 3D Pearl Clusters
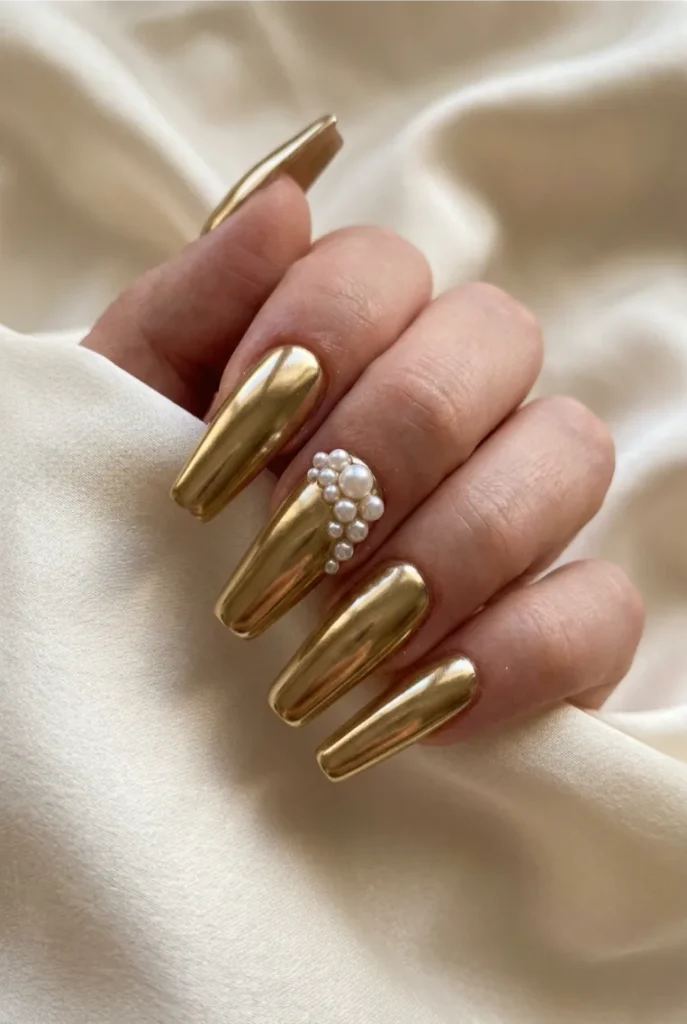
Full gold chrome already reads as a statement finish before any embellishment gets added, but small clusters of 3D pearls at the base of one or two nails push it further into glam territory without covering up the mirror shine everywhere else.
The pearls sit in graduated sizes, largest closest to the cuticle and smallest trailing off toward the center of the nail.
Attach the pearls with thick builder gel rather than glue, since gel cures hard and keeps heavier pearl clusters from popping off during everyday wear.
| Nail Glue | Builder Gel |
|---|---|
| Faster to apply. | Holds heavier pearls securely. |
| Can loosen within days. | Lasts through a full fill cycle. |
19. Rainbow Tie Dye Coffin Nails for a Full Spectrum Statement
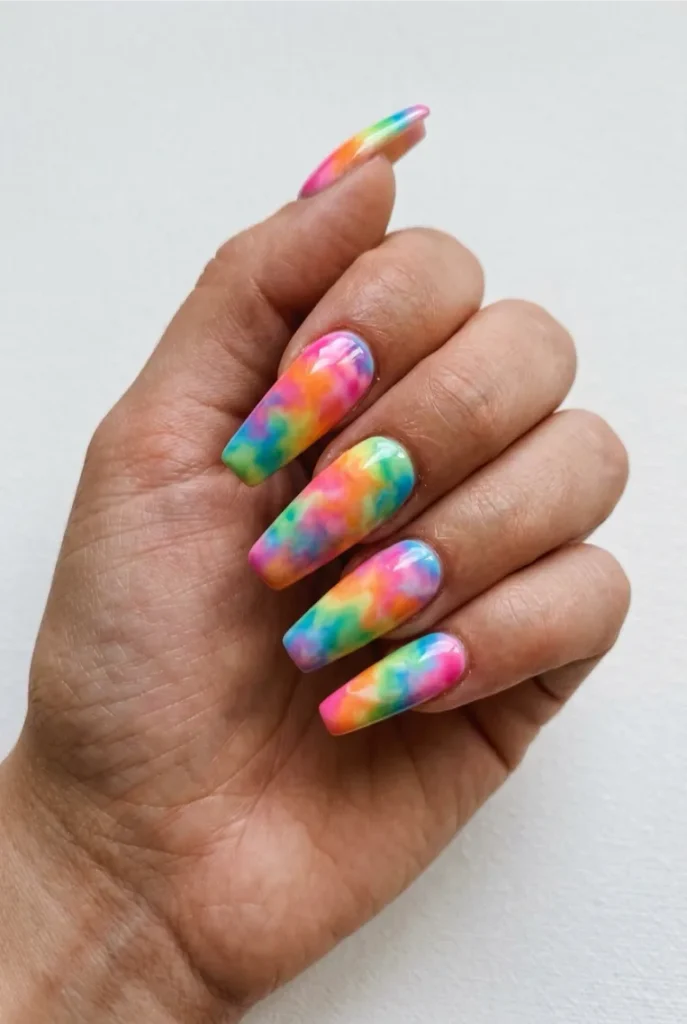
Tie dye nail art borrows straight from fabric dyeing techniques, letting five or six colors bleed into each other in soft irregular blooms rather than sitting in clean separated blocks.
On a coffin nail the extra length gives the colors more room to spread before they run into each other. There are two ways to approach the blending.
Wet dab method: colors are dabbed on wet and blended with a sponge for very soft, cloud-like edges.
Dry layering method: each color is cured separately in small dots before the next, giving crisper tie dye rings.
The wet method looks more like fabric, the dry method looks more like a mandala pattern.
Plain white base, no color.
Full rainbow tie dye bloom across the nail.
20. Bold Red and Black Zebra Print Coffin Nails
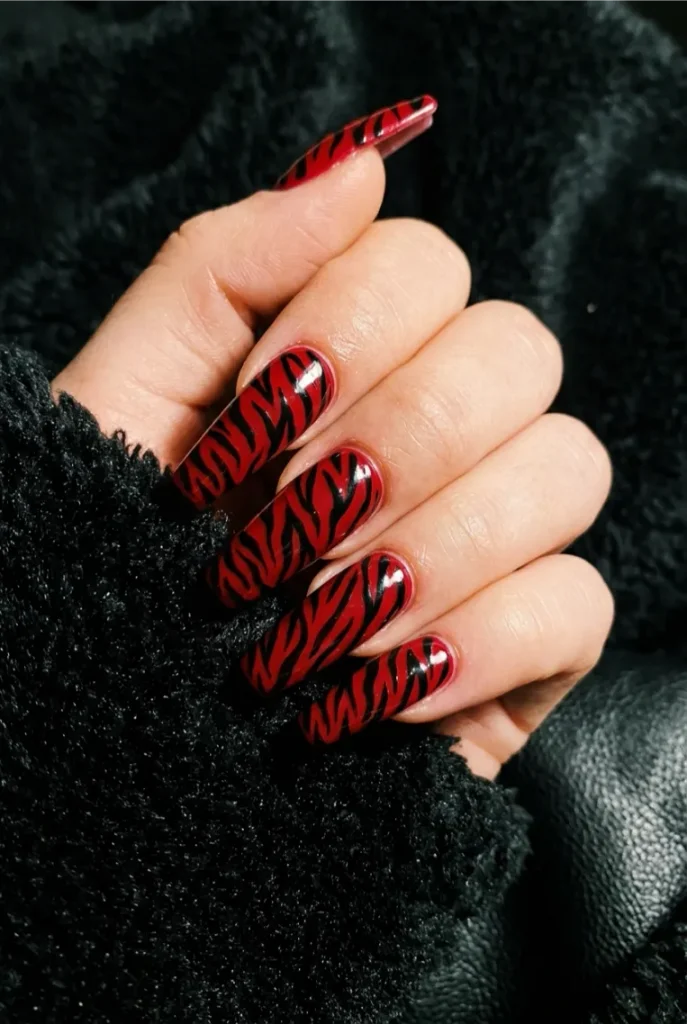
Zebra print in red instead of the standard black and white makes this final look feel deliberately loud, closer to a runway pattern than an animal print cliche.
Thin black stripes curve and taper across a saturated red base, thicker in the middle of each stripe and pointed at both ends, the same way natural zebra stripes taper.
Painting stripes that look organic rather than stiff comes down to a short checklist:
- Vary the stripe width across the nail
- Curve stripes instead of keeping them straight
- Leave uneven gaps between stripes, never a fixed spacing
Load extra polish on the brush for each stripe so the tapered ends thin out naturally as the brush runs dry.
- ▸Vary stripe width across the nail.
- ▸Curve stripes, don’t keep them straight.
- ▸Leave uneven gaps between stripes.
The End
Bold coffin nails work because the shape itself already makes a statement, so every design on this list leans into that instead of fighting it.
Whether it’s a mirror chrome finish, a hand painted poppy, or stripes that curve like real zebra print, the common thread is confidence over caution.
Pick whichever one matches your mood this week, screenshot it for your next salon visit, or save this whole board so you always have options ready.
Pin your favorite look now so it’s easy to find again when you’re ready to book your appointment.
Pin your favorite coffin nail idea now so you have it ready for your next salon appointment.


