Creating beautiful nail designs at home doesn’t have to involve expensive tools or complicated techniques.
Sometimes, one of the simplest tools for creating adorable nail art is already sitting in your kitchen drawer: a toothpick!
If you’re new to DIY manicures, learning how to paint cute simple nail art with a toothpick is a fun way to experiment with different patterns without investing in professional nail art equipment.
With a few nail polish colors, a clean toothpick, and a little patience, you can create tiny flowers, playful hearts, polka dots, and other charming designs.
The best part? These designs work beautifully on natural nails, including shorter nail lengths. Whether you prefer soft pastel colors, classic neutrals, or cheerful bright shades, there are plenty of easy patterns to try.
In this guide, you’ll learn what supplies you need, how to prepare your nails, and how to create five beginner-friendly toothpick nail art designs step by step.
Little Dots, Big Cuteness!
Discover how an ordinary toothpick can become your secret tool for creating adorable nail art at home.
Your 4 Easy Steps ♡
01. Prep Your Nails
Start with clean, dry nails. Shape them, gently push back cuticles, and apply a protective base coat for a smooth canvas.
02. Apply Your Base Color
Paint your nails with your favorite pastel or bright polish. Let the base color dry before adding your little designs.
03. Create Cute Designs
Dip a toothpick tip into polish and gently make dots, flowers, hearts, or tiny patterns. Use the pointed end for details and the blunt end for bigger dots.
04. Seal & Shine
Allow your artwork to dry completely, then apply a clear top coat to protect your design and give your nails a glossy finish.
Little artist tip: Keep a piece of paper nearby to test your toothpick dots first. Wipe the tip between colors for cleaner, prettier designs!
What You Need to Create Nail Art With a Toothpick
Before starting, gather a few basic supplies. You probably already have most of them at home.
Essential supplies:
- Toothpicks: Choose clean, smooth wooden toothpicks for making dots, lines, and small details.
- Base coat: Helps prepare your natural nails for colored polish.
- Nail polish: Choose two or three coordinating colors for your designs.
- Top coat: Helps protect your finished artwork and adds shine.
- Small piece of foil or a disposable palette: Use this as a surface for placing small drops of nail polish.
- Cotton swabs: Useful for cleaning small mistakes around your nails.
- Nail polish remover: Keep some nearby for correcting unwanted polish.
- Hand cream or cuticle oil: Use after your manicure to moisturize the surrounding skin.
You don’t need a professional dotting tool or a complete nail art brush set. A toothpick can create several simple decorative effects.
Beginner tip: Keep a few extra toothpicks nearby. A fresh tip makes it easier to create small details, especially when the previous tip has become covered in polish.
How to Prepare Your Nails Before Painting
Good preparation makes a noticeable difference in the final appearance of your nail art. Before creating your designs, spend a few minutes getting your nails ready.
1. Clean Your Nails
Remove any old nail polish using an appropriate nail polish remover. Wash your hands with soap and water, then dry them thoroughly.
Clean nails help you start with a smooth surface.
2. Shape Your Nails
Use a nail file to gently shape your nails. Rounded, oval, and short square shapes can all work well with simple toothpick designs.
You don’t need long nails. Small flowers, dots, and hearts can look especially cute on short natural nails.
3. Apply a Base Coat
Apply a thin layer of base coat and allow it to dry according to the product instructions.
A base coat provides a smooth foundation for your colored polish.
4. Apply Your Background Color
Choose a background shade that complements your planned design.
Some beginner-friendly combinations include:
- White with baby pink.
- Nude with chocolate brown.
- Pastel blue with white.
- Soft lavender with silver.
- Light pink with cherry red.
- Cream with tiny black dots.
Apply one or two thin coats as needed, allowing each coat to dry sufficiently before adding the next.
How to Paint Cute Simple Nail Art With a Toothpick
Now comes the creative part!
The basic technique is simple: place a small drop of nail polish on a disposable palette, dip the pointed end of your toothpick into the polish, and carefully transfer the color onto your nail.
Avoid dipping the toothpick directly into your nail polish bottle. Using a separate palette helps prevent accidental contamination of the bottle.
Here is how to create five easy designs.
1. Easy Polka Dot Nail Art
Polka dots are among the easiest toothpick nail art designs to create. They’re perfect for beginners because you only need to make small dots across your nails.
What you’ll need:
- A light background polish.
- A contrasting nail polish.
- One clean toothpick.
Step-by-step instructions:
- Paint your nails with your chosen background color.
- Allow the polish to dry sufficiently.
- Place a small drop of your contrasting polish on a disposable palette.
- Dip the pointed end of your toothpick into the polish.
- Gently touch the toothpick to your nail to create a small dot.
- Repeat the process to make several dots.
- Arrange the dots in straight rows, scattered patterns, or small clusters.
- Allow the design to dry before applying top coat.
Cute color combinations:
- White nails with tiny red dots.
- Baby pink nails with white dots.
- Nude nails with chocolate brown dots.
- Pastel blue nails with white dots.
For a minimal look, decorate just one or two accent nails instead of covering every nail with dots.
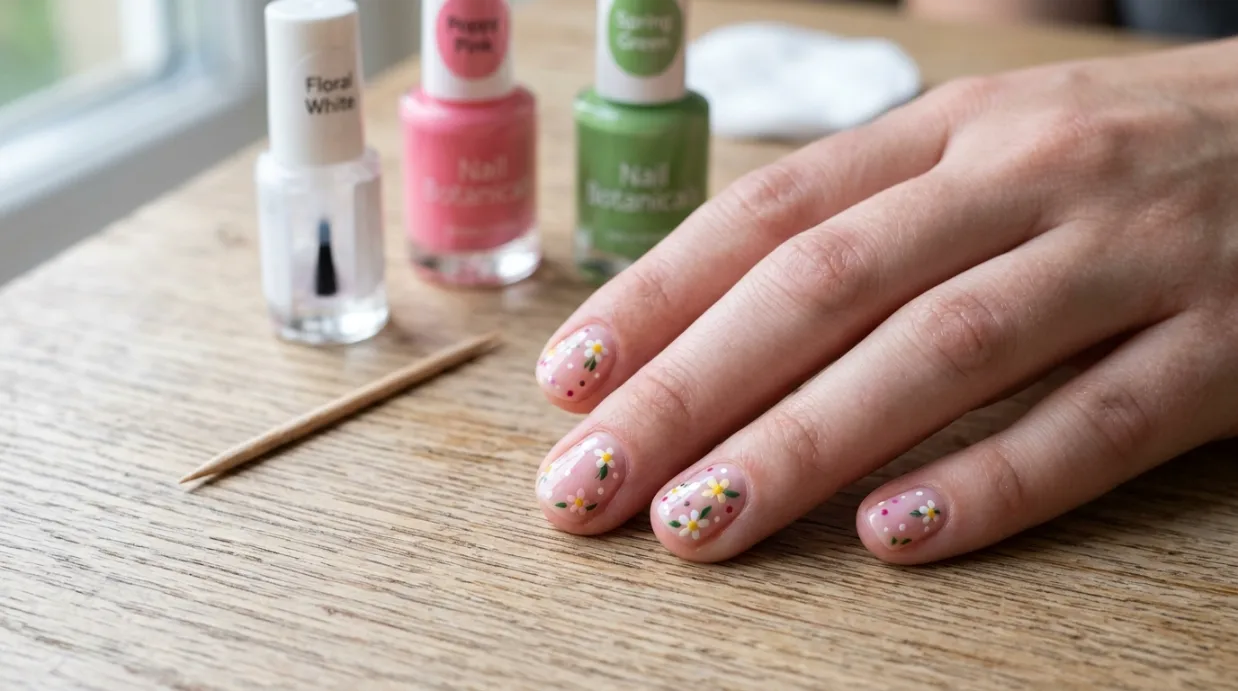
2. Tiny Flower Nail Art With a Toothpick
Tiny flowers are a lovely choice if you enjoy delicate and feminine nail designs. You can create a simple flower using five small dots arranged around a center point.
What you’ll need:
- A pastel or neutral base color.
- One flower color.
- A second color for the flower center.
- A clean toothpick.
Step-by-step instructions:
- Apply your preferred background color.
- Let the base polish dry.
- Place a small drop of flower-colored polish on your palette.
- Dip the toothpick into the polish.
- Create five small dots in a circular arrangement.
- Leave a little space in the middle.
- Add one tiny dot of another color in the center.
- Repeat on other nails if desired.
You now have a simple five-petal flower!
Design variations:
- White flowers on pastel pink nails.
- Yellow flowers on light blue nails.
- Pink flowers on nude nails.
- Small white daisies on a soft green background.
Beginner tip: Start with smaller dots than you think you need. You can always make them slightly bigger, but oversized dots may be difficult to turn into neat petals.
3. Cute Heart Nail Art
Tiny hearts are another adorable design you can make without a nail art brush.
The easiest technique involves creating two small dots and gently dragging their lower edges together to form a heart shape.
What you’ll need:
- A light pink, white, or nude base polish.
- Red, pink, or cherry-colored polish.
- A toothpick.
Step-by-step instructions:
- Apply your background polish and let it dry.
- Place a small drop of your heart color on a palette.
- Dip your toothpick into the polish.
- Place two small dots close together on your nail.
- Use the pointed tip to gently pull the lower part of each dot toward a shared bottom point.
- Refine the shape with a tiny amount of polish if necessary.
- Allow the heart to dry before sealing the design.
Cute variations to try:
- One tiny red heart on each ring finger.
- Two pink hearts on a white background.
- Small black hearts on nude nails.
- Red hearts combined with simple white dots.
If you’re struggling to create a symmetrical heart, start with one accent nail. Practice makes the technique easier to control.
4. Simple Floral and Leaf Patterns
If you like nature-inspired nail designs, try combining small flowers with simple leaves.
This design looks lovely on neutral, pastel, and soft green backgrounds.
What you’ll need:
- A nude or pastel base color.
- Green nail polish.
- White or pink nail polish.
- A clean toothpick.
Step-by-step instructions:
- Apply your chosen base color.
- Create a tiny flower using the five-dot technique.
- Dip a clean toothpick into green polish.
- Draw a short, thin line extending from the flower.
- Add two tiny green dots along the line.
- Gently drag each dot outward to create small leaf shapes.
- Repeat the pattern on one or two nails.
Color combinations worth trying:
- White flowers with green leaves on nude nails.
- Pink flowers with dark green leaves on cream nails.
- Yellow flowers with light green leaves on pastel blue nails.
Keep the leaves small and the stems delicate. This creates a more balanced design, particularly on shorter nails.
5. Abstract Dot and Line Nail Art
Not every cute nail design needs to represent a recognizable object. Sometimes, a few dots and curved lines are enough to create something stylish.
Abstract nail art is a good choice when you want something modern but don’t feel confident drawing flowers or hearts.
What you’ll need:
- A neutral or pastel background.
- Two contrasting nail polish colors.
- A toothpick.
Step-by-step instructions:
- Apply a neutral base color.
- Place two small drops of different colored polishes on your palette.
- Use the toothpick to make three or four dots in different sizes.
- Add a few short, curved lines between selected dots.
- Leave some empty space to keep the design from looking crowded.
- Allow the pattern to dry before applying top coat.
Design inspiration:
- Tiny black dots with delicate white lines.
- Brown and cream abstract patterns on nude nails.
- Pastel pink and lavender dots.
- Minimalist white swirls on a light pink background.
The key is to avoid filling every empty space. A little negative space makes simple nail art look more intentional.
Tips for Getting Better Results With Toothpick Nail Art
Toothpick nail art is easy to learn, but controlling the amount of polish and the size of each detail takes practice.
Use these tips to make your designs look neater.
Use a Small Amount of Nail Polish
Too much polish can create large, uneven dots and messy lines.
Dip only the tip of the toothpick into the polish. If you pick up too much, gently remove the excess on the edge of your disposable palette.
Choose Contrasting Colors
Your design should be visible against the background.
For example, white dots can disappear on a very pale background. Try darker or brighter shades when you want your pattern to stand out.
Work on One Nail at a Time
Creating a detailed pattern on all ten nails can feel overwhelming.
Start with one nail, complete its design, and then move to the next. This also gives you an opportunity to adjust your technique.
Keep the Design Simple
A toothpick is useful for small decorative details, but it isn’t designed for large, precise artwork.
Start with dots, tiny flowers, and simple hearts. Save more complicated patterns for when you feel comfortable controlling the tool.
Use a Fresh Toothpick Tip
Dried or thickened polish around the tip can affect the shape of your dots and lines.
Switch to a clean toothpick whenever the tip becomes messy. Never reuse a toothpick that has become rough, splintered, or damaged.
Allow Your Design to Dry
One of the most common mistakes is applying top coat too soon.
Give your artwork enough time to dry according to the polish manufacturer’s instructions. Apply top coat gently to reduce the chance of dragging the design.
Common Toothpick Nail Art Mistakes to Avoid
Even simple DIY nail art can become frustrating when small mistakes affect the finished result.
Here are a few problems beginners should watch out for.
| Common mistake | How to avoid it |
|---|---|
| Using too much polish | Pick up a small amount at a time. |
| Making oversized dots | Touch the toothpick lightly to the nail. |
| Working on wet base polish | Let the background coat dry sufficiently. |
| Using a dirty toothpick | Start with a clean, smooth toothpick. |
| Adding too many details | Leave some negative space. |
| Applying top coat too early | Allow the artwork to dry first. |
| Pressing too hard | Use gentle movements and minimal pressure. |
Remember, your first attempt doesn’t need to look perfect. Start with simple patterns and gradually experiment with more detailed designs.
Cute Simple Toothpick Nail Art Ideas for Short Nails
Short nails are an excellent canvas for small decorative patterns. You don’t need extra nail length to enjoy creative nail art.
Here are some combinations worth trying:
- Minimalist flower accents: Add one tiny flower to each ring finger.
- Pastel polka dots: Create small white dots over pastel pink nails.
- Tiny cherry-inspired dots: Use two red dots with small green details.
- Simple heart accents: Place one little heart near the center of each accent nail.
- Neutral abstract patterns: Combine brown dots and delicate lines over a beige base.
- Daisy-inspired designs: Create white petals with yellow centers.
- Colorful dot patterns: Use different pastel shades for a playful appearance.
If you prefer an understated manicure, decorate only one or two nails and leave the rest in a solid color.
How to Make Your Toothpick Nail Art Last Longer
Once you’ve finished your design, a few simple steps can help maintain its appearance.
- Allow each polish layer to dry according to its product directions.
- Apply a suitable top coat to help protect the artwork.
- Avoid using your nails to open containers or scrape hard surfaces.
- Wear protective gloves when washing dishes or using household cleaning products.
- Moisturize your hands and surrounding nail skin regularly.
- Avoid picking or peeling off chipped nail polish.
For nail product safety, follow the manufacturer’s directions and use nail polish in a well-ventilated area. The U.S. Food and Drug Administration also advises consumers to pay attention to nail product labels and warnings.
If your nails become painful, swollen, or unusually discolored, don’t simply cover the problem with polish. Consider seeking advice from a qualified healthcare professional.
Frequently Asked Questions
1. Can you do nail art with a regular toothpick?
Yes! A regular, clean wooden toothpick can create small dots, simple lines, flower petals, and basic heart shapes. It is a convenient alternative for beginners who don’t own professional nail art tools.
2. How do you make small dots on your nails without a dotting tool?
Place a small drop of nail polish on a disposable palette. Dip the pointed end of a clean toothpick into the polish and gently touch it to your nail. Repeat until you have the desired dot pattern.
3. How do you make flowers on nails with a toothpick?
Create five small dots in a circular arrangement using one polish color. Add a contrasting dot in the center to complete the flower. Allow the design to dry before applying top coat.
4. Is toothpick nail art suitable for short nails?
Absolutely! Small flowers, tiny hearts, polka dots, and minimalist patterns work particularly well on short natural nails. Keeping the details small helps the design look balanced.
5. What can I use instead of a professional nail art tool?
You can use a clean toothpick for dots and small details. Other household alternatives include the rounded end of a bobby pin for larger dots. Always use clean, smooth tools and avoid anything sharp that could injure your skin or nail.
Final Thoughts
Creating cute simple nail art doesn’t require expensive equipment or advanced painting skills. With a few nail polish colors and an ordinary toothpick, you can experiment with flowers, hearts, polka dots, and minimalist patterns right at home.
If you’re a beginner, start with polka dots or tiny flowers before trying more detailed designs. Choose colors you enjoy, work slowly, and remember that simple designs can be just as beautiful as complicated nail art.
So, grab a clean toothpick, pick your favorite nail polish shades, and give your next DIY manicure a little creative touch!